Learn to Crochet a Granny Rectangle – Easy Pattern for Beginners
Have you ever wanted to create a beautiful, handmade blanket but felt intimidated by complex patterns? What if I told you that you could crochet a stunning granny rectangle with a pattern that's both easy and fun? I'm Christa from The Secret Yarnery, and I'm excited to share a fantastic video tutorial that will guide you through every step of creating your very own granny rectangle! This versatile project can be used for blankets, scarves, and so much more. Ready to get started?
What You'll Need to Crochet Your Granny Rectangle
Before we dive into the pattern, let's gather the necessary supplies. Having everything ready will make the process smooth and enjoyable.
Yarn
For this project, I recommend using a regular four-weight worsted acrylic yarn. The great thing about granny squares and rectangles is that they are perfect for using up scrap yarn! You can mix and match any colors you like to create a truly unique piece. Feel free to experiment with different color combinations to achieve your desired look. If you need some color inspiration, check out a color wheel to help you find complementary colors. The Yarn available at the Secret Yarnery offers a wide variety of options to choose from.
Crochet Hook
I use a six-millimeter crochet hook with my four-weight worsted acrylic yarn. However, the hook size can significantly affect the finished product. If you want your granny squares to be more stiff, use a smaller hook. Conversely, if you prefer a more loose and floppy texture, opt for a larger hook.
Experiment with different hook sizes to achieve your desired fabric! You can find a variety of Crochet Hooks to suit your needs.

Other Supplies
In addition to yarn and a crochet hook, you'll need a few other essential supplies:
- A pair of scissors for cutting the yarn.
- A needle for sewing in your ends.
- Stitch Markers to help keep track of your stitches.
- Needle Threaders to help with threading yarn.
- Additional Needles - Sharp Tip might be useful.
Getting Started: Chain 21
Now that you have your supplies, let's begin creating our granny rectangle!
Making a Slip Knot
The first step is to make a slip knot. There are many ways to make a slip knot.
Any method you're comfortable with will work!
Creating the Foundation Chain
Next, we'll create a chain of 21 stitches. This chain will form the foundation of our rectangle.
- Wrap the yarn over your hook.
- Pull the yarn through the loop on your hook.
- Repeat this process until you have 21 chains.
When counting your chains, remember to count the "V's" underneath your hook, not the loop currently on the hook.
This chain determines the width of your rectangle, so make sure to count carefully!

Round 1: Building the Base
Round 1 is where our rectangle starts taking shape. We'll create the first corner and establish the basic pattern.
Creating the First Corner
We'll start by working into the fourth chain from the hook. This is where we'll create our first corner.
- Wrap the yarn over your hook.
- Insert your hook into the fourth chain from the hook.
- Pull up a loop (you should have three loops on your hook).
- Wrap the yarn over your hook and pull through two loops (two loops remain on your hook).
- Wrap the yarn over your hook and pull through the remaining two loops.
- Repeat steps 1-5 to make another double crochet into that same chain.
This forms the beginning corner of the rectangle.
Remember, this small stitch is the corner!
Chain 2 Corner
Now, we'll chain two to create the corner space. Simply wrap the yarn over your hook and pull through the loop twice.
First Set of 3 Double Crochets
Next, we'll make three double crochets into the next chain.
- Wrap the yarn over your hook.
- Insert your hook into the next chain.
- Pull up a loop (you should have three loops on your hook).
- Wrap the yarn over your hook and pull through two loops (two loops remain on your hook).
- Wrap the yarn over your hook and pull through the remaining two loops.
- Repeat steps 1-5 two more times to complete three double crochets into that same chain.
These clusters will form the main body of the rectangle.
Skipping and Stitching
Now, we'll skip two chains and make three double crochets into the third chain.
- Skip the next two chains.
- Wrap the yarn over your hook.
- Insert your hook into the third chain.
- Pull up a loop (you should have three loops on your hook).
- Wrap the yarn over your hook and pull through two loops (two loops remain on your hook).
- Wrap the yarn over your hook and pull through the remaining two loops.
- Repeat steps 3-6 two more times to complete three double crochets into that third chain.
Skipping chains creates the openwork texture of the granny square!
Repeating the Pattern
Repeat the "skip two, 3 double crochets" pattern along the chain. This will form one side of the rectangle.
Pause the video if you need time to catch up.
Creating the End
As you continue this pattern, you'll notice that you have four chains left at the end.
- Skip two chains.
- Work three double crochets into the third chain.
Finishing the First Round Corner
To complete the corner, we'll chain two and make three double crochets into the very last chain.
- Chain two.
- Wrap the yarn over your hook.
- Insert your hook into the very last chain.
- Pull up a loop (you should have three loops on your hook).
- Wrap the yarn over your hook and pull through two loops (two loops remain on your hook).
- Wrap the yarn over your hook and pull through the remaining two loops.
- Repeat steps 3-6 two more times to complete three double crochets into that last chain.
- Chain two.
Mirroring the Pattern
Now, we're going to mirror the pattern on the other side of the chain. This means we'll work into the same stitches where our double crochets originated on the first side.
Look for the stitches where your double crochets originate and work into those.
Round 2: Adding the Second Color
Time to introduce our second color and continue building the rectangle!
Joining the New Yarn
- Turn your work.
- Find a corner space where you haven't yet joined your yarn.
- Attach the new color yarn to the hook with a slip knot.
- Insert your hook into the corner space.
- Pull the slip knot through the corner space.
- Chain two (or three, depending on your preferred joining method).
Corner Stitch
Now, let's create the corner stitch:
- Yarn over, insert your hook into the same corner space.
- Pull through a loop.
- Yarn over, pull through two loops.
- Yarn over, pull through the last two loops.
- Repeat steps 1-4 twice more to make two more double crochets into the corner space.
Working Across the Sides
Next, we'll work across the sides, creating clusters of three double crochets into each space.
Corners always get corners! This means we'll work three double crochets, chain two, and three double crochets all into the same corner space.
Finishing the Round
Continue working around the rectangle, repeating the corner and side patterns. Remember to work three double crochets into each space along the sides and create a corner stitch in each corner space.
When you get back to the beginning, slip stitch to join the round, chain one, cut the yarn, and pull through to secure.

Round 3: Introducing the Third Color
Let's add another color to our growing granny rectangle!
Joining the New Yarn
- Turn your work.
- Find a corner space where you haven't yet joined your yarn.
- Attach the new color yarn to the hook with a slip knot.
- Insert your hook into the corner space.
- Pull the slip knot through the corner space.
- Chain two (or three, depending on your preferred joining method).
Corner Stitch
Now, let's create the corner stitch:
- Yarn over, insert your hook into the same corner space.
- Pull through a loop.
- Yarn over, pull through two loops.
- Yarn over, pull through the last two loops.
- Repeat steps 1-4 twice more to make two more double crochets into the corner space.
- Three double crochets into the next space.
Working Across the Sides
Next, we'll work across the sides, creating clusters of three double crochets into each space.
Corners always get corners! This means we'll work three double crochets, chain two, and three double crochets all into the same corner space.
Finishing the Round
Continue working around the rectangle, repeating the corner and side patterns. Remember to work three double crochets into each space along the sides and create a corner stitch in each corner space.
When you get back to the beginning, slip stitch to join the round, chain one, cut the yarn, and pull through to secure.
Round 4: The Final Color
It's time to add our final color and see our granny rectangle come to life!
Joining the New Yarn
- Turn your work.
- Find a corner space where you haven't yet joined your yarn.
- Attach the new color yarn to the hook with a slip knot.
- Insert your hook into the corner space.
- Pull the slip knot through the corner space.
- Chain two (or three, depending on your preferred joining method).
Corner Stitch
Now, let's create the corner stitch:
- Yarn over, insert your hook into the same corner space.
- Pull through a loop.
- Yarn over, pull through two loops.
- Yarn over, pull through the last two loops.
- Repeat steps 1-4 twice more to make two more double crochets into the corner space.
- Three double crochets into the next two spaces.
Working Across the Sides
Next, we'll work across the sides, creating clusters of three double crochets into each space.
Corners always get corners! This means we'll work three double crochets, chain two, and three double crochets all into the same corner space.
Finishing the Round
Continue working around the rectangle, repeating the corner and side patterns. Remember to work three double crochets into each space along the sides and create a corner stitch in each corner space.
When you get back to the beginning, slip stitch to join the round, chain one, cut the yarn, and pull through to secure.

Continuing with the Same Color
Want to keep going with the same color? Here's how:
Joining with a Single Crochet
- Chain one.
- Instead of slip stitching, insert your hook into the same spot where you would have slip stitched.
- Yarn over, pull through a loop (two loops on hook).
- Yarn over, pull through both loops.
Creating the Corner
- Chain three.
- Turn your work.
- Two double crochets into the corner space.
Using a Stitch Marker
A stitch marker is your best friend when working continuous rounds! Place a stitch marker in the corner stitch to mark it. This will help you keep track of your corners as you continue working. You can use Stitch Markers.
Matching Granny Rectangles to Different Sized Granny Squares
Did you know that you can adjust this pattern to match different sized granny squares?
All the formulas and starting chain counts are included in the pattern! The written pattern on the Secret Yarnery website includes instructions for making rectangles to match 3-round, 4-round, 5-round, and 6-round granny squares. You can find the written pattern here: Granny Rectangle Pattern.
Rectangle-to-Rectangle Matching
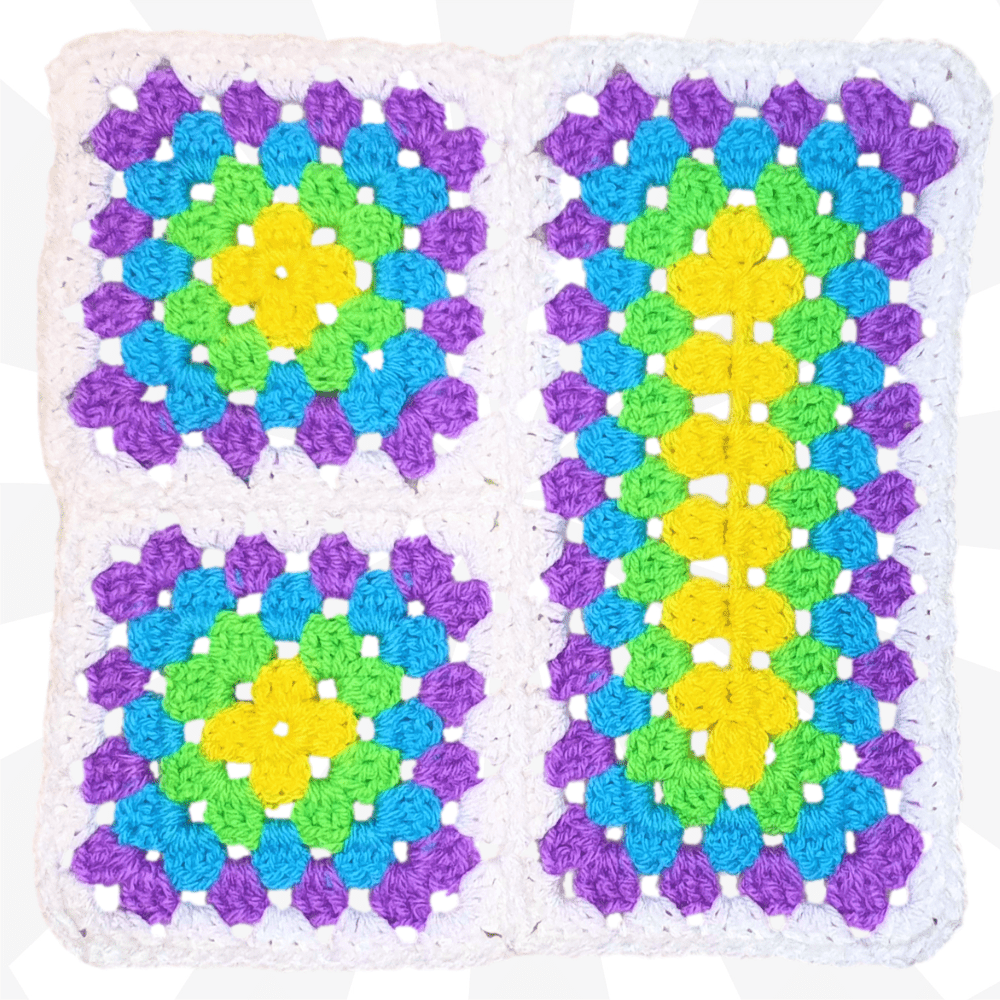
You can also match rectangles to other rectangles to create blankets or other projects! Feel free to get creative and experiment with different shapes and sizes.
Weaving in the Ends
Once you've finished crocheting your granny rectangle, it's time to weave in the ends.
Don't skip this step! It makes a big difference in the longevity of your project.
Use a needle to weave the yarn ends through the back of your stitches, securing them in place.
Joining Your Granny Rectangles
Now that you have multiple granny rectangles, you'll need to join them together!
Experiment to find your favorite joining technique! There are several different methods you can use, such as slip stitch, single crochet, mattress stitch, or even a join-as-you-go method.
Join-As-You-Go
The video demonstrates the join-as-you-go method.
YouTube is a great resource for visual learners! Search online for tutorials on different joining methods to find one that you like.

Project Ideas: What to Make with Your Granny Rectangles
What can you make with your granny rectangles? The possibilities are endless!
Blankets & Afghans
Use different color combinations to create unique and personalized blankets! The most common use for granny squares and rectangles is to create cozy and customizable blankets.
Scarves & Shawls
Granny rectangles add a fun and textured element to your wardrobe! Use a single rectangle or join multiple rectangles to create a stylish scarf or shawl.
Pillows & Cushions
Create decorative pillows or cushions by sewing granny rectangles together and stuffing them.
Bags & Totes
Use granny rectangles to make unique and eye-catching bags or totes.
Tips for Success
Here are a few tips to help you create beautiful granny rectangles:
Tension
Practice makes perfect! Maintain consistent tension throughout your project to ensure even stitches.
Color Choice
Don't be afraid to step outside your comfort zone and try something new! Experiment with different color combinations to create your desired aesthetic.
Blocking
Blocking can make a huge difference in the final appearance of your project! Consider blocking your finished rectangle to even out the stitches and give it a professional look.
Have Fun!
Crochet should be a fun and relaxing hobby! Remember to relax and enjoy the process of crocheting.
Expand Your Crochet Skills with The Secret Yarnery
Ready to learn more? Check out other crochet tutorials on The Secret Yarnery website or YouTube channel!
Left-Handed crocheters, don't stress! Here are left-handed tutorials: [https://bit.ly/3UWNmoJ] and [https://www.youtube.com/@lefthandedcrochettutorials].
Come join the Secret Yarnery community and share your creations.
Don't Miss Out!
Subscribe to The Secret Yarnery's YouTube channel for more free patterns and tutorials! Subscribe Here
Sign up for the newsletter to receive updates on new patterns and promotions! Newsletter Sign-Up
Buy Me a Coffee!
Support The Secret Yarnery by buying me a coffee! Ko-fi
Crochet Must-Haves
As an Amazon Associate I earn from qualifying purchases.
- Bags - Yarn Ball Storage
- Bags - Large UFO Zipper Pouches
- Bags - Regular UFO Zipper Pouches
- Ball Winder
- Baskets - WIPS
- Color Wheel
- Crochet Hooks
- Foot Warmer
- Measuring Tape
- Neck Light
- Needle Threaders
- Needles - Blunt Tip
- Needles - Sharp Tip
- Scissors
- Stitch Markers
- Tea - Kericho Gold
- Tins - Accessories
Video Timestamps
- 0:00
- Round 1: 2:00
- Round 2: 9:17
- Round 3: 15:01
- Round 4: 19:34
- Continuing with Same Color: 24:00
Hashtags
#SecretYarnery #EasyCrochet #BeginnerCrochet #CrochetPatterns #CrochetTutorials #CrochetWithMe #CrochetInspiration #CrochetProject #DIYCrochet
With this easy-to-follow crochet tutorial, you'll be creating beautiful granny square rectangles in no time! This pattern is perfect for beginners, and the possibilities for customization are endless. Remember to explore The Secret Yarnery for more patterns and inspiration. Happy crocheting!
FAQs
1. Is this pattern suitable for beginners?
Yes! This granny rectangle pattern is very beginner-friendly. The step-by-step instructions and video tutorial make it easy to follow, even if you’re new to crochet.
2. What type of yarn works best for this project?
A four-weight worsted acrylic yarn is recommended. It’s versatile, easy to work with, and perfect for beginners. However, you can use different yarn weights and textures depending on your preference.
3. Can I use different hook sizes for this pattern?
Absolutely! You can experiment with hook sizes to achieve your desired texture. A smaller hook will create tighter stitches, while a larger hook will result in a looser, drapier fabric.
4. How do I adjust the size of the rectangle?
The size can be adjusted by increasing or decreasing the number of foundation chains. Follow the guide in the tutorial for matching rectangles to squares or achieving the size you want.
5. How many colors should I use?
You can use as many or as few colors as you like! This pattern provides instructions for adding multiple colors, so feel free to be creative.
6. What can I make with granny rectangles aside from blankets?
Granny rectangles are versatile and can be used for scarves, shawls, cushions, bags, tote covers, and more! The possibilities are endless.
7. Can I join multiple rectangles together?
Yes! You can join them using various techniques like slip stitch, single crochet, or a join-as-you-go method. Choose the method that best suits your project.
8. How do I hide the yarn ends?
Use a needle to weave in the ends on the back of your stitches securely. This ensures a clean finish and prevents unraveling.
9. What tools can help improve my crochet experience?
Some helpful tools include stitch markers, blunt-tip needles, sharp scissors, needle threaders, and a measuring tape. You can also get a yarn ball winder or storage bags to stay organized.
10. What’s the best way to keep my stitches consistent?
Maintain even tension while crocheting. Practicing regularly will help you achieve uniform stitches over time.
![]()
Christa Patel is the creative mind behind The Secret Yarnery, a popular online destination for all things crochet. Based in Nairobi, Kenya, Christa has dedicated her life to sharing the joy of crochet with people around the world. Her friendly teaching style, combined with detailed and easy-to-follow tutorials, has turned The Secret Yarnery into an inspiring community for crocheters of all skill levels.
With a deep passion for creativity and a commitment to fostering a love for crochet, Christa has helped beginners overcome their fears of starting new projects and encouraged seasoned crocheters to expand their skills. Through her video tutorials, patterns, and blog posts, she has brought vibrancy and innovation to the world of crochet.
What Makes Christa Unique?
- Engaging Instruction: Christa’s approachable teaching methods make even complex patterns feel simple and fun to learn.
- Focus on Versatility: Her video tutorials, like the Granny Rectangle, emphasize patterns that can be customized, reused, and adapted for various projects.
- Community Builder: Christa encourages sharing and collaboration through her active engagement with The Secret Yarnery community.
When not crocheting, Christa enjoys connecting with her followers, discovering new color schemes, and perfecting her craft. Her goal is to inspire crocheters worldwide to pick up their hooks and unleash their creativity. You can explore more of her work at The Secret Yarnery website or follow along on her bustling YouTube channel for endless crochet inspiration.
About the Author
With a passion for crafting easy, beginner-friendly tutorials and patterns, Christa inspires crafters of all skill levels to unleash their creativity worldwide. She encourages yarn lovers to connect, create, and crochet a world filled with beautiful handmade treasures!
Learn to Crochet a Granny Rectangle – Easy Pattern for Beginners