How to Join Crochet Flower Granny Squares: Easy Step-by-Step Guide!
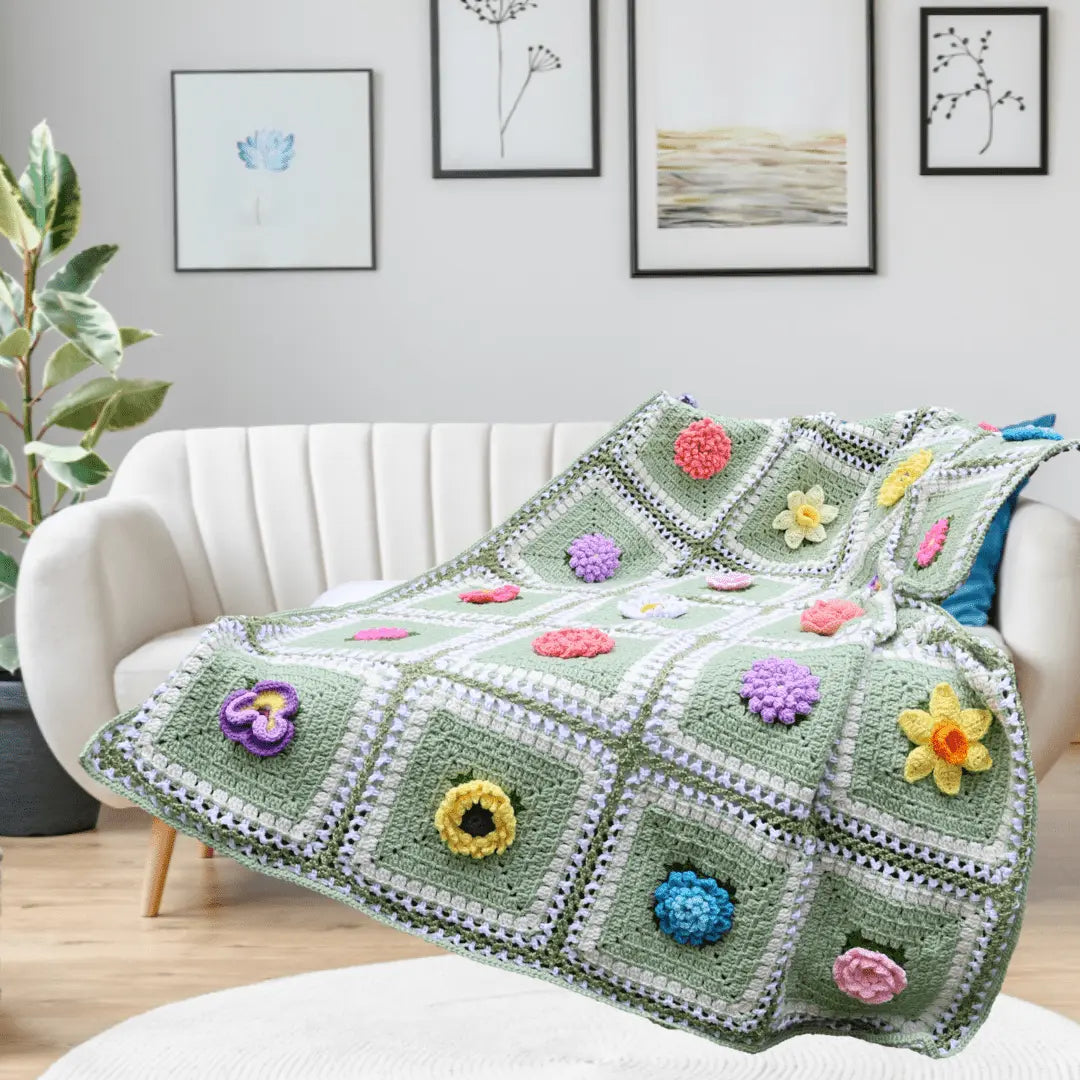
Have you ever gazed upon a pile of individual granny squares and dreamed of transforming them into a stunning, cozy blanket? The BloomScape CAL (Crochet-Along) is here to turn that dream into reality! We'll take those beautiful crochet flower granny squares you've been working on and join them together using a technique that's both easy to learn and visually captivating. I'm going to show you how to create a "delicate flat braid join" that will seamlessly connect your squares, giving your finished blanket a professional and polished look. Get ready to snuggle up with a blanket that's as beautiful as it is comfortable, complete with a "smooth finished flat lay Edge" that you'll be proud to show off.
In this post, I'll guide you through the process of joining your granny squares with the flat braid join. You'll also learn how to create a consistent border that perfectly matches the join, giving your blanket a cohesive and professional finish. The result? A blanket with a beautiful flat lay edge that will make your creation look store-bought. Don't let the intricate appearance fool you; this technique is surprisingly easy to master! I promise! And if you need help with crochet in general, I have written some great beginner-friendly blog posts. I'd recommend taking a look at this easy guide for beginners. I also have many patterns and tutorials for the granny squares.
The BloomScape CAL: Your Gateway to Crochet Flower Power
If you are unfamiliar with the term CAL, it stands for Crochet-Along. It's a fun and interactive way to work on a crochet project together with other crafters. When you participate in a CAL, you get to share your progress, ask questions, and receive support from a community of like-minded individuals. The BloomScape CAL is the perfect opportunity to create something beautiful while connecting with fellow crochet enthusiasts.
So, grab your hook, yarn, and join the CAL to share your progress! Working on a collaborative project offers support, new friendships, and a sense of shared accomplishment as you make this beautiful blanket with the community.

Plain English Patterns: Crochet Made Easy
One of the things that sets my patterns apart is that they're written in plain English. I know that reading patterns can sometimes feel like deciphering a secret code, so I've made it my mission to write patterns that are clear, concise, and easy to understand. I write these patterns so it feels like I am sitting right next to you. This means you won't have to worry about complicated jargon or confusing instructions. Whether you're a beginner or an experienced crocheter, you'll find my patterns accessible and enjoyable to use. You can find all of my patterns on my website, Secretyarnery.com. I’ve designed them to feel like a one-on-one lesson, guiding you through each step.
Language Accessibility: Crochet for Everyone
I understand that not everyone speaks English as their first language, and I want to make my tutorials accessible to as many people as possible. That's why I've included a feature in the video that allows you to select your preferred dialect. By clicking the gear icon on the video, you can scroll through the options and find the dialect that works best for you. This commitment to inclusivity ensures that everyone can enjoy and learn from my crochet tutorials.
Blanket Dimensions: Size Matters
Before we dive into the joining process, let's talk about the finished size of the blanket. My BloomScape blanket, including the join, measures 46 inches by 68 inches, or 117 centimeters by 173 centimeters. It's made up of 24 BloomScape squares, arranged in a layout that's four blocks wide and six blocks tall. These dimensions are important to keep in mind as you plan your own blanket, as they will affect the amount of yarn you need and the overall look of the finished product.

Yarn Selection: Finding the Perfect Fit
For my BloomScape squares, I used Favorite yarn from Icy Yarns. While it's labeled as a four worsted weight acrylic, it's a bit thinner, more like a DK weight yarn. Each skein contains 110 meters per 100 grams, or 229 yards per 3.35 ounces. I recommend using the same yarn you used for your squares to maintain consistency throughout your project. Feel free to visit the Icy Yarns website to explore their selection!
The Magic of Bernat Satin: Adding a Touch of Shine
To add a special touch to the center join, I used Bernat Satin yarn. This yarn has a beautiful shine that gives the join a subtle, eye-catching detail. Each skein contains 182 meters per 100 grams, or 200 yards per 3.5 ounces, and it's also a four weight yarn. Of course, you can use the same color yarn as your squares, a different color, or even a different type of yarn altogether. The choice is yours!
Hook Size: The Foundation of Your Project
Using the right hook size is essential for achieving the correct gauge and ensuring that your blanket turns out the way you want it to. For this project, I used a 5.5 millimeter hook, the same hook I used for all of the flower granny squares. Gauge is the measurement of how many stitches and rows you have per inch or centimeter.
Essential Tools: Getting Ready to Crochet
Before we get started, let's make sure you have all the essential tools you'll need for this project:
- A 5.5 millimeter crochet hook
- A needle for sewing in your ends (Needles - Blunt Tip work great!)
- A pair of scissors (Scissors )

Navigating the Tutorial: Time Stamps to the Rescue
To help you navigate this tutorial, I've included time stamps that allow you to jump back to specific sections as needed. Whether you want to review a particular technique or refresh your memory on a certain step, the time stamps will guide you directly to the information you're looking for. This makes it easy to revisit challenging steps or simply review the process at your own pace.
Video Tutorial Beginning
Here is the video tutorial:
Getting Started: Joining the First Square (3:01)
Alright, let's dive into joining our BloomScape squares! Grab your first square and follow these steps:
- Insert your hook into any of the corner spaces.
- Place a loop of white yarn (or your preferred color) on your hook. Remember, I'm using white to make sure it's visible against my cream squares.
- Slip stitch with both strands to join.
- Chain four.
- Single crochet into the next space.
- Repeat chain four and single crochet along each loop.
- When you reach the corner, work a single crochet, chain four, and another single crochet into the same corner space.
Maintaining consistent tension is key to ensuring a neat and even join. Don't be afraid to pause the tutorial and practice this technique until you feel comfortable with it.

Don't Miss Out: Subscribe for More Crochet Fun!
Before we move on, I want to encourage you to subscribe to my channel for more quick, easy, and fun crochet tutorials! By subscribing, you'll never miss out on new projects, helpful tips, and inspiring ideas. Plus, when you hit the bell icon, you'll receive notifications whenever I upload a new video. It's a great way to stay connected and support my channel, allowing me to continue creating free tutorials for you to enjoy.
Completing the First Square (Corner Details)
Now that you've worked your way around the first square, here's how to finish it off:
- Chain four after the last single crochet.
- Single crochet into the same corner space.
- Chain four.
- Slip stitch into the legs of the first slip stitch to join.
- Chain one to secure the yarn.
- Cut the yarn, leaving a long tail for sewing in.
Securing your yarn properly is essential for preventing your work from unraveling.
The Perfect Finish: Sewing in the First Tail
To achieve a seamless look, let's sew in that first tail:
- Thread the tail onto a needle.
- Sew over the top of the two legs of the slip stitch.
- Bring the tail to the back side.
- Sew in the tail on the back side to secure.
This small detail makes a big difference in the overall appearance of your finished project.

Sewing in Tails: A Necessary Step for a Professional Finish
I know it can be tempting to skip this step, but trust me, sewing in all those tails is crucial for a professional finish. Not only does it prevent your work from unraveling, but it also gives your blanket a clean and polished look.
Preparing for the Join: Squares Ready to Unite (7:05)
Alright, now that all the tails are sewn in, it's time for the fun part: joining our squares together!
Laying Out Your Squares: Planning Your Masterpiece
Before you start joining, take some time to lay out your squares in the order you want them to appear in your blanket. This will help you visualize the finished product and ensure that you're happy with the overall arrangement.
- Arrange your squares in the desired order for the blanket.
- Stack each row to keep the order organized.
- Begin with the first stack.
Careful planning is essential for a visually appealing result. I recommend taking a photo of your layout for reference.
Edging the First Block: Preparing for the Braid
To prepare for the flat braid join, we need to edge the first block:
- Join your yarn in any corner space.
- Slip stitch to join.
- Chain four.
- Single crochet into the next space.
- Repeat chain four and single crochet around the block.
- When you reach the corner, work a single crochet, chain six, and another single crochet into the same corner space.
The chain six in the corner is what creates the extra space we need for the braid join.

Completing the First Block's Edging
Here's how to finish the edging of the first block:
- Slip stitch into the legs of the first slip stitch to join.
- Chain one to secure the yarn.
- Cut yarn, leaving a long tail for sewing in.
Edging the Second Block: Leaving One Side Open
Now, let's edge the second block, but with a slight variation:
- Edge three sides of the block as before.
- Stop at the last corner.
- Chain three (half of the corner chain).
We leave one side open to prepare for joining it to the first block.
The Joining Begins: Connecting the Blocks (16:21)
It's time to connect the blocks! Follow these steps carefully:
- Pull up a larger loop on the hook.
- Remove hook.
- Insert hook into the corner loop of the first block.
- Place yarn back on the hook.
- Bring it through and chain three to finish the corner.
- Half chain again and put it through the loop above and finish the chain.
- Chain two.
- Pull up a bigger loop, remove hook, insert into the next loop of the first block.
- Place yarn back on the hook.
- Bring it through and chain two.
- Repeat chain two, insert into the next loop, and chain two all the way along.
This technique creates a unique "twisted braid" effect that adds a touch of elegance to your finished blanket.

The Twisted Braid: Adding a Touch of Elegance
The twisted braid isn't just functional, it's also beautiful! This unique detail elevates the look of your finished blanket.
Navigating the Side Join: A Step-by-Step Approach
To reinforce the steps for joining along the side:
- Single crochet into the stitch.
- Chain two.
- Remove hook.
- Insert hook into the next loop of the first block.
- Place yarn back on the hook.
- Bring it through and chain two.
Completing the Corner Join: The Final Touch (19:22)
Specific instructions for completing the corner join:
- Single crochet into the corner space.
- Chain three.
- Remove hook.
- Insert hook into the corner loop of the first block.
- Place yarn back on the hook.
- Bring it through and chain three.
- Slip stitch into the legs to join.
- Chain one to secure the yarn.
- Cut yarn, leaving a long tail for sewing in.
Joining Multiple Blocks: Building Your Blanket
Now that you've mastered the basic join, it's time to continue joining the remaining blocks. Remember to repeat the steps for edging and joining, and don't hesitate to refer back to the tutorial as needed.

Starting the Next Row: Joining on Two Sides (27:00)
For the next row, we'll be joining blocks on two sides. This is the standard method for most of the blocks in your blanket. Edge the block on two sides as before, then prepare to join on the remaining two sides.
Kitty Corner Join: A Key Technique for Seamless Connections
The "kitty corner" joining technique is essential for creating seamless connections between your blocks:
- Chain three after the single crochet in the corner space.
- Remove hook.
- Insert hook into the opposite corner loop (kitty corner).
- Place yarn back on the hook.
- Bring it through and chain three.
- Single crochet back into the same corner space.
Ignoring Loops: Streamlining the Joining Process
As you're joining your blocks, you may encounter some tricky spots where the loops don't seem to line up perfectly. Don't worry! Just remember these instructions: Join yarn in any loop (avoiding the joins between blocks), Slip stitch to join, and Chain three (counts as the first chain four). I also have a blog post on Easy Crochet Patterns which can help if you need more guidance.

Completing the Two-Sided Join: A Final Flourish (31:22)
To finish the two-sided join:
- Slip stitch into the legs to join.
- Chain one to secure the yarn.
- Cut yarn, leaving a long tail for sewing in.
Repeat and Conquer: Joining the Rest of Your Squares
Continue joining the remaining squares using the techniques you've learned. You're doing great!
The Edging: A Polished Finish (34:25)
Now that all your squares are joined, it's time to add the finishing touch: the edging! The purpose of the edging is to create a polished, unified look that complements the center join.
Joining the Edging Yarn: Starting the Border
Follow these steps to join the edging yarn:
- Join yarn into any loop (avoiding the joins between blocks).
- Slip stitch to join.
- Chain three (counts as the first chain four).
Working the Edging: Consistent Loops All Around
To work the edging:
- Single crochet into the next space.
- Chain four.
- Repeat single crochet and chain four around the entire blanket.
Navigating the Joins in the Edging: Seamless Transitions
When you reach the joins between blocks in the edging:
- Chain four to get to the space.
- Single crochet into the first space.
- Single crochet into the second space.
- Chain four to continue.

Corners with a Twist: Creating Defined Edges
Here's how to create defined corners in the edging:
- Single crochet into the corner space.
- Chain six.
- Single crochet back into the same corner space.
Completing the Edging Round: A Step Closer to Finished
To finish the edging round:
- Slip stitch into the legs of the first slip stitch to join.
- Chain one to secure the yarn.
- Cut yarn, leaving a long tail for sewing in.
Edging Round 2 (Mirroring Technique): (31:22)
For this round, we're using the mirror technique, which means we're simply repeating the process from the first edging round! If you are looking for more beginner tips, I'd recommend reading my blog post about easy crochet.
- Join 2nd edging color yarn into any loop (avoiding the joins between blocks).
- Slip stitch to join.
- Chain three (counts as the first chain four).
Edging Round 3 & 4 (Tie It All Together) (34:25)
This round ties all the edges together, creating a cohesive and polished look.
- Join yarn into any loop (avoiding the joins between blocks).
- Slip stitch to join.
- Chain three (counts as the first chain four).
- Chain two single crochets and chain 3's for corners.
The Invisible Join: A Seamless Finish
To create a truly seamless finish, let's use the invisible join technique:
- Cut yarn, leaving a tail.
- Thread tail onto a needle.
- Insert needle under the two strands of the first stitch.
- Bring needle back down where the yarn came from.
- Pull yarn to tighten (but not too much).
Final Touches: Sewing in the Last Tails
All that's left to do is sew in those last few tails. Once that's done, your beautiful BloomScape blanket is complete!

Share Your Projects: Inspire Others!
I'd love to see your finished BloomScape blankets! Please share photos of your creations on social media using the hashtag #SecretYarnery. And remember to tag me, I love seeing what you create!
Free Patterns and Next Video:
Don't forget to check out the free pattern linked in the description for this project! Ready for your next adventure? Check out this video here. Stay hooked, friends!
FAQs
The BloomScape CAL (Crochet-Along) is a collaborative crochet project designed for enthusiasts to create a beautiful flower granny square blanket together. Participants can share progress, ask questions, and connect with fellow crafters while working step-by-step on the same pattern.
2. What is a flat braid join?
A flat braid join is a crochet technique used to connect granny squares with a visually appealing braided look. It’s a delicate yet sturdy way to join squares, giving your finished blanket a seamless and polished appearance.
3. What yarn works best for the BloomScape blanket?
For consistency, it's best to use the same yarn for the squares and the join. In this tutorial, Favorite yarn by Icy Yarns and Bernat Satin are recommended. Favorite yarn is a 4-worsted (feels like a DK weight), while Bernat Satin adds a subtle shine to the join.
4. How many granny squares are required for the finished blanket?
The blanket is composed of 24 granny squares arranged in a 4x6 layout, which results in final dimensions of approximately 46 inches by 68 inches (117 cm by 173 cm).
5. Can I use a different hook size?
Yes, you can, but using the 5.5 mm hook as recommended ensures consistency in gauge. Adjusting hook size may alter the size and tension of your blanket.
6. What is the benefit of sewing in tails after crocheting?
Sewing in tails ensures your blanket won't unravel over time and gives it a clean, professional finish. While it might seem tedious, it's essential for durability and aesthetics.
7. What’s the purpose of the chain counts in the flat braid join?
The chain counts (e.g., chain 4 or chain 6 for corners) create the loops needed for the braid effect, ensuring flexibility and consistency in the join. Correct chaining prevents your blanket from puckering or curling.
8. Can I adjust the blanket size?
Absolutely! Adjust the number of granny squares depending on your preferred blanket dimensions. You’ll need more or fewer squares and yarn to accommodate changes.
9. What’s the difference between edging and joining?
- Edging: Adding a border to each square or the entire blanket for a clean, framed look.
- Joining: Connecting the individual squares together to build the full blanket.
10. What’s the “kitty corner join”?
The kitty corner join is a technique for joining squares diagonally across their corners to ensure seamless transitions between blocks and add a beautiful braided effect.
11. Can I use different colors for the join?
Yes! You can stick with one color or mix and match additional colors for the join and edging to make your blanket unique.
12. What if I need more help as a beginner?
You can refer to Krista’s beginner-friendly posts like this guide or start with simpler crochet patterns designed for beginners.
![]()
Christa Patel is the creative mind behind Secret Yarnery, a thriving online hub for crochet enthusiasts of all skill levels. With decades of experience and a passion for crochet, Christa has dedicated her journey to making crochet accessible, fun, and inspiring for everyone. She specializes in crafting clear, beginner-friendly patterns and tutorials written in plain English, ensuring you never feel lost during your project.
Christa's vision goes beyond just crochet—she aims to foster a global community of makers who support and inspire each other. Through her engaging video tutorials, helpful blog posts, and creative CAL (Crochet-Along) events like the BloomScape Blanket, she provides step-by-step guidance to help crocheters of all levels succeed.
Christa Patel also emphasizes inclusivity, offering features like multilingual captions to make her tutorials accessible worldwide. Whether you’re holding a hook for the first time or a seasoned crocheter seeking inspiration, Christa’s approachable teaching style and vibrant personality will encourage you to explore your creativity and enjoy the art of crochet.
When she’s not busy designing patterns or recording tutorials, Christa enjoys connecting with her community through social media and sharing the joy of crochet with fellow enthusiasts.
About the Author
With a passion for crafting easy, beginner-friendly tutorials and patterns, Christa inspires crafters of all skill levels to unleash their creativity worldwide. She encourages yarn lovers to connect, create, and crochet a world filled with beautiful handmade treasures!
How to Join Crochet Flower Granny Squares: Easy Step-by-Step Guide!