How To Make Colorful Diagonal Crochet Granny Squares Fast!
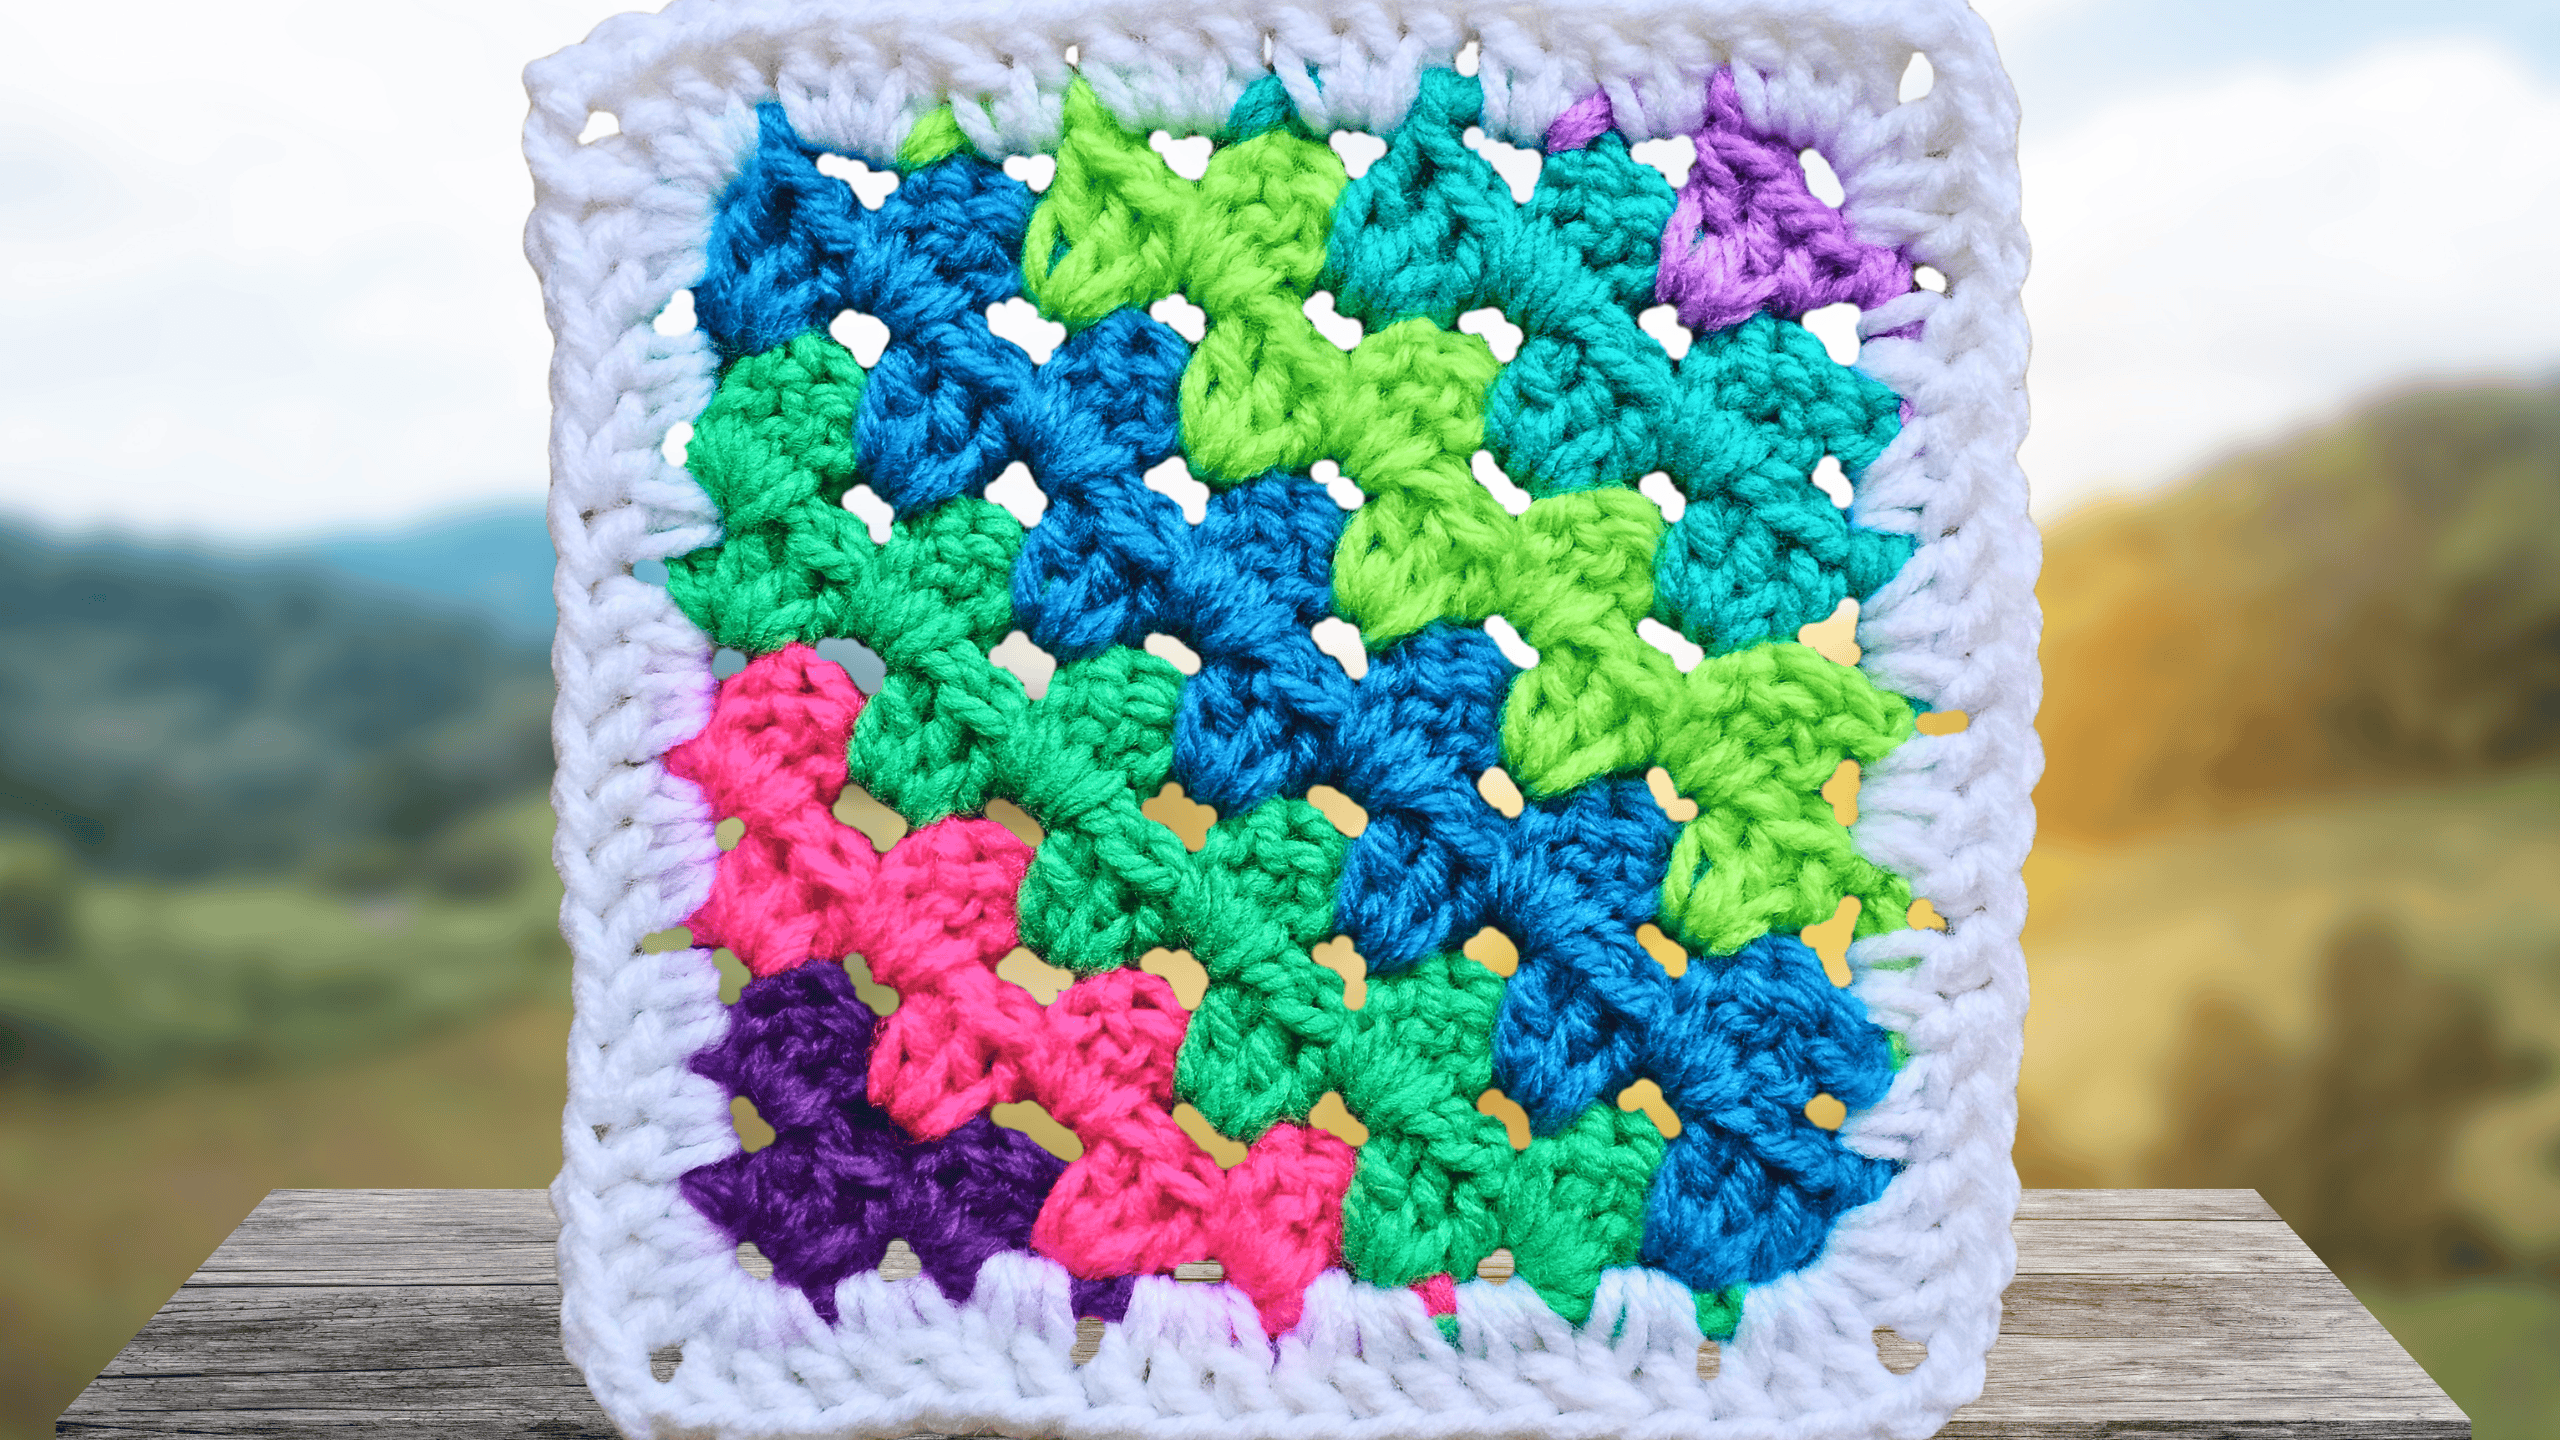
Looking for a fresh take on the classic crochet project? The diagonal granny square features a striking pin wheel design that brings a bold, modern twist to your creations. This granny square pattern blends seamlessly with traditional five-round squares, letting you mix and match styles with ease. Whether you want cheerful blankets, unique cushions, or bright accessories, this pattern opens up a whole palette of creative possibilities.
Why try diagonal granny squares?
Versatility at its best: Diagonal granny squares add visual interest, blend beautifully with standard squares, and work up quickly—perfect for using up yarn scraps or custom color combos.
Materials Needed for the Project
Gather your supplies and get ready to crochet along.
You'll need:
- Assorted yarn scraps (any weight you like)
- Size 4 worsted weight acrylic (as shown in the tutorial)
- Crochet hook (6 mm recommended for the appropriate hook size listed on your yarn label)
- Scissors
- Needle for sewing in ends
- (Optional) Sharp tip needles for easier weaving like these highly rated ones
Having the right tools keeps the process fun and frustration-free.

Preparing Your Yarn and Hook
First, make a slip knot as you always do and place it onto your hook, leaving a long tail. You'll use this tail to sew in your ends later, ensuring your work stays neat and tidy.
Begin your diagonal granny square by making a chain of four stitches. This chain will form the starting ring where everything takes shape.
Making the Foundation Ring
Here’s how to get your project started right every time:
- Make a slip knot and place it securely on your hook, leaving a generous tail.
- Chain four.
- Insert your hook back into the very first chain you made.
- Hold the tail alongside your work, forming a tiny “U” under your hook.
- Slip stitch through the chain to form a solid ring, then tighten the circle to secure it.
- Keep your ring open using your thumb and finger so it doesn’t collapse as you crochet your stitches into the center.
Alternatively, you can create a foundation ring using the magic circle method for a tighter starting loop. Holding that ring open makes it easy to work your stitches into the center.

Starting the First Round: Forming the Initial Granny Stitches
To begin the first round:
- Begin with 3 loops on your hook, which will serve as your first tr (US dc), or double crochet stitch.
- Create three US dc stitches into the center of the ring, working over the yarn tail to add extra stability.
- These stitches will cluster tightly in the middle, leaving a space on each side of the group, just like traditional granny stitches.
- Finish this segment with 3 loops on your hook again, then turn your work to start the next row.
Continuing the First Round: Adding More Granny Stitches
Now, start building the classic granny stitches with a diagonal twist.
- Crochet three tr (US dc) into the open space before the first granny shell.
- Skip to the next open space and place another three tr (US dc).
- To finish, do one more double crochet in that same space but stop before the very last yarn-over so two loops remain on your hook.
- Cut your thread, again leaving a generous tail to help with sewing later.
- You’re now perfectly set up to join your next color in the neatest way possible, completing these essential stitches.

Adding Color Two: Joining New Yarn and Continuing
Time to introduce that vibrant color:
- To complete the unfinished tr (US dc), yarn over and pull your new color all the way through the remaining loops.
- For a neat finish, carry the yarn tails together along the back of your work, ensuring tidy carrying yarn that won’t show on the right side.
- Begin the row by creating three turning stitches with the new color, then flip your work to the right side.
- Into the space before your first set of three, work three tr (US dc).
- Add three more tr (US dc) into the center space.
- In the open space after the shell, crochet another set of three tr (US dc), finishing the row with an additional tr (US dc) so that the row ends with four stitches.
- When making a color change, cut the working yarn and repeat the joining technique as before to maintain a smooth transition between colors.
Tip: Start every row with three turning stitches and turn your work to create a polished edge, differentiating the right side from the wrong side.
This method of joining and carrying yarn is perfect for tapestry crochet projects, giving your colorwork a clean and professional appearance.
Progressing Through Color Three and Beyond
Each new color, each new row, follows the same friendly steps.
- Begin with a slip stitch and turn.
- Crochet three tr (US dc) into the space before the first set.
- Continue placing three more tr (US dc) in every space across the row—these form your granny clusters.
- When you reach the last space at the end, complete the set of three, and finish with a single tr (US dc) if you’re not ready to change color.
You decide how large to make your granny square. Five rounds create a block that blends perfectly with traditional granny squares, but you can expand your square as much as you like.
Pro Tip: If my pace feels too fast or slow, adjust the video playback controls to tailor crochet sessions to your comfort level.

When and How to Start Decreasing the Granny Square Size
Once your square reaches the size you want (like five rounds to match standard dimensions), it’s time to create the diagonal effect.
- Instead of placing shells at the very edges, skip those edge spaces.
- Jump straight into the first true space with a set of three double crochets.
- Continue clusters across, then close the row with a single double crochet at the end.
- For any color change during decreases, simply repeat the loop join from previous sections.
This technique creates the diagonal lines that give the diagonal granny square its unique shape and make it so versatile for mixing and matching.
For a visual understanding or written patterns with stitch diagrams, see the step-by-step mitered granny square guide that shows how diagonal effects stack up.
Decreasing Rows: Step-by-Step Instructions
- Begin each decrease row by skipping the first shell and working three tr (US dc) stitches into the next main space.
- Each row reduces by one cluster, creating the distinctive diagonal edge.
- At the end of each row, make three turning stitches and flip your work.
- Continue working three tr (US dc) clusters in each space between sets across the row.
- Place only one tr (US dc) in the final space of the row.
- If you plan to change colors, blend in your next hue as you did previously.
Increase Row (Before Decrease)Decrease Row (After Decrease)Work clusters into ALL spaces, including edgesSkip edge spaces; start clusters in first main spaceEach row expands or maintains widthEach row shortens by one cluster, shaping the diagonal
For those interested in exploring other diagonal styles, the Easy Mitered Granny Square Pattern offers a fresh take on these techniques. Another excellent example to consider is the two-triangle granny square, which also showcases creative diagonal construction.

Finishing Off the Decreasing Rows
As you reach the last few clusters of your granny square, the piece begins to narrow.
- For your final round, choose whether to keep your color or make a color change for one more bright pop.
- At the end, always chain three and turn, with the last row finishing with a double crochet to create a neat, polished edge.
- Continue working into the last spaces until only one row remains, ending with a final set of three double crochets and one double crochet for a sharp, squared-off finish.
Closing the Granny Square: Final Steps
To put the finishing touch on your diagonal granny square, complete the final corner with a secure closure.
- Begin by making two loops at the end.
- Turn your work and slip stitch to join in the nearest space.
- Make one loop to lock in the thread.
- Cut the thread, leaving a long tail.
- Pull the hook up and draw the thread through. Gently tug to snug down the last stitches.

Managing Tails: Knotting and Sewing in Ends
Colorful projects bring lots of yarn ends! Here’s how I handle them so everything stays neat:
- Knot together yarn ends of matching color, but don’t pull so hard that you bunch up the stitches.
- For yarn ends that start or end far apart (and can’t be knotted with a buddy), use a sharp tip needle and carefully sew in your ends along the path of your stitches, then back again.
- If you’re working over yarn ends along the edge, knot them, tug to check they’re secure, then trim to fit the stitches.
- Always match the tightness of your knots to the size of the stitch for a seamless look.
Best Practices for Managing Yarn Ends
- Match colors before knotting.
- Avoid pulling too tight; you risk puckering the fabric.
- Sew in the rest with a sharp tip needle, hiding the yarn ends between stitches.
- Double check knots before trimming short.
Adding a Border to Your Diagonal Granny Square
Borders are the finishing touch that elevate your diagonal granny square. Here’s how to achieve crisp, professional results:
- Begin in one of the corner spaces free from a tangle of tails for a smooth start.
- Insert your hook under a double crochet along the edge.
- Pull through a loop and slip stitch to join.
- Secure the tail and hold it along your work’s edge as you proceed.
- Create the initial height needed for your first double crochet.
- Add two double crochets into the corner to shape the rounded corners to be added.
Border Stitch Patterns for Matching Diagonal and Standard Granny Squares
Matching is essential, especially when connecting a diagonal granny square with traditional five-round granny squares, much like in traditional quilt making.
Option 1: Match only other diagonal granny squares
- Work two US dc stitches in each space all the way around for uniformity.
Option 2: Match standard five-round granny squares
- Along each side, create four “clusters” for stitch consistency using US dc:
- Into the first space: one double crochet, then start the next but leave two loops on your hook.
- Begin another double crochet in the next space, yarn over, and pull through all three loops to create a neat, connected decrease.
- Add another double crochet.
- For the centers of each side: work three double crochets in each central space.
- At chain corner spaces: work three double crochets, chain two, three double crochets all in the same space. Slide stitches if you need room—chain corner spaces should lay flat, not crowded.
Border Stitch Flow:
- Work the first border decrease set across two spaces.
- Fill center spaces with regular three double crochet stitches.
- Apply the decrease set into the last two spaces before the next corner space.
- At corner spaces: three double crochets, chain two, three double crochets.
This approach ensures your square blends perfectly with other blocks—no uneven edges.
Working the Border Around All Sides
Ready to work the border around all four sides? Here’s a simple system:
- Insert hook and join yarn at a chain corner space with a slip stitch.
- Chain two (first double crochet), add two more for the start.
- For diagonal-to-diagonal matching, work two double crochets per space.
- For diagonal-to-standard matching, as seen in traditional granny square patterns, follow the decrease-and-cluster stitch pattern described above.
- Work three double crochets into each of the next two center spaces.
- In the last two spaces of the side, make a decrease cluster across both.
- For each corner: three double crochets, chain two, three double crochets.
- Repeat the sequence on all four sides, working over any tails you can.
- On finishing the final side, three double crochets, chain two, and slip stitch to the first chain of the round.
- Chain one, cut the yarn, and snugly pull the end through.

Final Tail Trimming and Square Finishing
Once the border’s complete:
- Tug each tail gently to ensure a snug fit.
- Trim the tails close to the stitches, taking care not to cut into your work.
- For longer tails, weave them in one last time using your needle.
Tail-Check Callout:
Don’t forget to tug before you trim! Keeping tails snug creates a cleaner finish and helps your square hold its shape longer.
Finally, consider blocking your squares as a last step to enhance their shape and prepare them beautifully for laying out or joining into a finished piece.
Additional Tips and Notes
- Change colors as often or as seldom as you like, making each project unique and personalized.
- Using up yarn scraps in coordinated shades can add a vibrant, eye-catching touch to your work.
- Experiment with different yarn types, weights, and hooks to create varied textures and sizes, or try techniques like tapestry crochet for even more creative possibilities.
- If the video moves too fast or slow, adjust the playback speed—crochet should always be a relaxing experience!
- All my written patterns use plain English, just like this walkthrough, and they’re always available at my website, The Secret Yarnery.
Crochet should be fun and fearless—make mistakes, try new colors, and enjoy every stitch as you explore projects like the classic granny square pattern.
Where to Find More Patterns and Tutorials
Ready to keep crocheting and learning? Here are my top resources:
- Find more easy-to-follow granny square patterns and other written designs at The Secret Yarnery
- Left-handed? Check out this left-handed granny square tutorial series for clear, step-by-step crochet instructions.
- Subscribe to The Secret Yarnery’s YouTube channel for weekly live Q&As and brand-new crochet patterns subscribe here
- Shop my Amazon store of favorite crochet tools and yarn to update your creative kit.
- Download your free crochet cheat sheet and printable PDFs for granny squares.
Left Handed?
Summary of Step Progression in the Diagonal Granny Square
Here’s a handy checklist to keep you on track:
- Make a slip knot, chain four, and join in the round
- Work the first set of granny stitches into the ring
- Build up rows with three double crochets per space, chaining three and turning each row
- Change colors as desired by completing unfinished double crochets with new yarn
- Repeat rounds until your square reaches the preferred size (usually five rounds)
- Begin decreasing by skipping edge spaces and working clusters in main spaces only
- Finish with a single double crochet at row ends
- Close the square with chain, slip stitch, and securing yarn steps
- Knot and carefully sew in yarn tails, ensuring a smooth finish
- Work the border using either two double crochets per space (for matching diagonals) or four-cluster sides (for matching standards)
- Tidy up all final ends, check tail snugness, and trim
If you miss a chain or stitch, simply count your clusters and check your edges. Consistency is more important than perfection!
FAQs
Q: What yarn and hook should I use?
A: Use any weight you like. In the tutorial, I use size 4 worsted acrylic with a 6 mm hook. Check your yarn label and pick the hook it suggests.
Q: Can I mix these with 5-round classic granny squares?
A: Yes. Make your diagonal square five rounds, then use the matching border option so the stitch count lines up with standard grannies.
Q: How do I start the square?
A: Chain 4, slip stitch to form a ring, chain 3, then work three double crochets into the ring. That’s your first shell.
Q: How do I change colors neatly?
A: Stop before the last yarn-over of the final double crochet, pull the new color through to complete the stitch, then chain 3 and turn.
Q: When do I start decreasing?
A: When your square reaches the size you want (often five rounds). Skip the edge spaces, start clusters in the first real space, and end the row with one double crochet.
Q: How big should I make each square?
A: Five rounds will match most classic grannies. Go larger if you want; just keep the same decrease method to shape the diagonal.
Q: How do I keep edges straight?
A: Chain 3 and turn at the start of every row. Skip edge spaces during decreases. Count clusters each row to stay consistent.
Q: How do I manage all the yarn tails?
A: Knot matching colors gently, then weave ends with a sharp needle along the stitch path. Don’t pull too tight or the fabric will pucker.
Q: What border should I use?
A: For diagonal-to-diagonal joins, work two double crochets per space. To match classic 5-round grannies, use the decrease-across-two-spaces at each side edge, with 3 DC, CH 2, 3 DC at corners.
Q: Can beginners do this pattern?
A: Yes. It uses simple stitches: chain, slip stitch, and double crochet. The video shows each step at an easy pace.
Q: Will any color combos work?
A: Absolutely. Scrap yarn looks great. Keep similar yarn weights together for best results.
Q: How do I join finished squares?
A: Use your favorite method: slip-stitch join, single crochet join, or join-as-you-go on the border round. Match stitch counts on both squares first.
Q: Is there a left-handed version?
A: Yes. See the linked left-handed granny square series in the post for mirrored demos.
![]()
Christa Patel is a crochet educator, designer, and host of the Secret Yarnery on YouTube, where thousands of makers learn simple, stress-free crochet every week. Her specialty is turning classic motifs, like granny squares, into fresh, mix-and-match projects with tidy techniques, easy color changes, and clean borders. Christa’s patterns use plain English, short steps, and clear visuals so beginners can succeed fast and experienced crocheters can relax and create.
Christa is known for:
- Beginner-focused tutorials with right- and left-handed options
- Scrap-friendly granny squares and modular blankets
- Practical tips for neat joins, borders, and weaving ends
- Weekly live Q&As and community support
About the Author
With a passion for crafting easy, beginner-friendly tutorials and patterns, Christa inspires crafters of all skill levels to unleash their creativity worldwide. She encourages yarn lovers to connect, create, and crochet a world filled with beautiful handmade treasures!
How to Crochet Colorful Diagonal Granny Squares the Easy Way