Crochet Class 21: Master the Back Post Double Crochet (BPdc): Beginner's!
|
Time to read 9 min
Product added to cart
|
Time to read 9 min
Have you ever wanted to add beautiful texture and ribbing to your crochet projects? The back post double crochet (BPdc) is your answer! I'm so excited to share this comprehensive guide, inspired by Christa's fantastic crochet class at Secret Yarnery. Whether you're a complete beginner or looking to expand your stitch repertoire, this tutorial will walk you through every step of mastering the BPdc. Get ready to unlock new possibilities in your crochet creations, from cozy ribbed cuffs to stunning textured designs. I learned so much from Christa and I'm so happy to share that knowledge with you! Check out Christa's YouTube channel to learn even more.
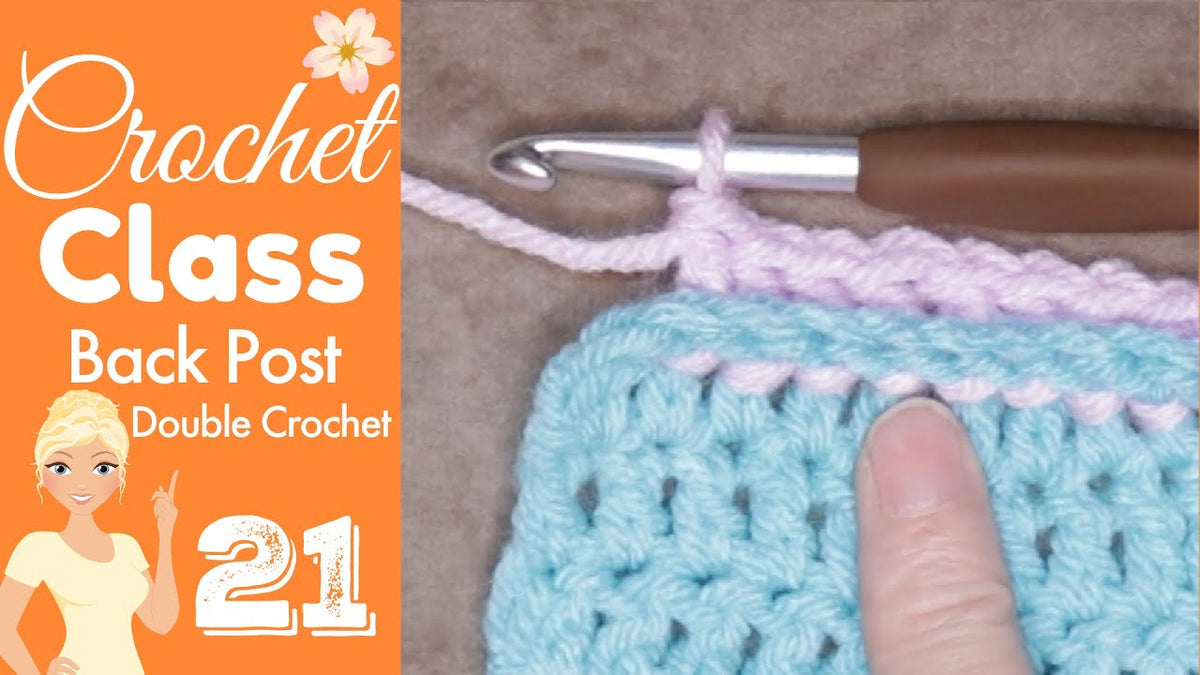
So, what exactly is the Back Post Double Crochet? It's a variation of the classic double crochet stitch, but with a twist! Instead of working into the top of the stitch in the previous row, you work around the back of the post. This creates a raised texture on the fabric, making it perfect for ribbing, interesting stitch patterns, and adding dimension to your projects. Back Post Double Crochet is a technique that will become a go-to in your crochet toolkit.
Why should you bother learning this stitch? Well, the advantages are numerous! The BPdc is fantastic for creating a ribbed effect, which is ideal for cuffs on sweaters, brims on hats, and edgings on blankets. It adds a professional and polished look to your work. Beyond ribbing, it brings amazing texture and dimension. You can combine it with other stitches to create unique patterns and designs. It's a super versatile stitch that will open up a whole new world of crochet possibilities.
Before diving into the BPdc, there are a few basic crochet skills you should have under your belt. These include:
A solid understanding of these basics is crucial for success with the BPdc. If you need a refresher on the double crochet stitch, check out this helpful tutorial: How to do a double crochet. Luckily there are plenty of Crochet Class resources on Secret Yarnery if you need to brush up.
To get started practicing the BPdc stitch, gather these materials:
Choosing the right yarn and hook size is important for achieving the best results. As an Amazon Associate I earn from qualifying purchases, here are some suggested products: Crochet Hooks, Yarn, Scissors, Sharp Tip Needles, Blunt Tip Needles, Stitch Markers, Tape Measure, WIP Baskets, Neck Light, Foot Warmer, Needle Threaders, Accessory Tins, Ball Winder, Kericho Gold Tea, Color Wheel, Yarn Storage Bags, Large UFO Bags, and Regular UFO Bags.
Here's how to create the BPdc stitch, based on Christa's clear instructions:
Step 1: Wrap the yarn around your hook (yarn over).
Step 2: Insert your hook from back to front around the post of the stitch in the row below. Imagine you're giving the post a hug from behind!
Step 3: Bring the hook back to the back of your work. You should have the post of the stitch on your hook.
Step 4: Yarn over and pull through the stitch (you should have three loops on your hook).
Step 5: Yarn over and pull through two loops (you should have two loops on your hook).
Step 6: Yarn over and pull through the remaining two loops (you should have one loop on your hook).
That's it! You've completed one Back Post Double Crochet stitch. Repeat these steps to create a row of BPdc stitches.
Christa's video provides a fantastic visual demonstration of the BPdc. Her tips can make learning the stitch even easier. She suggests folding your crochet to get a better view of the post you're working around. This is a game-changer! Don't be afraid to manipulate your work to see what you're doing.
Beginners often make a few common errors when learning the BPdc. Knowing these pitfalls can help you avoid them:
Here are some tips for preventing these mistakes:
The best way to master the BPdc is to practice! Create a small swatch to get comfortable with the stitch. Here's a simple pattern:
This swatch will help you solidify your technique and get a feel for the stitch. It's an easy Crochet Class project for beginners.
One of the most popular uses for the BPdc is creating ribbing. To achieve a ribbed effect, you alternate Front Post Double Crochet (FPdc) and BPdc stitches.
Here's how to create a ribbed swatch:
Alternating these stitches creates a beautiful, stretchy ribbing perfect for all sorts of projects.
You can also work BPdc in the round, which is commonly used for hats, cowls, and other circular projects. To start a BPdc round, simply work the BPdc stitch around each post of the stitches in the previous round. Use stitch markers to keep track of your rounds, especially when working on larger projects.
Maintaining even tension is crucial for a professional-looking finished project. Here are some tips for achieving consistent tension when working the BPdc:
Uneven tension can affect the appearance of your project, so take the time to practice and find what works best for you.
Even with practice, you might encounter some issues while working the BPdc. Here are some common problems and their solutions:
Now that you've mastered the BPdc, what can you make with it? Here are some project ideas:
Let your creativity flow and experiment with the BPdc in different projects!
Once you're comfortable with the basic BPdc, you can explore more advanced techniques. This includes textured stitch patterns, such as cables and basketweave, that incorporate the BPdc stitch. You can also combine BPdc with other stitches for unique designs. Experiment with different yarn weights and colors to create truly stunning effects.
To keep your BPdc crochet projects looking their best, follow these care tips:
I encourage you to join The Secret Yarnery community! It's a great place to share your projects, ask questions, and connect with other crocheters. You can find The Secret Yarnery on Facebook.
There are so many other resources available from Christa and The Secret Yarnery to help you enhance your crochet skills. Check out the written patterns, crochet planners, and free crochet classes available on the Secret Yarnery website. There are also Crochet Podcasts available!
The Back Post Double Crochet might seem a little tricky at first, but with practice, it's easy to master. Start practicing and experimenting with this versatile stitch today! And remember, you can always refer back to this guide and Christa's video as needed. Stay hooked!
Front post double crochet (FPdc) is worked by inserting the hook around the post of the stitch from front to back, while back post double crochet (BPdc) is worked from back to front. This difference creates contrasting raised and recessed textures, ideal for ribbing and patterns.
If you're familiar with basic crochet stitches like double crochet, BPdc is beginner-friendly. It may feel tricky initially, but with practice and guidance, it becomes easier to master.
The ribbed effect occurs when BPdc is combined with FPdc in alternating stitches or rows. If there's no ribbing, ensure proper placement of stitches and tension consistency. Double-check you're distinguishing FPdc and BPdc when alternating.
BPdc is fantastic for projects that require texture, stretch, or structure. Common uses include:
Yes! BPdc works across various yarn types. For beginners, start with worsted weight yarn. Experiment with lighter or bulkier yarns for unique textures and results.
To maintain consistent tension:
Here are common BPdc errors:
Review the step-by-step guide before beginning!
Absolutely! BPdc pairs well with FPdc and is often combined in advanced patterns like cables, basketweave, and other textured designs. It's very versatile.
Yes, BPdc works beautifully in the round, especially for hats or cowls. Use stitch markers to track your progress and ensure stitch consistency when working circular patterns.
Christa Patel
Christa Patel, the creative force behind The Secret Yarnery, is a passionate crochet expert and educator. With years of experience, Christa has built a thriving community of crocheters, offering accessible tutorials, patterns, and tips for beginners and advanced learners alike. Known for her clear instructions and encouraging approach, she empowers others to explore and enjoy the art of crochet.
Through her engaging YouTube channel, Christa covers everything from basic stitches to advanced techniques, like the Back Post Double Crochet. Her tutorials have become go-to resources for crocheters worldwide. Beyond teaching, Christa shares practical crochet tips, product recommendations, and behind-the-scenes insights about her crafting journey.
When she's not crocheting, Christa loves connecting with her community through lively discussions, podcasts, and her vibrant Facebook group. Her mission is to make crochet approachable, inspiring, and fun for everyone. Whether you're picking up a hook for the first time or looking to expand your skills, Christa can guide you every step of the way.
Easy crochet tutorial
Both right and left handed video tutorials
Perfect for beginners!


