Crochet a Summer Shawl: Easy Sundae Granny Pattern for Beginners!
Hooked on crochet and looking for your next project? I've got you covered! In this blog post, I'll guide you through creating a beautiful Sundae Granny Shawl, inspired by my tutorial from The Secret Yarnery.
This easy-to-follow pattern is perfect for beginners, featuring a simple one-row repeat and a lacy design that's ideal for spring or summer. Get ready to unleash your creativity with customizable color combinations and a relaxing crochet experience!
What is the Sundae Granny Shawl?
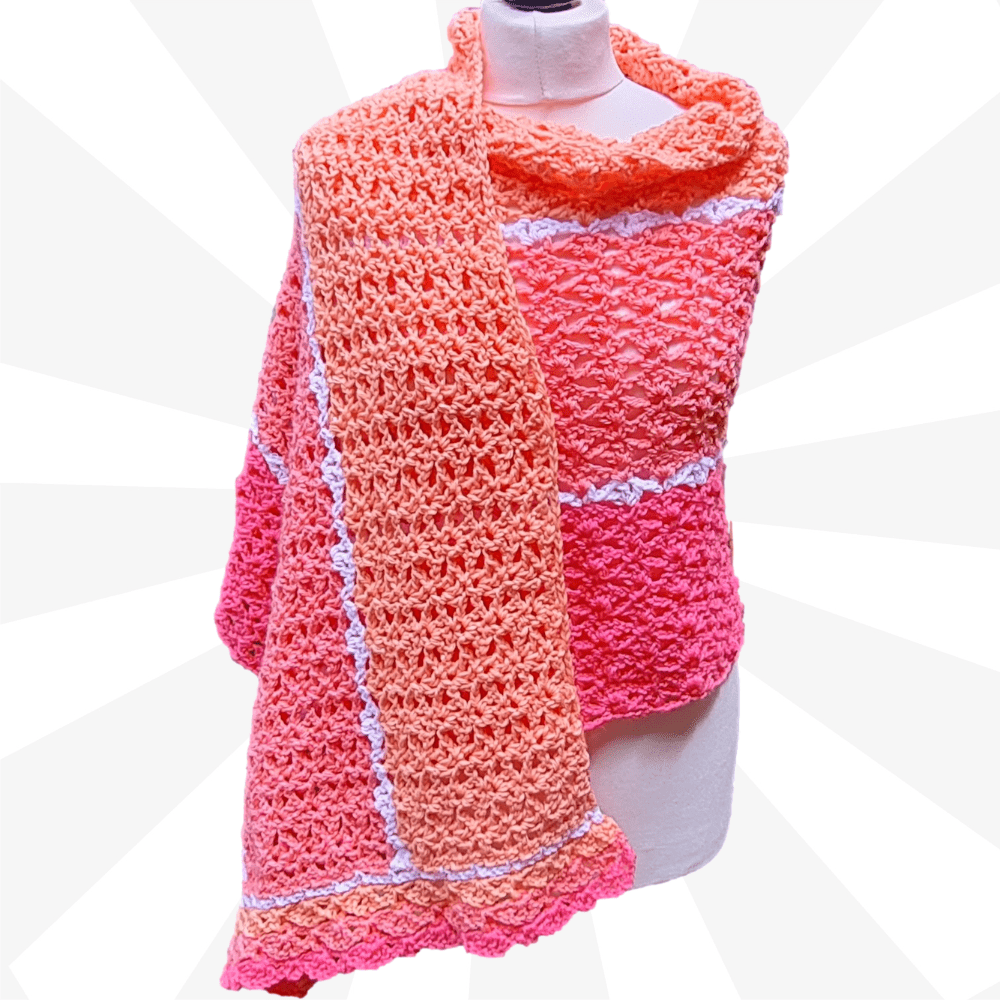
The Sundae Granny Shawl is a rectangular shawl pattern with a fun twist on the classic granny stitch. What makes it special? The use of multiple yarn colors makes it pop and a joy to work on! This project is a fantastic way to add a splash of handmade charm to your wardrobe.
Here are some key features:
-
Lacy and open design
-
Simple one-row repeat
-
Customizable colors
-
Beginner-friendly

Why You'll Love This Crochet Pattern
I'm excited for you to make your own shawl! Here's why I think you'll love this Crochet, Summer Shawl project:
-
Easy to remember: The simple one-row repeat makes this pattern ideal for relaxing crochet. Once you get the hang of it, you can crochet without even thinking!
-
Customizable: Use any yarn and color combination to match your style. Want a bold, bright shawl? Go for it! Prefer something more muted and elegant? That works too!
-
Perfect for warm weather: The lacy design is breathable and lightweight. This makes it perfect for layering on those cool summer evenings.
-
Great for beginners: Learn basic crochet stitches and techniques. If you're new to crochet, this is a great project to build your skills and confidence. Check out my other crochet patterns!
-
Makes a beautiful gift: A handmade shawl is a thoughtful and appreciated present. Show someone you care with a beautiful, handcrafted gift.
-
Portable project: Easy to take on the go for crocheting anywhere. Whether you're waiting for an appointment or traveling, this project is easy to bring along.
Materials You'll Need
Ready to get started? Here's what you'll need:
Yarn
- Three different colors of worsted weight yarn (approximately 125 grams of each color). In the tutorial, I used Favorite from Ice Yarns and One Softly Baby.
- If using one color, you will need 400 grams.
You can find a wide selection of worsted weight yarns at Ice Yarns.
Crochet Hook
- 6.5 mm crochet hook (or 6 mm if you don't have a 6.5 mm).
Other Supplies
- 12 Stitch markers (optional, but helpful for beginners).
- Needle for weaving in ends.
- Scissors.
Gauge and Size
Gauge isn't super critical for this project, but it can affect the final size of your shawl. If you're concerned about size, I recommend making a small swatch to check your gauge before you begin.
The pattern creates a rectangular shawl, but you can adjust the length and width by adding or subtracting rows and repeats.
As a reference, my finished shawl is approximately [insert dimensions here].
Abbreviations
Here are some common crochet abbreviations used in this pattern:
- ch - chain
- sc - single crochet
- dc - double crochet
- st - stitch
Special Stitches
This pattern uses a couple of special stitches that create the lacy, textured design:
- Scoop: 1 double crochet, chain 1, 1 double crochet, chain 1, 1 double crochet, chain 1, all into the same stitch.
- Cherry: 1 single crochet, chain 3, 1 single crochet into the same stitch.
These stitches are easy to learn and add a lot of visual interest to the shawl.

Getting Started: Making the Foundation Chain
Let's get started! Here's how to make the foundation chain:
- Make a slip knot and place it on your hook.
- The pattern is a multiple of 8 + 6. I like to chain sets of 16.
- For the tutorial, I'm making a sample size. If you're making the full size, you will need to chain 192 + 6.
Using Stitch Markers
- Place stitch markers every 16 chains to help keep track (optional but recommended for beginners).
- Be sure to count your chains accurately!
- Identify the "camel bumps" on the back of the chain. These are the loops you'll be working into in the next row.
Row 1: Creating the First Row of the Shawl
Alright, let's get into the first row!
- After completing the foundation chain, chain 6 more.
- Locate the second back loop from the hook and make one single crochet.
- Chain 1.
- Skip 3 chains.
- In the fourth back loop, create the "scoop" stitch: 1 double crochet, chain 1, 1 double crochet, chain 1, 1 double crochet, chain 1, all into the same stitch.
- Skip 3 chains.
- In the fourth back loop, create the "cherry" stitch: 1 single crochet, chain 3, 1 single crochet into the same stitch.
- Chain 1.
- Alternate between the "scoop" and "cherry" stitches all the way along the chain.
- Don't worry if it looks bunched up, it will be fixed in the next row.
- At the end of the row, work into the last chain (the fourth chain from the hook).
- End the row with 1 double crochet, chain 1, 1 double crochet.
Check out the timestamps in the YouTube video for visual guidance!
Row 2 (and beyond): The Repeating Row
Now for the best part - the repeating row! This is where the pattern really starts to take shape.
- Chain 1 and turn your work.
- In the very first stitch, make one single crochet.
- Chain 1.
- This row reverses the pattern:
- Create "scoops" in the center of the "cherries" from the previous row.
- Create "cherries" in the center stitch of the "scoops" from the previous row.
It's all about finding that center point!
- Identify the center stitch of both the "scoop" and "cherry" stitches.
- At the end of the row, work into the last stitch, getting two strands of the "v" on the top of the hook.
- End the row with 1 double crochet, chain 1, 1 double crochet.
This row is the foundation of the entire shawl, repeating to create length. Keep repeating this row until your shawl is the desired length. And remember, I have visual aids in my YouTube video.

Changing Colors (and Weaving in Ends)
After completing 12 rows of the first color, it's time to change colors. Here's how I like to do it:
- Finish the last stitch of the row by starting the last double crochet, but don't complete it. Leave the last two loops on the hook.
- Cut the yarn, leaving a tail long enough to weave in later.
- Grab the new color, make a loop, and pull it through the last two loops on the hook to complete the double crochet.
- Chain 1 and turn your work.
- Continue with Row 2 using the new color.
- Give the tails a loose knot to keep them in place.
Weaving in ends is an important skill to master for a clean finish.
Color Blocking Pattern
Here's the color sequence I used in the tutorial:
- 12 rows of the darkest color.
- 1 row of white (or neutral color).
- 12 rows of the medium color.
- 1 row of white.
- 12 rows of the lightest color.
Feel free to get creative! Experiment with your own color combinations to create a shawl that's uniquely you.
The Final Row (Before the Border)
Almost there! Here's how to prepare your shawl for the border:
- After completing the last row of your last color, chain 1 and turn your work.
- Make one single crochet into the very first stitch.
This will give you a nice base to work the border into.
Adding the Border: Overview
The border adds a finished edge and helps prevent stretching. It also gives the shawl a polished, professional look. I like to switch to a smaller hook (6 mm) for the border to create a tighter edge. The border consists of multiple rows of different stitches and colors, adding a final touch of beauty to your shawl.
Border Row 1: Creating the Foundation
Let's start building that beautiful border!
- Begin in the first single crochet of the final row.
- Attach the white yarn with a slip stitch, joining both strands.
- Chain 2.
- Identify the "circle spots" along the edge of the shawl – these are where you'll be working your stitches.
- In the next circle spot, make one single crochet.
- Chain 3.
- Continue alternating between one single crochet in each circle spot and chain 3 along the entire edge of the shawl.
- Pay attention to your stitch placement, and keep it consistent.
Border Row 1: Finishing the Corner
Now for the tricky part - the corner!
- At the end of the row, there's one stitch left.
- Make the last single crochet in that stitch.
- To create a bit of extra space in the corner, chain 2.
- Look for the next chain along the edge and insert your hook, getting two strands of the chain on the hook.
- Make one single crochet, but don't finish it. Leave it on your hook to prepare for the color change.
Border Row 2: Changing Color in the Border
Let's switch things up again:
- Cut the white yarn, leaving a tail to weave in.
- Grab the lightest color yarn and make a loop.
- Finish the single crochet with the new color.
- Chain 1 and turn your work.
Border Row 2: Continuing the Pattern
And now, back to the pattern:
- In the very first single crochet, make one single crochet.
- Chain 3.
- In the next stitch (the next single crochet from the previous row), make one single crochet.
- Chain 3.
- Continue alternating between one single crochet in each stitch and chain 3 along the entire edge of the shawl.
Border Row 2: Finishing the Corner
Almost there!
- When you reach the end of the row, make one single crochet in the second to last single crochet.
- Chain 3.
- Give the border extra space by going right into the very first stitch, right by the legs of that very first stitch where you did your slip stitch.
- Pop your hook in and make one single crochet.
Border Row 3: Adding Scoops and Cherries
Now for some texture!
- Chain 1 and turn your work.
- Make one single crochet into the very first stitch.
- Chain 1.
- This row introduces the "scoop" and "cherry" stitches to the border.
- In the next stitch, create a "scoop": 1 double crochet, chain 1, 1 double crochet, chain 1, 1 double crochet, chain 1.
- In the next stitch, create a "cherry": 1 single crochet, chain 3, 1 single crochet into the same stitch.
- Alternate between "scoops" and "cherries" along the entire row.
- Work one into each of these single crochets in the row below.
Border Row 3: Finishing the Corner
And that last stitch is:
Finish that last cherry and make your single crochet right into this single crochet down below.

Border Row 4: Changing Colors Again
Time for another color change!
- At the end of the row, start a single crochet into the single crochet from the row below, but don't finish it.
- Cut the yarn, leaving a tail to weave in.
- Grab the medium color yarn and make a loop.
- Finish the single crochet with the new color.
- Chain 1 and turn your work.
Border Row 4: Continuing the Pattern
Let's keep crocheting!
- Make one single crochet into the very first stitch.
- Chain 3.
- Make one single crochet into the space of the first "cherry."
- Chain 3.
- Make one single crochet into the center stitch of the "scoop."
- Chain 3.
- Continue alternating between single crochet in the center of the "cherries" and single crochet in the center stitch of the "scoops," chaining 3 between each.
Border Row 4: Finishing the Corner
And to finish this row up:
At the end of your row, do your chain three, and now we're just going to single crochet right down here into that single crochet at the end of our row.
Border Row 5: Scoops and Cherries (Reversed)
Now, reverse those stitches:
- Chain 1 and turn your work.
- Make one single crochet into the very first stitch.
- Chain 1.
- This row reverses the "scoop" and "cherry" pattern from Row 3.
- If there was a "scoop" in the row below, create a "cherry" on top.
- If there was a "cherry" in the row below, create a "scoop" on top.
Into this first stitch one single crochet chain three and one single crochet chain one next we have a cherry down below so we're going to do a scoop on top.
Border Row 5: Finishing the Row
To finish this border row:
At the end of our row we're going to make one single crochet right down here into this stitch, but we're not going to finish it, we're just going to start that single crochet and leave it on our hook. We're going to change our colors to our last color the darkest color that we have.
Border Row 6: Changing Colors
Time to bring in that last color!
- Cut the yarn, leaving a tail to weave in.
- Grab your last color yarn and make a loop.
- Finish the single crochet with the new color.
- Chain 1 and turn your work.
Border Row 6: Chains and Single Crochets
Here's what to do for this row:
Make one single crochet into the very first stitch. This row consists of chain 3 and single crochet, working into the center stitch of the "scoops" and the center of the "cherries." Alternate chain three and single crochet into the center stitch of the scoop chain three and send and single crochet into the center of the cherry chain three.
Border Row 6: Finishing the Row
And to complete this row:
At the end of our row we're going to make our last stitch right here our last single crochet right into that stitch of the row down below.
Border Row 7: Single Crochet (Final Row)
We're almost at the finish line!
- Make sure you get two strands of that stitch on the top of your hook.
- Chain one and turn your work.
- One single crochet into this very first stitch right by our chain, one single crochet chain one.
Cherries get scoops and scoops get cherries for this row, you want to do the opposite for this row.
Border Row 7: Finishing the Row
And now, the very last stitch:
At the end of your row I've done my last cherry and my chain one now we're just gonna do our last single crochet right down here right into that first stitch one single crochet and chain one so that is going to secure our yarn.
Cut your yarn leaving a long enough tail to sew with your needle later.

Completing the Border on the Other End
Now, repeat the exact same border on the opposite end of the shawl. Don't forget to create that extra space in the corners (using the chain two and single crochet method) to ensure the border lays flat.
Weaving in All the Ends
Weaving in all those yarn ends is key to a polished and professional-looking finish! Make sure you weave them in securely so they don't unravel over time. Here's a blog post about weaving in ënds to help!
Blocking (Optional)
Blocking can really elevate the look of your finished shawl. It helps even out the stitches, improves the drape, and enhances the overall appearance.
More Crochet Patterns from The Secret Yarnery
Looking for more crochet inspiration? Check out my other popular crochet patterns on my website! You'll find a wide variety of projects to suit every skill level and style. You might enjoy browsing my collection of written patterns.

Subscribe and Stay Connected!
Don't forget to subscribe to my YouTube channel for more crochet tutorials and inspiration! You can also find me on social media for behind-the-scenes peeks and updates. Join the community!
Thank you
Thank you for following along with this pattern. I hope you enjoy crocheting your own Sundae Granny Shawl! Happy crocheting!
Left Handed?
FAQs
1. What yarn works best for this pattern?
This pattern is designed for worsted weight yarn, but you can use any yarn you prefer. The suggested weight ensures a balance of structure and flow. Use three colors for a fun, color-blocked look or one solid color for a classic touch.
2. How much yarn will I need?
You’ll need approximately 125 grams for each of the three colors or 400 grams if using a single color. The amounts may vary depending on your tension and adjustments to the shawl size.
3. Can I customize the size of the shawl?
Absolutely! The pattern is fully customizable. You can adjust the foundation chain and the number of rows to make it longer or wider to fit your desired dimensions.
4. Does gauge matter for this project?
Gauge isn’t critical for this pattern, but it can affect the final size of your shawl. If size matters, make a small swatch to check your gauge before starting.
5. What tools do I need?
You’ll need a 6.5 mm crochet hook (or 6 mm if you don’t have a 6.5 mm hook), stitch markers (optional), a needle for weaving in ends, and scissors.
6. How do I change colors seamlessly?
The pattern provides step-by-step instructions on how to switch colors cleanly, ensuring your shawl looks polished. You'll finish the last stitch of the row and join the new color before turning your work.
7. Do I need to add the border?
The border is optional but adds a professional look and prevents stretching. It also allows you to add extra details and color coordination to your shawl.
![]()
Christa Patel is the creative force behind Secret Yarnery. With a passion for making crochet fun and simple, Christa designs beginner-friendly patterns and shares step-by-step tutorials on YouTube and her blog. Her clear teaching style, practical tips, and joyful approach have inspired thousands of crocheters to create beautiful projects with confidence. When she’s not crocheting or recording new videos, Christa enjoys spending time with her family and connecting with fellow crafters around the world.
Follow Christa for more easy patterns, crochet tips, and creative inspiration:
About the Author
With a passion for crafting easy, beginner-friendly tutorials and patterns, Christa inspires crafters of all skill levels to unleash their creativity worldwide. She encourages yarn lovers to connect, create, and crochet a world filled with beautiful handmade treasures!
Crochet a Summer Shawl: Easy Sundae Granny Pattern for Beginners!