Crochet the Coronation Baby Blanket: Easy & Quick Pattern & Guide!
Ready to create a beautiful and cozy baby blanket? The Coronation Baby Blanket is the perfect project for crocheters of all skill levels! This pattern features a simple, two-row repeat that creates a stunning textured design.
Get Ready to Crochet This Adorable Baby Blanket
If you're a beginner looking for a rewarding project or an experienced crocheter wanting a quick and satisfying make, this blanket is for you. The Coronation Baby Blanket is fast, easy, and creates a beautiful texture that's perfect for gifting to a new baby or creating a cherished heirloom. Plus, the repetitive nature of the pattern makes it relaxing and meditative – a true joy to crochet!
You can also find a written pattern to complement this tutorial on the Secret Yarnery website.
Materials You'll Need
To crochet the Coronation Baby Blanket, you'll need a few essential supplies. Here's a breakdown:
-
Yarn:
- Krista used Savor from Ice Yarns, which is 100% Dralon Acrylic and a worsted weight yarn. This yarn is known for its exceptional softness, making it ideal for baby blankets. The sample blanket used approximately 400g, or 660m.
- You can find the yarn here.
- Alternative worsted weight acrylic yarns will also work well.
-
Crochet Hook:
- A 7mm crochet hook is recommended for this pattern.
- If you're looking for a reliable hook, you can find a 7mm Clover hook on Amazon here.
- If you prefer a 6mm hook, that will work too! Just add 12 chains to your starting chain to achieve the correct size.
-
Other Supplies:
- Scissors for cutting the yarn.
- Yarn needle for weaving in the ends.
Here is a list of some optional items that can be used to help:
- Stitch markers
- Measuring tape
- Color wheel

Getting Started: Making the Slip Knot and Initial Chain
Let's begin! First, make a slip knot with your yarn, leaving a long tail for weaving in later. This tail will ensure a secure and neat finish.
Now, for the foundation chain: this pattern works on a multiple of three. This means you'll chain in sets of three until you reach your desired width. For the 7mm hook, 87 chains were used, and around 99 chains for a 6mm hook. Keep working on your chain until it is the width you want your blanket to be.
Row 1: Creating the Foundation with Back Loops
This first row sets the stage for the entire blanket, so let's take it slow and ensure we get it right!
- Working into the Back Loops: Gently roll your chain to the side to reveal the back loops. It's important to work into the second chain from the hook, not the first. The first back loop is right underneath the working yarn and you want to go into the second. If working into your back loops is difficult, you can work into the front, but your blanket will look a lot more finished if you can work into your back loops.
- The First Repeat: Begin with a single crochet, chain one, and skip one chain. This creates the first little space that we'll build upon.
- Creating the "Bumps": Now comes the fun part! We're going to create what I call "bumps." In that second chain, create a single crochet, chain two, and another single crochet, all in the same chain.
- Continuing the Row: Repeat the sequence: chain two, skip two chains (or "camel bumps"), and create another "bump" (single crochet, chain two, single crochet). Don't worry if your work starts to curl – this is perfectly normal and will straighten out in the next row!
- Ending Row 1: After your last "bump," you should have two chains remaining. Chain one, skip one, and then single crochet into that very last stitch.
Row 2: Building the "Heads"
Row two is super quick, which makes the whole process so much more fun.
- Starting the Row: Chain three (this counts as your first double crochet), and turn your work. This is easily done by sliding your hand under your working yarn, grabbing your work and turning it towards you.
- Working into the Bumps: For this row, we'll be working into the center of each "bump" from the previous row. That's the chain-two space we created.
- Creating the "Heads": In each chain-two space, create three double crochets. These clusters of double crochets will form the "heads" of our pattern.
- Continuing the Row: Repeat the "three double crochets into the center of each bump" sequence all the way across the row.
- Finishing Row 2: At the end of the row, you'll have a little bit hanging down. Find the top of that single crochet from the previous row (it's the stitch right down here on the side). Make one double crochet into that last stitch, making sure you have two strands of the stitch on your hook.

Row 3: The "Crown" Row
Now it is time to add the crowns!
- Starting the Row: Chain one, turn your work. Single crochet into the first stitch, chain one, skip one.
- Creating the Crowns: This is where the magic happens! We're going to place a "crown" in the center stitch of each "head" (that's the middle double crochet of the three). A "crown" is simply a single crochet, chain two, and another single crochet, all worked into the same stitch.
- The Pattern Repeat: After you've made your crown, chain two and jump to the next head.
- Repeating Across the Row: Repeat the "crown, chain two, jump" sequence across the entire row.
- Finishing the Row: Chain one, skip one, and single crochet into the top of the chain three from the previous row.
Looking for other crochet patterns? Check out the pattern section of my website!
Repeating the Pattern
Now that you've completed the first three rows, you've established the pattern! Simply alternate between Row 2 (the "head" row) and Row 3 (the "crown" row) until your blanket reaches your desired height. Ending on a head row is recommended for the neatest finish.
Recap of the "Head" Row (Row 2)
Let's recap the "head" row to make sure we've got it down:
- Starting: Chain 3, turn.
- Main Section: 3 double crochets into every chain-2 space of the crowns from the previous row.
- Ending: One double crochet into the top of the turning chain from the previous row.
- Quick Tip: Ensure you're working into the top of the turning chain by getting two strands of the stitch on your hook.
Recap of the "Crown" Row (Row 3)
And now, the "crown" row:
- Starting: Chain 1, turn. Single crochet into the first stitch, chain 1, skip 1.
-
Main Section:
- Crown (single crochet, chain 2, single crochet) in the center double crochet of each "head."
- Chain 2, jump to the next head.
- Ending: Chain 1, skip a stitch, single crochet into the top of the chain-3 from the previous row.
- Mnemonic Device: "Chain 2, Crown, Chain 2, Jump" to remember the sequence.
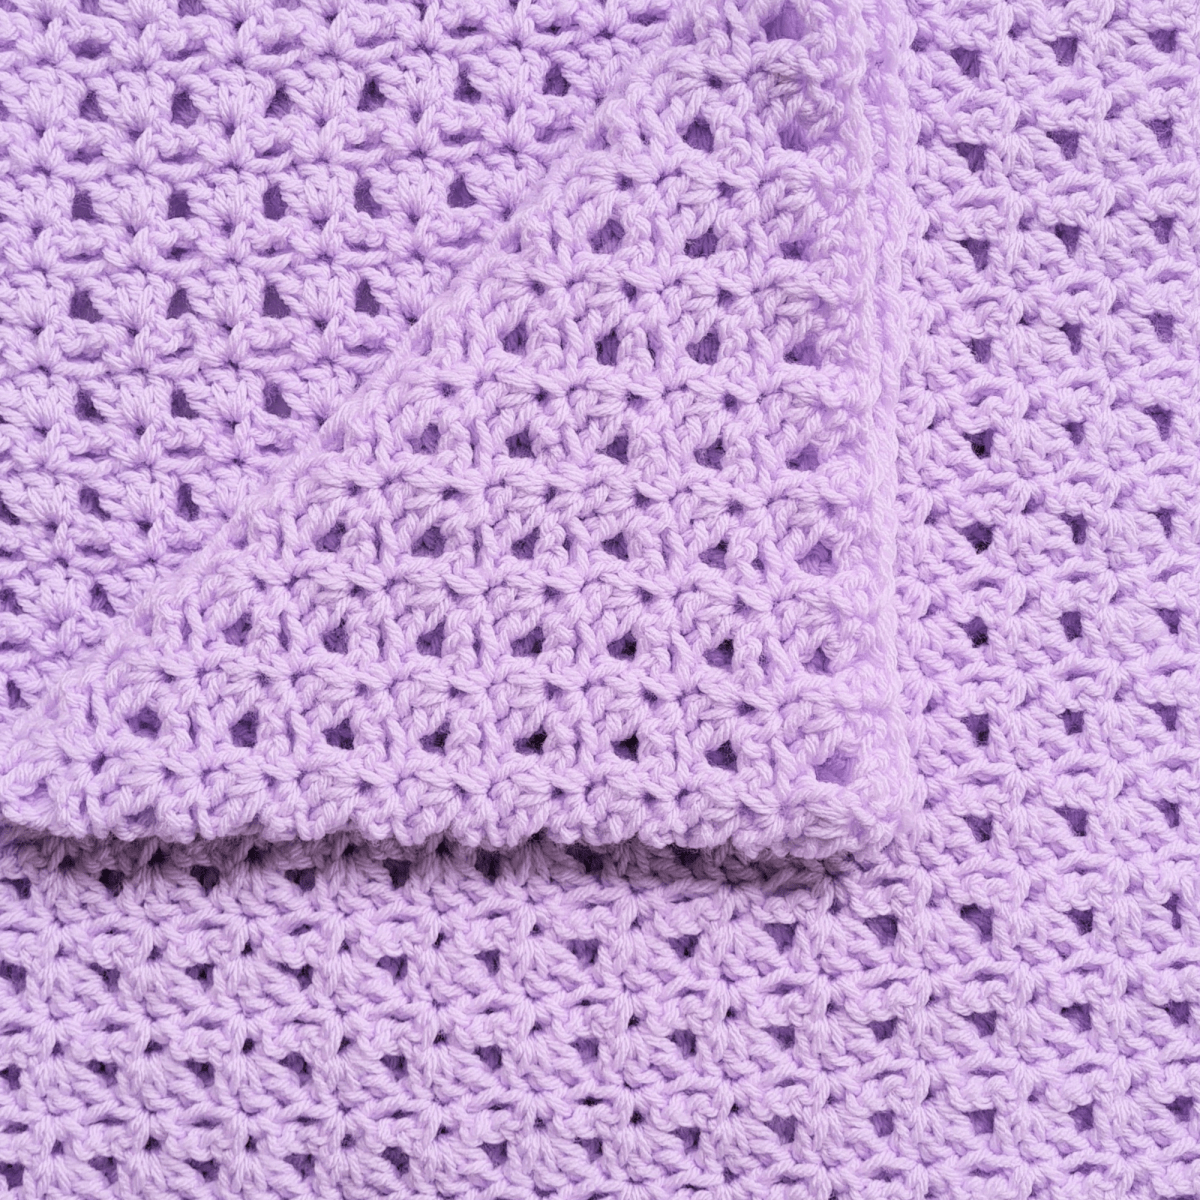
![]()
What if you miss a crown
Don't worry, we all make mistakes! If you happen to miss a crown on one of your heads, it's not the end of the world.
-
Missing a Crown:
- It's okay to make mistakes, especially if you're new to crochet.
- You can always frog back (rip out your stitches) and fix it.
-
The Quick Fix:
- If you don't want to frog, here's a simple solution: Instead of placing your "head" (3 double crochets) into the center of a crown, just put them into the single crochet stitch directly below where the crown should be.
-
The end result:
- The beauty of this pattern is that it's quite forgiving. If you use the quick fix, it will be hard to tell that you missed a crown at all!

Finishing the Blanket (Last Row)
Once your blanket reaches the desired size, it's time to finish it off!
- Ending on a Head Row: It is important that you end your blanket on a "head" row, this gives it the neatest finish.
-
The Final Row (Single Crochet & Chain-2 Spaces):
- Chain one, turn your work. Single crochet into the first stitch, chain one.
- Instead of crowns, just make one single crochet into the center stitch of the head, chain two.
- Jump to the next head (center stitch), single crochet, chain two.
-
Repeating the Final Row:
- Repeat the "single crochet, chain two, jump" sequence across the entire row.
-
Finishing Off:
- After the last single crochet, chain one, and single crochet into the top of the chain three.
- Chain one to secure your yarn, cut your yarn leaving a long enough tail.
- Pull your hook up.
- Snug that down to secure.
- Weaving in Ends: Finally, use a yarn needle to weave in all loose ends, hiding them securely to prevent unraveling.
If you love crocheting baby blankets, you can find more crochet baby blanket patterns on my website!
Video Timestamps Recap
Here's a handy breakdown of the key points in the video:
- 0:00 - Introduction
- 1:23 - Row One
- 5:26 - Row Two
- 7:37 - Crown Row
- 10:09 - Head Row
- 11:07 - Crown Row RECAP
- 11:48 - Head Row RECAP
- 12:48 - QUICK FIX - Missing Crown
- 14:14 - Last Row
Join the Secret Yarnery Community!
I hope you enjoyed this tutorial and found it helpful! If you did, I'd love for you to join the Secret Yarnery community!
Subscribe to my YouTube channel and hit the notification bell so you don't miss out on any new patterns and tutorials: https://bit.ly/3VvXdCd
You can also find me on:
- Instagram: Secret Yarnery
- Facebook: The Secret Yarnery
- Facebook Group: The Secret Yarnery Crochet Community
I encourage you to share your finished blankets in the Facebook group so we can all admire your beautiful work!
Happy crocheting, and stay hooked!
Left Handed?
FAQs
1. What size is the finished Coronation Baby Blanket?
The finished blanket size will depend on how wide and tall you make it. Using the recommended yarn and a 7mm crochet hook, you can expect a blanket approximately 36x36 inches when following the provided instructions. Adjust your starting chain for your desired size.
2. Can I use a different type of yarn?
Yes, you can substitute with any worsted-weight yarn. Acrylic yarns are a great alternative, as they are soft, durable, and easy to wash—perfect for baby blankets. Just ensure the yarn provides a similar gauge for best results.
3. What happens if my blanket curls while working?
A slight curl is normal in the initial rows, especially during Row 1. This will settle as you continue crocheting and build on the pattern. Blocking the final blanket can also help eliminate any remaining curl.
4. How do I make the blanket larger or smaller?
To adjust the blanket size:
- For a wider blanket, increase the starting chain in multiples of three.
- For a shorter blanket, simply stop repeating the pattern rows when you've achieved your desired height.
5. Can beginners make this blanket?
Absolutely! This pattern is designed to be beginner-friendly. It uses simple stitches like single crochet, double crochet, and basic chains, along with a repetitive pattern that’s easy to memorize. The video tutorial is also a helpful guide.
6. What is a “quick fix” for missed crowns?
If you miss a crown, you don’t need to restart the whole row. Instead, place the “head” (three double crochets) into the single crochet stitch where the crown should have been. The finished blanket will still look great!
7. Do I have to end on a “head row”?
Yes, ending on a “head row” provides the neatest edge for your blanket, ensuring a polished and symmetrical finish. It’s recommended before adding your final row or border.
8. How can I make the edges straighter?
Use a stitch marker on the first and last stitch of each row to ensure consistency. This will make it easier to find the edge stitches and keep your blanket edges neat and straight.
9. Can I add a border to this blanket?
Yes! Adding a border can enhance the finished look. A simple single crochet border or shell stitch border would complement the design well. Just crochet around the edges evenly.
10. How many skeins of yarn do I need?
For the sample blanket made with Savor yarn, approximately 400g (660m) was required. If you are using a different yarn, check its yardage and weight to calculate the amount needed.
![]()
Christa Patel is a passionate crochet enthusiast and the creative mind behind The Secret Yarnery. With a mission to inspire both beginners and experienced crocheters, Christa shares detailed tutorials, patterns, and tips to make crochet accessible and enjoyable for everyone.
Originally from Canada and currently based in Nairobi, Kenya, Christa turned her love for yarn into a thriving community of fellow yarn lovers worldwide. Her designs often highlight simplicity, beauty, and practicality, making them perfect for gifting or creating treasured keepsakes.
Christa’s teaching style is warm and approachable, with step-by-step instructions that help crocheters of all skill levels succeed. Whether through her popular YouTube channel, Facebook groups, or written patterns, Christa is dedicated to spreading the joy of crochet and connecting with fellow creators.
In addition to crafting beautiful pieces, Christa encourages her followers to embrace creativity, share their projects, and find relaxation in the art of crochet. Her dedication to the craft has earned her recognition as a trusted source for crochet knowledge and design inspiration worldwide.
Connect with Christa:
- YouTube: The Secret Yarnery
- Instagram: Secret Yarnery
- Facebook: The Secret Yarnery
- Join the Community: The Secret Yarnery Crochet Community
With Christa’s guidance, you can confidently create cherished handmade items while enjoying the soothing rhythm of crochet.
About the Author
With a passion for crafting easy, beginner-friendly tutorials and patterns, Christa inspires crafters of all skill levels to unleash their creativity worldwide. She encourages yarn lovers to connect, create, and crochet a world filled with beautiful handmade treasures!
Crochet the Coronation Baby Blanket: Easy & Quick Pattern & Guide!