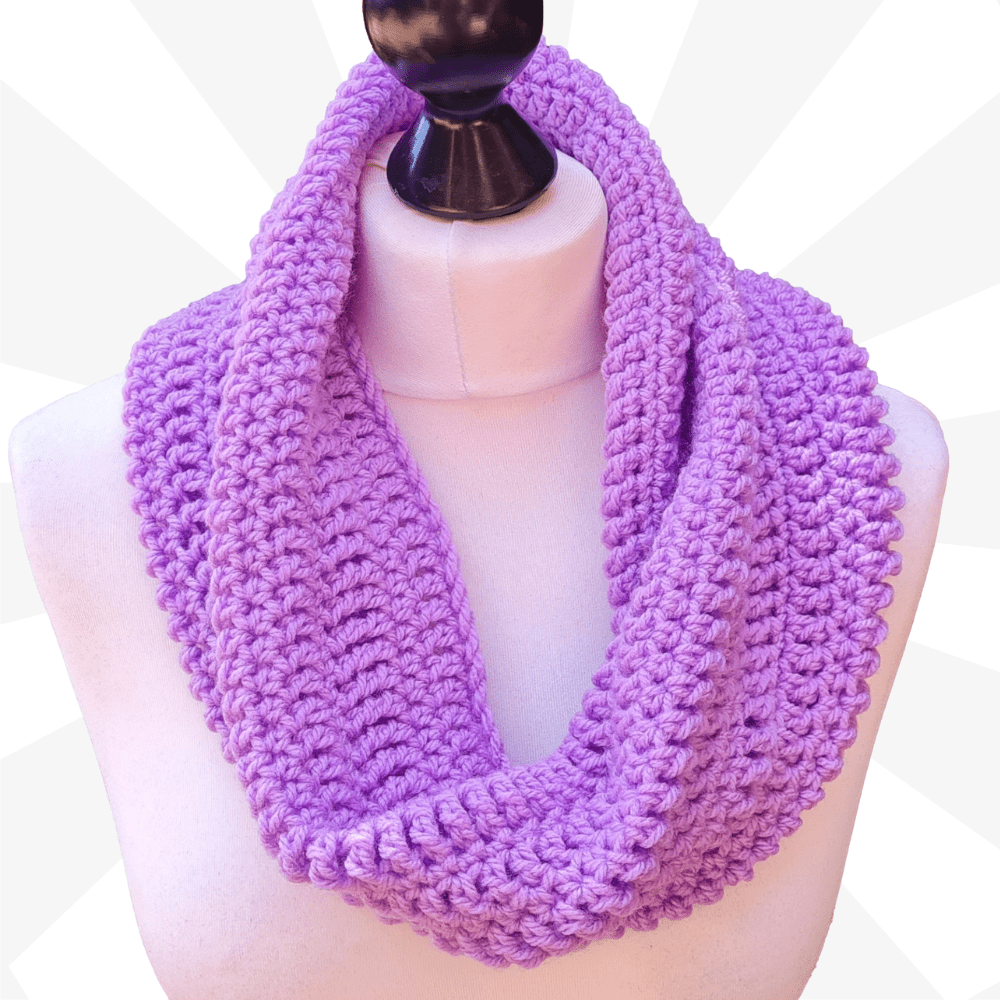
Easy Crochet Cowl for Beginners | Step-by-Step Stitch Sampler Tutorial
Ready to learn how to crochet a cozy and stylish accessory? This easy crochet cowl is perfect for beginners and a fantastic way to practice your stitches! You'll love how simple it is to make, and the result is a warm, fashionable cowl you can wear all winter long. Christa from the Secret Yarnery will guide you through every step, so grab your hook and yarn, and let's get started! You'll learn how to create basic crochet stitches and work in the round to make a lovely cowl, so read on and watch the video to begin your next crochet project!
Why Crochet a Stitch Sampler Cowl?
Are you new to crochet? This stitch sampler cowl is an excellent project to begin your crochet journey! It's designed with beginners in mind, using a straightforward pattern and repetitive stitches that are easy to master. Plus, the design is quite forgiving, so minor mistakes won't even be noticeable.
This cowl provides a wonderful opportunity to learn and improve your basic crochet stitches. You'll practice the four key stitches needed to crochet:
- Single crochet
- Half double crochet
- Double crochet
- Treble crochet
What’s more, this pattern is highly customizable! You can easily adapt it to your preferences. Feel free to vary the stitch repeats, practice specific stitches you want to improve, or even use different yarn colors to create a truly unique piece.
The stitch sampler cowl is not only a great learning tool, but it is also cozy and practical. The finished cowl will keep you warm and snug during the colder months. Plus, don’t worry if your stitches aren’t perfect. Because the cowl will be bundled around your neck, minor imperfections will be hidden from view.

Materials You'll Need
To create your stitch sampler cowl, you'll need a few essential materials. Gathering these before you begin will help your project go smoothly.
- Yarn: Use a worsted weight (4 weight) yarn for the best results. You'll need approximately 100 grams of your chosen yarn. Worsted weight yarn is readily available and comes in a wide array of colors and textures, perfect for customizing your cowl! You could check out some of the yarns I recommend at my shop!
- Crochet Hooks: You'll need a 7mm crochet hook for the main part of the cowl. Optionally, you can use an 8mm (L hook) for the foundation chain to create a looser base. If you don't have an 8mm hook, a 6mm hook will work if you crochet loosely for the chain. If you need a new set of hooks, here is a link to some recommended crochet hooks on Amazon.
- Stitch Markers: Prepare 8 stitch markers to help keep track of your progress. If you don't have stitch markers, paper clips or bobby pins can be used as substitutes. These are essential for marking chain intervals and ensuring accurate stitch counts.
- Contrasting Yarn: Cut a 14-inch piece of contrasting yarn. This will be used to mark the beginning of each round, making it easier to keep track of your work.
- Scissors: A basic pair of craft scissors is needed to cut the yarn.
- Tapestry Needle: A tapestry needle will be helpful for weaving in the ends of the yarn to give your project a professional, clean finish.
Getting Started: Making the Foundation Chain
Let's begin by creating the foundation chain. This is the base upon which your entire cowl will be built, so it's important to get it right.
First, grab your larger hook (either the 8mm or the 6mm, if you're chaining loosely). Now, make a slip knot using any method you prefer. Shrink that knot down and place it onto your hook, ready to start chaining.
To make the foundation chain, you'll be chaining in sets of 10, for a total of 80 chains. This technique makes it much easier to keep track of the total chain length without constantly counting each individual chain.
Chain 10: 1, 2, 3, 4, 5, 6, 7, 8, 9, and 10. I recommend doing a nice relaxed chain. Don't correct your tension or pull on the yarn too tightly.
Now, roll those pretty little "v's" over onto their side. Right underneath the working yarn, you'll see the back loops, or "camel bumps." That's what you're looking for. Go into the very first one, right here, with a stitch marker. Pop a stitch marker in to keep track of your chains.
If you don't have stitch markers, feel free to use a paper clip or a bobby pin. You could also just chain all 80 and skip the stitch markers, if you prefer.
Next, chain another 10: 1, 2, 3...and 10. Roll it onto its side again, find that back loop right underneath the working yarn, and pop another stitch marker in.
Keep going, chaining in sets of 10 and popping in a stitch marker until you have chained 80. If you prefer to count each stitch, you can skip the stitch markers altogether.

Joining the Chain
Once you've used up your eight stitch markers and chained 80, it's time to join the chain to form a ring. This step is crucial for creating the continuous loop of the cowl.
Lay your chain out flat, making sure the "pretty side" (the side with the little "v's") is facing up and the stitch markers are facing down all the way around. It's very important to ensure that there are no twists in the chain. A twist will result in a Möbius strip instead of a nice, even cowl.
Now, switch to your smaller hook (the 7mm). Insert the hook into the first chain you made, ensuring that two strands of the chain are on the top of your hook. This will create a more secure join.
Next, yarn over and pull the yarn through all loops on the hook. This is a slip stitch. Then, chain one to secure the join.
Remember, the goal is to create a flat ring without any twists!
For this pattern, we'll be working into the back loops of the chain. This creates a neat, professional finish on both the top and bottom edges of the cowl.
If working into the back loops is too difficult, you can work into the front loops instead. These are the little "moons" at the bottom of the chain. However, keep in mind that this will create a slightly different visual effect.
To locate the first back loop, flip the chain to the side. You'll be looking for the little "camel bumps" along the back. Find the first camel bump after the chain one.
Round 1: Single Crochet
For the first round, we'll be working a single crochet into each back loop (or camel bump) all the way around. This will create a solid base for the rest of the cowl.
Insert your hook into the first back loop. Yarn over and pull through two loops. That’s a single crochet. Next, single crochet into the next camel bump.
You should see one camel bump, two camel bumps, three… We're going to go into each camel bump, or each back loop, and make one single crochet.
Working into the back loops can be a bit tedious, so it's important to go slowly and carefully.
As you work, check the bottom and top edges of your work. They should have a consistent, matching finish.
Since this step can take some time, feel free to pause the video and work your way around until you get closer to the join.
Joining the Round and Adding the Contrasting Yarn
Now that you're nearing the end of the first round, lay your work flat again, ensuring there are no twists. Make sure you're working into the top of the row and away from the tail.
Grab your contrasting yarn and lay it over the top of your work, near the join. We want to catch it when we make our next stitch, to show us where we started the round.

Round 2: Double Crochet
For the second round, we'll be working one double crochet into each stitch all the way around. This will add height and texture to your cowl.
Yarn over, insert your hook into the next stitch, yarn over, pull through, yarn over, pull through two loops, yarn over, pull through the remaining two loops. That's a double crochet. Don't worry about the small hole at the chain one, we're going to use our tail to sew that shut when we're finished.
Make sure to pick up two strands of the "v" on top of the stitch. To find the next stitch, trace back your yarn to identify the stitch you just worked into. The next stitch is right there.
Pause the video, if you need to, and work one double crochet into each stitch all the way around until you are closer to the starting point.
Subsequent Rounds: Half Double Crochet, Treble Crochet
Once back at the join, flip the contrasting yarn up and over your work. This marks the beginning of the new round. We’re going to use it as our stitch marker.
For this round, we will work one half double crochet into each stitch all the way around. When you get back to where our contrasting yarn is, we can just flip it over, front to back.
As you crochet, the work will naturally slope towards your dominant hand. To keep the cowl going up and down straight, lay it out flat and see the direction it's going. If it wants to go to the right, put in an extra stitch every once in a while.
After the half double crochet, the next stitch I like to do is a treble crochet. This involves wrapping your yarn twice on the fat part of your hook, and then working one treble crochet into each stitch. I will link to a crochet guide to help refresh your memory of how to do these stitches. I will also link the Secret Stitches CAL.
Continuing the Stitch Sampler
To continue the stitch sampler, keep repeating the order of stitches. For example, you could do single crochet, double crochet, half double crochet, treble crochet, and then repeat. This way, you’re using the same stitches, just in a different way.
Of course, you can always change the order of stitches or use different stitches altogether. The goal is to practice the stitches you want to improve and create a unique texture.
Continue working in rounds until the cowl reaches about 12 inches in height. Alternatively, you can work until you have only a small amount of yarn left. Just make sure to always be working into the stitch before moving the yarn on top of it!

Finishing Off: Single Crochet Border
When your cowl is about 12 inches tall, or when you have a little bit of yarn left, it's time to finish off. We want to end on a row of single crochet. It doesn't have to be in the exact order that we did for our cowl, but a single crochet is a nice finished edge, since it doesn't have as much stretch as the other stitches.
So, work one single crochet into each stitch all the way around. When you get back to where the contrasting yarn is, keep single crocheting all the way into the stitch.
Just past my contrasting yarn (where my first single crochet is), I am going to do a slip stitch. A slip stitch is when you put your hook in, grab your yarn, and bring it back, turn your hook, and bring it through. We're going to do that three times. Slip stitch into the next. And one more time, slip stitch into the next. That just tapers down our row.
To secure your work, chain one, and then cut your yarn, leaving a four- or five-inch long tail. Pull your hook up and your yarn through, and snug that down to secure.
Weaving in the Ends
Now that you've finished crocheting the cowl, it's time to weave in the ends. This will give your project a clean and professional finish.
Start by removing the contrasting yarn. Gently pull it out from one side. This should leave a neat join.
Thread the yarn tails onto a tapestry needle. Weave the tails into the back of the stitches to secure them.
Finally, use the bottom tail to sew the hole shut.

Final Thoughts and Call to Action
Congratulations, you've finished your easy crochet cowl! I hope you enjoyed making this project. It’s a perfect way to learn new stitches and create something beautiful and functional.
I encourage you to share your finished cowls! Post photos on social media and tag the Secret Yarnery. I would love to see your projects.
Make sure to subscribe to the Secret Yarnery's channel and visit my website SecretYarnery.com for more patterns, tutorials, and inspiration. I offer a wide variety of crochet patterns, from beginner-friendly projects to more advanced designs. You can also sign up for the Secret Yarnery's Newsletter to stay up-to-date on the latest news, patterns, and tutorials.
Thanks for following along, and I hope you enjoyed this project!
FAQs
1. What skill level is required for this pattern?
This is a beginner-friendly pattern perfect for those new to crochet. It focuses on practicing basic stitches like single crochet, half double crochet, double crochet, and treble crochet.
2. Can I customize the size of the cowl?
Yes! The pattern is easily adjustable. To make the cowl larger or smaller, change the foundation chain length in multiples of 10. You can also increase the height by adding more rows of stitches.
3. What type of yarn should I use?
Use a worsted weight (4 weight) yarn for the best results. Choose any color or texture to personalize your cowl. Approximately 100 grams of yarn is required for the project.
4. What if I don’t have a 7mm or 8mm hook?
If you don’t have an exact crochet hook, you can substitute with a slightly smaller or larger hook, but be mindful that this might affect the size and tension of the cowl.
5. What supplies do I need to complete this project?
- Worsted weight yarn
- 7mm crochet hook (optional 8mm for the foundation chain)
- Stitch markers or substitutes like bobby pins
- Scissors and a tapestry needle for finishing.
6. Will minor mistakes in the stitches affect the cowl’s look?
Not at all! This pattern is forgiving, and minor imperfections will be hidden when the cowl is worn. It’s a great beginner’s project to build confidence.
7. How long does it take to finish?
Most crocheters can finish this cowl in a few hours, depending on their experience and speed. It’s a quick project that’s perfect for a busy weekend.
8. Is there a video tutorial available?
Yes! A full step-by-step video tutorial walks you through the entire process. Watch it here: Video Link.
9. Can I sell the finished product?
Absolutely! You are welcome to sell the finished cowl you create. However, please credit the pattern design to the Secret Yarnery.
10. Where can I get support if I’m stuck?
For assistance, feel free to leave a comment on the video tutorial, visit the Secret Yarnery website, or join their online crochet community for support and tips.
![]()
Christa Patel is the creative mind behind The Secret Yarnery, a beloved online destination for crochet enthusiasts worldwide. Known for her straightforward tutorials and approachable designs, Christa has helped thousands of crafters improve their skills and discover the joy of crochet.
With years of experience and a passion for teaching, Christa specializes in beginner-friendly patterns that are both practical and stylish. Her cheerful, step-by-step teaching style makes her tutorials easy to follow, no matter your skill level. Whether you're picking up your first crochet hook or looking to master new techniques, Christa’s patterns and videos provide all the guidance and encouragement you need.
When she’s not crocheting, you can find Christa exploring vibrant yarn markets, designing new projects, and inspiring a global community of yarn lovers through her website and YouTube channel.
For more patterns, tips, and tutorials, visit her website SecretYarnery.com or subscribe to her YouTube channel The Secret Yarnery. Discover your next favorite crochet project with Christa!
About the Author
With a passion for crafting easy, beginner-friendly tutorials and patterns, Christa inspires crafters of all skill levels to unleash their creativity worldwide. She encourages yarn lovers to connect, create, and crochet a world filled with beautiful handmade treasures!
Easy Crochet Cowl for Beginners | Step-by-Step Stitch Sampler Tutorial