Crochet a Daisy Granny Square 2.0: A Step-by-Step Guide
Dreaming of adding a touch of handmade charm to your home? Or maybe you want to create a unique gift for someone special? Look no further than the daisy granny square! This updated version, inspired by The Secret Yarnery's YouTube tutorial, is a delightful twist on a classic crochet motif. You can use them to create blankets, pillows, bags, and so much more!
This blog post is your comprehensive guide to crocheting your own daisy Granny Square 2.0. I've taken the detailed video tutorial and transformed it into an easy-to-follow written pattern, perfect for crocheters of all skill levels. Whether you're a beginner just learning the basics or an experienced crocheter looking for a fun new project, this guide will walk you through each step of the process.
Gathering Your Supplies
Before we begin, let's gather all the materials you'll need for this project. Having everything on hand will make the process smoother and more enjoyable.
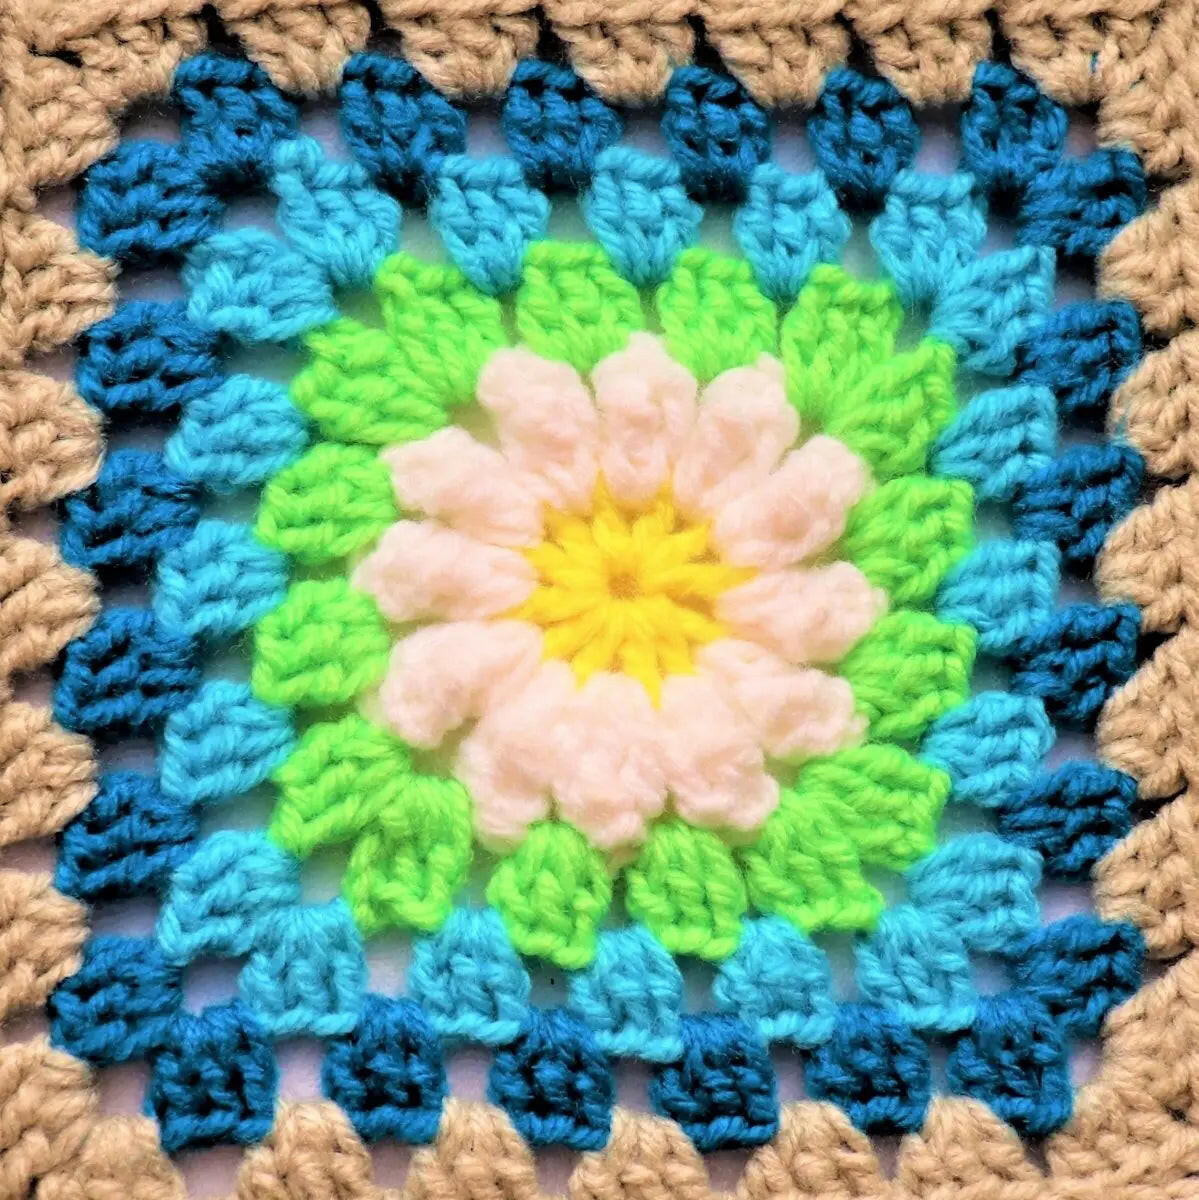
- Yarn in five colors: For my daisy, I used a bright yellow ("daffodil") for the center, white for the petals, a vibrant lime green for the first Granny Square round, and sapphire for the subsequent rounds. Finally, I used a pink. Feel free to choose your own color combinations! Consider traditional white and yellow for a classic look, pastel shades for a soft and delicate feel, or bold contrasting colors for a modern twist.
- 5 mm crochet hook: This is the hook size I used, but you may need to adjust depending on your yarn weight and tension.
- Darning needle: Essential for weaving in those pesky ends!
- Scissors: For snipping yarn.
When choosing your yarn, keep in mind that using similar weights will ensure a consistent look and prevent your Granny Square from becoming warped or uneven. The 5mm crochet hook works well with most medium-weight yarns, but you might want to go up or down a size if your tension is particularly tight or loose.
If you're looking for more crochet must-haves, check out The Secret Yarnery's curated list of essential tools.

Getting Started: The Center
We'll start by creating the center of the daisy using the "daffodil" color or your chosen center color. There are two main methods for starting a Granny Square: the chain method and the magic ring method. I'll explain the chain method in detail, but if you're already familiar with the magic ring, feel free to use that instead.
Chain Method
- Chain 3: Create a slip knot on your hook, then wrap the yarn over your hook and pull it through the loop to create a chain. Repeat this two more times until you have a chain of three.
- Slip stitch to the first chain: Insert your hook into the first chain you made, yarn over, and pull the yarn through both the chain and the loop on your hook. This creates a small ring.
Creating the Double Crochets
- Chain 3: Chain 3 again. This chain 3 will count as your first double crochet.
- Make 11 more double crochets into the center of the ring: Yarn over, insert your hook into the center of the ring, yarn over, pull through (you should have three loops on your hook), yarn over, pull through two loops, yarn over, pull through the remaining two loops. That's one double crochet! Repeat this 11 more times, working into the center of the ring.
- Count your stitches: Make sure you have a total of 12 double crochets, including the chain 3 that counts as your first double crochet.
Joining the Round
- Slip stitch to the top of the chain 3: Insert your hook into the top chain of the initial chain 3, yarn over, and pull through both the chain and the loop on your hook. This joins the round.
- Chain 1 to secure: Chain 1 to secure the stitch.
- Cut the yarn and pull the tail through: Cut your yarn, leaving a short tail, and pull the tail completely through the loop on your hook.
Finishing the Center
- Flip the center over: Flip your work over to the wrong side.
- Cut off the initial tail: You can now cut off the initial tail from the chain 3, as it has been secured by the double crochets.

Crafting the Petals
Now comes the fun part: creating the daisy petals! For this step, I'm using white yarn, but you can choose any color you like.
Choosing Your Petal Color and Joining the Yarn
- Make a slip knot: Create a slip knot on your hook, leaving a long enough tail (at least 3 inches) for weaving in later. Using a longer tail ensures you have enough to work with and don't have to fight it later.
- Describe where to join the new color: Instead of joining in the same spot where you ended the previous round, join in the space before the join. This helps to avoid creating a bulky area where all your joins are concentrated.
- Slip stitch to join: Insert your hook into the chosen space, yarn over, and pull through both the space and the loop on your hook to join.
Creating the First Petal
- Chain 4: Chain 4. This chain 4 will count as your first treble crochet.
- Make 3 treble crochets into the same space: A treble crochet is similar to a double crochet, but with an extra step. Wrap your yarn twice around your hook, insert your hook into the same space, yarn over, pull through (you should have four loops on your hook), yarn over, pull through two loops, yarn over, pull through two loops, yarn over, pull through the remaining two loops. That's one treble crochet! Repeat this two more times, working into the same space.
Forming the "Puff Stitch" Petal
This step is what gives the petals their unique, slightly rounded shape.
- Pull up the loop: Gently pull up the loop on your hook to create some slack. This will make it easier to insert your hook into the next stitch.
- Insert your hook: Insert your hook into the fourth chain from the start (the top of the initial chain 4). You should be able to identify this stitch by looking for the little "v" shape at the top of the chain.
- Place the loop back on your hook: Carefully place the loop that's currently on your hook back onto your hook.
- Tighten it down and pull through: Tighten the loop slightly and then pull it through the chain you just inserted your hook into. This creates a "puff" effect at the top of the petal.
- Chain 2 to secure: Chain 2 to secure the petal and create a space between it and the next petal.
Repeating the Petal Process
- Move to the next space: Move to the next space between double crochets from the previous round.
- Repeat the steps: Repeat the steps for creating the petal (3 treble crochets, puff stitch, chain 2) in each space around the center.
- Maintain consistent tension: As you crochet, try to maintain consistent tension. This will help to ensure that your petals are all the same size and shape.
Weaving in the Tail as You Go
To save yourself some time and effort later, you can weave in the tail from your white yarn as you crochet. Simply hold the tail along the back of your work and crochet over it, encasing it within your stitches. This will secure the tail and prevent it from unraveling.
Joining the Round and Finishing
- After completing all 12 petals: Once you've created all 12 petals, it's time to join the round.
- Slip stitch to join: Slip stitch to join at the top of the first petal (the stitch that connected the treble crochets into the puff stitch).
- Chain 1 to secure: Chain 1 to secure.
- Cut the yarn and pull the tail through: Cut the yarn, leaving a tail long enough to weave in later, and pull the tail completely through the loop on your hook.

Adding the First Round of the Square
Now, it's time to transform our daisy circle into a square! This is where we'll add the first round of the square using our chosen "square" color (in my case, lime green).
Choosing Your "Square" Color and Joining the Yarn
- Make a slip knot: Create a slip knot on your hook, leaving a long enough tail for the darning needle.
- Explain why a darning needle is essential for this step: A darning needle will make it much easier to weave in the ends securely.
- Join in the space before the join: As with the petals, join in the space before the join of the petal round to avoid bulkiness.
- Slip stitch to join: Slip stitch to join.
Creating the First Side
- Chain 3: Chain 3 (counts as a double crochet).
- Make 2 more double crochets: Make 2 more double crochets into the same space (total of 3 double crochets, including the chain 3).
- Chain 1: Chain 1.
Continuing Along the Side
- In the next space: In the next space between petals, make 3 double crochets.
- Chain 1: Chain 1.
- Repeat: Repeat this pattern until you reach the space where you want to create a corner.
Creating the Corner
- In the corner space: In the corner space, make 3 double crochets.
- Chain 3: Chain 3.
- Make 3 more double crochets: Make 3 more double crochets into the same corner space.
- Chain 1: Chain 1.
Completing the Round
Continue the pattern of 3 double crochets and a chain 1 into each space between the petals, creating corners as described above. Remember, the pattern between corners is two shells of three double crochets, with a chain one in-between each shell and on each side.
Joining the Round and Finishing
- Slip stitch to join: Slip stitch to the top of the initial chain 3 to join.
- Chain 1 to secure: Chain 1 to secure.
- Cut the yarn and pull the tail through: Cut the yarn and pull the tail through.
Round Two and Beyond
Ready to keep growing your Granny Square? Now we'll add the next round (and beyond!) using a different color, or you can stick with the same one. I will show you how to continue using the same color in this section.
Choosing Your Next Color and Joining
- Make a slip knot: Make a slip knot, leaving a long enough tail for the darning needle.
- Join in the corner space: Join in the corner space before your last join.
- Slip stitch to join: Slip stitch to join.
Creating the Corner
- Chain 3: Chain 3 (counts as a double crochet).
- Make 2 more double crochets: Make 2 more double crochets into the same corner space.
- Chain 1: Chain 1.
Working Along the Side
- Make 3 double crochets: Make 3 double crochets and a chain 1 into each space along the side.
- Chain 1: Chain 1.
Creating the Corner
- In the corner space: In the corner space, make 3 double crochets.
- Chain 3: Chain 3.
- Make 3 more double crochets: Make 3 more double crochets into the same corner space.
- Chain 1: Chain 1.
Repeat for each round
Repeat the pattern of creating shells of 3 double crochets and corners with a chain 3 in the corner space. You can continue adding rounds until your Granny Square reaches the desired size.
How to Continue with the Same Color
- Chain one: Chain one, yarn over, and insert into the third chain.
- Grab yarn and pull through: Grab yarn and pull through.
- Yarn over and pull through all three: Yarn over and pull through all three for a half double crochet.
- Chain three and continue as normal: Chain three and continue as normal.

Weaving in the Ends
Weaving in the ends is arguably the most tedious part of any crochet project, but it's essential for a clean and durable finish. Don't skip this step!
Using a Darning Needle
- Thread the yarn tail: Thread the yarn tail onto your darning needle.
- Weave the tail: Weave the tail through the back of the stitches, following the same color yarn where possible. Try to weave the tail in different directions to secure it.
- Split the yarn strands: For extra security, you can split the yarn strands in half and weave each half in a different direction.
- Trim the excess: Once you've woven in the tail securely, trim the excess yarn close to the stitches.
Remember the tip from the video about putting the hook in one of the loops? This can help you remember to weave in those pesky tails!
Blocking Your 2.0 Granny Square
Ever wonder how to give your finished crochet project that professional, polished look? The answer is blocking! Blocking is the process of shaping and setting your finished piece, and it can make a huge difference in the overall appearance of your Granny Square. It helps to even out stitches, create crisp edges, and ensure that your square is perfectly square.
There are two main methods for blocking: wet blocking and steam blocking.
Wet Blocking Method
- Dampen the Granny Square: Soak your Granny Square in lukewarm water until it's thoroughly damp. Gently squeeze out any excess water – don't twist or wring it, as this can distort the stitches.
- Pin the Granny Square to a foam board: Lay your damp Granny Square on a foam blocking board (or a towel-covered surface). Gently stretch and shape the square until it's the desired size and shape, then use pins to secure it in place. Make sure to pin the corners and along the edges to create a straight, even border.
- Let dry: Allow the Granny Square to air dry completely. This may take several hours or even overnight, depending on the humidity.
Steam Blocking Method
- Pin the Granny Square to a foam board: Pin your Granny Square to a foam blocking board.
- Use steam from an iron to block: Hold a steam iron a few inches above the Granny Square and gently steam it, being careful not to touch the iron directly to the yarn. The steam will relax the fibers and allow you to shape the square.
Joining Granny Squares
Now that you've created a collection of beautiful daisy Granny Squares, it's time to join them together to create a larger project! There are several different methods for joining Granny Squares, each with its own unique look and feel.
- Slip Stitch Join: This is a simple and straightforward method that creates a flat, almost invisible seam.
- Hold the squares together, right sides facing each other.
- Demonstrate the slip stitch join, working through both loops of each square.
- Single Crochet Join: Similar to the slip stitch join, but using single crochet stitches for a tighter seam.
- Flat Braid Join: A decorative join that creates a braided effect on the right side of the work.
- Invisible Join: Using a darning needle to sew the squares together for a seamless look.
When choosing the best method for your project, consider factors such as the desired look, the weight of the yarn, and the type of project (e.g., blanket, garment).
Project Ideas
Now that you know how to make a daisy Granny Square 2.0, what can you create with it? The possibilities are endless! Here are just a few ideas to get you started:
- Blankets/Afghans
- Pillows
- Bags/Purses
- Cardigans/Sweaters
- Scarves
Don't be afraid to get creative and personalize your projects! Adapt the pattern and colors to create unique items that reflect your own style. Share your finished projects on social media using the hashtag #SecretYarnery! Here's a link to other great patterns.
Conclusion
Congratulations! You've successfully learned how to crochet a daisy Granny Square 2.0. By following these steps, you can create beautiful and unique projects that will be cherished for years to come. Be sure to check out The Secret Yarnery for more great patterns and inspiration. Remember that crochet projects, like the color changing granny square, are a great way to express creativity! I encourage you to try this pattern and share your creations with the crochet community!
FAQs
1. What type of yarn works best for a Daisy Granny Square?
Medium-weight yarn works best for a consistent and even granny square. You can use cotton, acrylic, or blended yarns depending on the project. Make sure all colors are of the same weight to prevent unevenness.
2. Can I use a different hook size?
Yes! You can adjust the hook size if your stitches are too tight or loose. A smaller hook creates tighter stitches, while a larger hook gives a looser look.
3. How do I choose color combinations?
Choose colors that complement each other or match the theme of your intended project. For a classic look, use yellow and white for the daisy. Pastels create a soft effect, while bold colors stand out for modern designs.
4. What is blocking, and is it necessary?
Blocking helps shape the granny square and even out your stitches, giving it a polished finish. While it's optional, it is recommended for professional-looking results.
5. How do I change yarn colors seamlessly?
To change colors, finish your last stitch with the new color by pulling it through the final loop on your hook. Secure with a knot or start crocheting with the new yarn, then weave in the ends for a clean finish.
6. Can beginners make these daisy granny squares?
Yes! This guide is beginner-friendly and includes clear instructions for each step. Starting with one square is a great way to practice!
7. What projects can I create with Daisy Granny Squares?
You can make blankets, pillows, tote bags, scarves, sweaters, table runners, and more! Get creative and try different layouts.
8. How long does it take to make one Daisy Granny Square?
It depends on your experience and speed. For most crocheters, one square can take 20-40 minutes.
9. How do I prevent my square from becoming uneven?
Ensure your tension is consistent throughout the stitching process. Using yarns of the same weight also helps maintain the balance and shape.
10. What’s the best joining method for Daisy Granny Squares?
The joining method depends on your project. Slip-stitch joins provide a nearly invisible seam, while flat braid or single-crochet joins add decorative texture.
![]()
Christa Patel is a passionate crochet enthusiast, blogger, and teacher with years of experience in crafting beautiful handmade creations. Inspired by her love for yarn and creativity, she enjoys sharing easy-to-follow patterns, step-by-step tutorials, and tips with the crochet community. Christa’s mission is to make crochet accessible for everyone — from beginners learning their first stitches to seasoned crafters seeking fresh inspiration.
Her expertise lies in simplifying complex patterns so anyone can create stunning projects, like granny squares, cozy blankets, and stylish accessories. Christa also believes in the therapeutic power of crochet and encourages readers to explore it as a creative and calming hobby.
When she’s not crocheting, Christa loves connecting with fellow makers and supporting the growing crochet community. Follow her journey for more patterns, creative ideas, and crochet tips!
About the Author
With a passion for crafting easy, beginner-friendly tutorials and patterns, Christa inspires crafters of all skill levels to unleash their creativity worldwide. She encourages yarn lovers to connect, create, and crochet a world filled with beautiful handmade treasures!
Crochet a Daisy Granny Square 2.0: A Step-by-Step Guide