How to Crochet the Tulip Stitch: A Step-by-Step Tutorial for Beginners
The crochet tulip stitch has quickly become one of my favorite patterns for adding texture, color, and charm to any project. Whether you're working on a spring throw, a cheerful cushion, or just want to master a unique stitch to add to your repertoire, the tulip stitch will not disappoint. In this comprehensive guide, I’ll break down each step with easy instructions, tips, and helpful details so you can confidently crochet your own field of blooming tulips.
Materials Needed for Crocheting the Tulip Stitch
Before you start, make sure you have everything on hand to keep your crochet session smooth and enjoyable. Here’s what you’ll need:
- Yarn: Choose three colors: one for the base, one for the leaves, one for the tulip flowers.
- Crochet Hook: Use a size appropriate for your yarn (I use a 5 mm hook, but check your yarn’s label or gauge preference).
- Scissors: Sharp enough for clean cuts.
- Darning Needle: For weaving in those yarn tails at the end.
Tip: When picking colors, use a neutral or soft shade for the base, a green for the leaf row, and a bright or contrasting color for your tulips. For best results, plan color changes before you start crocheting.
Decide how much space you want between your tulip rows. You’ll space the base rows in multiples of two (for example, two, four, or six rows of single crochet between tulip rows).

Preparing Your Yarn and Workspace
Organization makes a big difference, especially when using multiple colors. I always cake my yarn to avoid tangles and make sure each color is readily accessible. Arrange all your yarn cakes together before you start. Keep your workspace clutter-free and comfortable, ideally at a table or with a lap tray for support.
Keep yarn tails tidy by tucking them next to your work or under your ball. Tidiness will save time and reduce frustration as you switch colors.
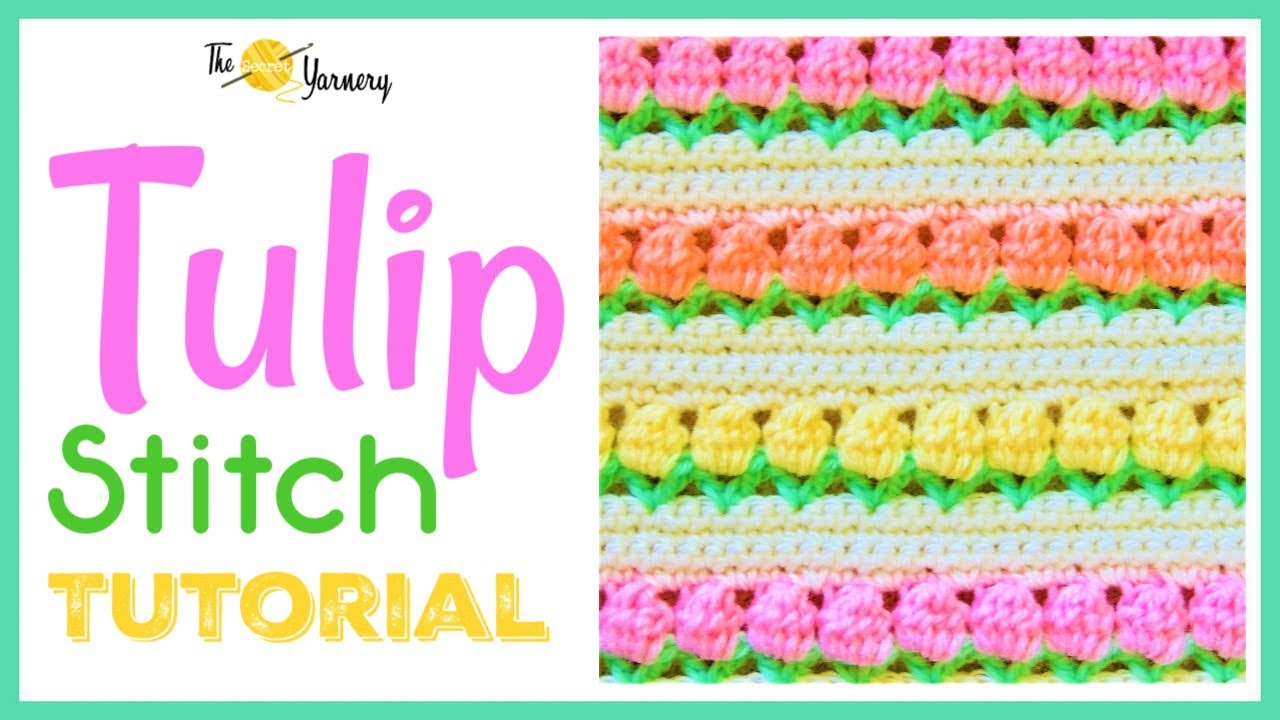
Understanding the Tulip Stitch Design
The beauty of the tulip stitch is the way it mimics rows of blossoming tulips, framed by leafy greens and a solid base. Each repeat consists of:
- A base color band (single crochet rows)
- A leaf row (easy V-stitches in a contrasting color)
- A tulip flower row (clusters created from double crochets, bunched to form the tulip shape)
Spacing the tulip rows with even numbers of base rows keeps the flowers aligned and facing the same direction. This approach works great for pillow fronts, throws, scarves, and more.
If you’re interested in taking tulip stitch ideas further, check out my tips on making an Amazing Tulip Stitch Blanket with Shell Border.

Starting the Foundation Chain
Here’s how to start your crochet tulip stitch project on the right foot:
- Chain in multiples of three. This keeps your tulip and leaf stitches in line.
- Chain loosely. Too-tight chains make later rows tough to work into. If your foundation is always tight, consider using a hook half or one size larger just for the starting chain.
- Measure the length by counting. Decide the final width of your item and chain to that length, always counting in groups of three.
- Leave a 5-inch tail. You’ll need this when weaving in your ends for a neat finish.
Foundation Chain Tips:
- Multiples of 3 chains = correct stitch alignment
- Loose chains = easier first row
- Larger hook = better results if you tend to crochet tightly
Working the First Row of Single Crochet Into the Foundation Chain
Start your first row by skipping the very first chain and working your first single crochet into the next (second) chain from your hook. This preserves the correct stitch count.
- Go into either the “V” of the chain or the back “camel bump.” For items where the edge shows, the camel bump creates a neat edge, but it’s not required for joined pieces like pillows.
- Insert your hook, yarn over, pull through, yarn over again, and pull through both loops—this forms a single crochet stitch.
- Pick whichever loop (top one or both) you want for your hook placement, but stay consistent throughout the row.
- Single crochet into each chain across the row.
Note: If your work starts to curl up like a spiral, don’t worry—this is normal with single crochet foundation rows. The curl will relax as you finish more rows.

Completing the First Row of Single Crochet
Continue single crocheting across the chain until only the last stitch remains. Be careful not to skip the final stitch, as that can throw off your stitch count. Once at the end, you’re ready to turn your work for the next row.
Turning and Starting the Second Row of Single Crochet
At the end of the row, chain one to bring your hook to the correct height for the next row, then turn your work. Place one single crochet into each stitch across.
For your base color band, complete at least two rows of single crochet before moving on. Keeping these bands an even number (multiples of two) ensures the tulips always face the right way and avoids a lopsided border when you eventually join or edge your piece.
Maintain stitch count by checking that you finish with the same number of stitches as you started, and always crochet into both loops at the edge for a straight border.
Finishing the Base Color Rows and Changing Yarn
Once your base rows are complete, cut your yarn, leaving a tail to weave in. Gently remove your hook. Attach the next color (for the leaves) by placing a loop of the new yarn on your hook, then drawing it through the last stitch. For added security, pull a bit of the old (base) color through as well.
Hold both yarn tails down along the row as you start the next stitches. This helps keep your work tidy and weaves the ends in as you go.
Creating the Leaf Rows: Chain 3 and V-Stitch Introduction
Begin your first green (leaf) row.
- Chain 3—this counts as your first double crochet.
- Skip the first stitch, then make a V-stitch into the next. A V-stitch is: double crochet, chain 1, and another double crochet into the same stitch.
- Skip two stitches. Make the next V-stitch in the third stitch.
- Repeat V-stitches across the row, always skipping two stitches between each.
If you get to the end and don’t have an extra stitch left, simply frog (unravel) a bit and adjust your spacing, occasionally skipping just one stitch to get back on track. It’s ok to fudge a little at the edge as long as the overall pattern stays in sync.
V-Stitch Step-by-Step:
- Double crochet, chain 1, double crochet all in the same stitch
- Skip two, repeat
Finishing the Leaf Row and Preparing for Tulips
Complete the leaf row with a single double crochet into the very last stitch. This gives you something to crochet into on the next band without pulling the edge out of shape.
Cut your yarn and join the tulip (flower) color using the same attach-and-pull-through method as before. Chain two after joining—this acts as a buffer along the edge and creates a spot to stitch into when you add a border later.

Crocheting the Tulip Clusters: Five Double Crochet Clusters
The tulip flowers really come to life in this row. Work into the center space (the “V”) of each V-stitch from the previous row.
- Wrap yarn, insert hook into V space, and pull up a loop.
- Work the first double crochet only halfway—leave the last step undone.
- Repeat until you have five unfinished double crochets (each leaving the last loop on the hook).
- You’ll have six loops on the hook now. Yarn over and pull through all six at once—this closes the tulip at the top.
- Chain two to get to the next V-stitch, then repeat.
If you want flatter tulips, use clusters of three double crochets instead of five. I like mine puffy, so I stick with five, carefully pulling my hook up after each to keep loops even.
Finish the row by single crocheting into the top of the starting chain (not the space, but into an actual chain stitch). This creates a tidy, straight edge.
Looking for more tulip projects? Try this Crochet Tulip Pillow Free Pattern and Video Tutorial for a twist on the basic tulip stitch.
Returning to Base Color After Tulip Clusters
Snip your tulip yarn and reattach your base color as before. Place a loop of the new yarn on your hook, insert into the last stitch, and draw the new color through. Hold your yarn tails along the row and crochet over them as you move forward—this keeps everything neat and helps secure those color changes.
Chain one and turn your work.
Single Crocheting Over Tulips and Chain Spaces
With your base color on, work the next row of single crochet.
- In the chain-two spaces between tulip clusters, place two single crochets.
- For the top of each tulip cluster, insert your hook into the big loop at the top and place one single crochet.
The rhythm is: two single crochets in each gap, one single crochet on every tulip cluster, all the way across. This neat stacking keeps your pattern even and prepares for either another set of base rows or a border.
Tip: Keep yarn tails on top of the row for the first stitch or two, crocheting over them to hide and secure them along the way. If a tail pulls tight, gently tug it to straighten everything out before continuing.
For creative border ideas, take a look at crochet borders for blankets guide to find a complementary finish for your project.
Continuing with Base Rows Between Tulip Patterns
You can add more rows of single crochet in your base color before the next tulip section. Always work an even number of base rows—two minimum, or more for extra space between the flower rows. This flexibility lets you control how dense or spread out your tulip motif appears.
If you’re making a cushion or blanket, experiment with different numbers of base rows to see what look you prefer.

Repeating Leaf Rows and Tulip Clusters for Pattern Continuity
Once your base rows are finished, rejoin your leaf color (green) and repeat the leaf V-stitch row, just as before.
Pay special attention to your stitch count and edge placement as you work for a perfectly aligned pattern. The first few repeats may feel slow, but with practice, your fingers will fly, and your tulips will pop just right.
Want even more tulip stitch inspiration? See this Tulip Stitch crochet blanket tutorial to explore a blanket version using this pattern.
Joining Yarn Colors and Securing Tails Explained
Switching yarn colors can feel daunting at first, but here’s a simple, knot-free way to get clean, secure joins:
- Insert your hook into the stitch where the new color will start.
- Place the new color loop on your hook and pull it through.
- Pull the last bit of the old color snug, then crochet over both tails for several stitches to hide and secure them.
- Always leave 4-5 inches of tail for weaving in after you finish your piece.
Color Joining FAQ:
- Can I tie knots? You can, but sewing in tails creates a smoother finish with less bulk.
- Should I crochet over tails? Yes! Whenever you can, this keeps things tidy and cuts down on finishing time.
- What if I miss a tail? Use your darning needle to weave it in at the very end.
Troubleshooting Common Challenges
Every pattern has its quirks. Here’s how I tackle common tulip stitch issues:
- Curling foundation rows: The single crochet start often curls up. This is normal and flattens out with added rows or a good blocking.
- Tight chains or stitches: Chain loosely, or swap to a larger hook for the foundation chain if needed.
- Edge wobble or gapping: Always count your stitches at row ends. If you lose count, pull back a few stitches and check your work. Small errors in the V-stitch row can throw off the entire tulip row.
- Yarn tail tangles: Keep only the yarn you’re working with in your hand, leaving tails out of the way until you reach a row where you can crochet over them.
- Uneven puffiness in tulips: If your finished tulips are tight or lumpy, try pulling the hook upward after each cluster stitch so each loop is even and the cluster closes neatly.
Looking for another perspective? Try this Tulip Stitch Crochet Tutorial for a step-by-step breakdown and extra visuals.
Optional Variations: Customizing Your Tulip Stitch
The crochet tulip stitch is endlessly flexible for creative expression.
- Alternate tulip colors for stripes or rainbow effects. I like to use coral and watermelon shades together as in the tutorial, but any colors work.
- Adjust the cluster size (use three instead of five double crochets) for a flatter flower if you prefer a subtle texture.
- Change up the space between tulip rows by adding extra single crochet rows—closer rows mean tighter tulip patterns, wider spacing creates a field-of-flowers look.
- Try with different yarn weights and hook sizes for bigger or smaller tulip motifs.
You can also explore adorable no-sew options like this No-Sew Tulip Pillow Free Crochet Pattern for extra inspiration.

Finishing Off and Preparing for Edging or Assembly
When satisfied with the size or length of your piece:
- Cut your yarn, pull the tail through the last loop, and tug gently to secure.
- Use your darning needle to weave in all the loose ends from your color changes, working back and forth for a secure, invisible finish.
- For a professional look, block your completed work by wetting and pinning it to flatten curls and pop the tulip stitches.
- If you’re making a cushion cover or blanket, use the tidy single-crochet edges to join panels or add a decorative border.
Share your projects on social media with the tag @ThimblesOfHope so I can see what you’re making!
Helpful Tips and Final Advice
- Always use a consistent hook size unless your foundation chain is particularly tight—then use a larger hook just for that portion.
- Count diligently, especially on the foundation (multiples of three) and in the base rows (multiples of two), to keep your stitches lining up.
- Keep tails organized as you move from color to color, crocheting over them whenever possible.
- Practice the tulip cluster on scrap yarn until you’re comfortable with the technique.
- Be patient—it’s normal for your first few rows to feel slow until you get the rhythm.
- Subscribe to crochet channels and check out additional video tutorials like Crochet Tulip Stitch – How to Crochet to see other stitch variations and tips.
For more ways to use this stitch or to find new project ideas, see the Tulip Stitch Blanket with Cute Shell Border product.
The crochet tulip stitch is a bright, playful way to personalize gifts or home accessories. Watch your garden grow—one row at a time—and have fun making something uniquely yours. Stay hooked!
FAQs
What is the crochet tulip stitch?
The tulip stitch is a textured, two-row repeat that uses V-stitches for leaves and double crochet clusters for flowers. It creates rows that look like tulips.
What is the stitch multiple for the tulip stitch?
Chain a multiple of 3 for the foundation. Work base rows in even numbers, like 2, 4, or 6 rows, between tulip sections.
What yarn is best for the tulip stitch?
Worsted weight acrylic or cotton blends work great. Choose three colors: base, green for leaves, and a bright flower color. Smooth yarn shows the texture best.
What hook size should I use?
Use the hook on your yarn label. Many people like 5 mm with worsted weight. If your foundation is tight, go up a half or full size for the chain only.
How do I keep my edges straight?
Count at the end of each row. Always place the last stitch in the final “V” or chain-top. For the leaf row, finish with one double crochet in the last stitch to keep the edge tidy.
My starting row curls. Is that normal?
Yes. Single crochet foundations can curl. It relaxes as you add rows or after blocking.
How do I do the leaf row?
Use V-stitches: double crochet, chain 1, double crochet in the same stitch. Skip two stitches between Vs across the row.
![]()
Christa Patel is a crochet designer, teacher, and the maker behind Secret Yarnery. She shares easy, colorful patterns and step-by-step tutorials that help beginners feel confident fast. Her focus is simple stitches, smart color choices, and practical tips you can use right away.
When she isn’t filming tutorials or writing guides, Christa is testing yarn, sketching new ideas, and answering reader questions. Her favorite projects are textured blankets, cozy pillows, and quick gifts that use up stash yarn.
About the Author
With a passion for crafting easy, beginner-friendly tutorials and patterns, Christa inspires crafters of all skill levels to unleash their creativity worldwide. She encourages yarn lovers to connect, create, and crochet a world filled with beautiful handmade treasures!
How to Crochet the Tulip Stitch: A Step-by-Step Tutorial for Beginners