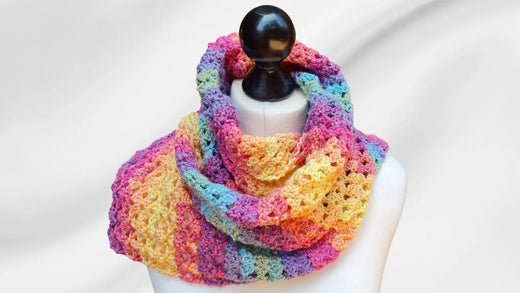
The Best Easy Crochet Scarf: A Step-by-Step Guide to the Dirty Granny Scarf
Are you looking for an easy crochet project that's both beautiful and satisfying? The Dirty Granny Scarf is perfect for beginners and experienced crocheters alike. Its simple one-row repeat makes it incredibly easy to memorize, and the result is a gorgeous, textured scarf you'll be proud to wear or give as a gift. It's the ideal project if you're looking for easy crochet, a beautiful crochet scarf, or projects for beginners. Let's grab our hooks and dive into this fun pattern! If you prefer to follow along with a video, Christa has a great one you can watch.
Table of contents
Materials You'll Need
Before we get started, let's gather the materials you'll need for this project. Having everything ready will make the process smoother and more enjoyable.
-
Yarn: I recommend using Ice Yarns Magic Glitz for a touch of sparkle. If you prefer a non-glitter option, Magic Light is the same yarn without the glitter. Of course, you can use any yarn you like, just be sure to adjust your hook size accordingly based on the yarn label. You can find a great selection of yarn at Secret Yarnery's yarn selection.
- For the larger scarf, you'll need approximately 150 grams (5.3 ounces) or 540 meters (591 yards).
- For a smaller scarf, 100 grams (3.5 ounces) or 360 meters (394 yards) will be sufficient.
-
Crochet Hooks: A 4.5 mm crochet hook is ideal for this project, but you should always use the size recommended on your yarn label. I also use a larger, 5.5 mm hook for the starting chain to keep it nice and loose. If you need a new set, check out these recommended crochet hooks.
-
Other Supplies:
- You'll need five stitch markers if you're making the larger scarf, or four for the smaller one. These stitch markers will help you keep track of your stitches.
- A needle for weaving in the ends.
- A pair of scissors.

Gauge and Finished Size
The finished size of your scarf will depend on how much yarn you use and how many chains you start with. Here are the approximate measurements:
-
Larger Scarf:
- Finished measurements: 42 inches by 8.5 inches (183 cm by 22 cm).
- Start with a chain of 40.
-
Smaller Scarf:
- Finished measurements: 54 inches by 6.5 inches (137 cm by 16 cm).
- Start with a chain of 32.
If you want to customize the size of your scarf, you can easily adjust the length by adding or removing rows. To adjust the width, add or remove chains in sets of eight. This is important to maintain the pattern.
Getting Started: Making the Initial Chain
Now for the fun part! Let's start by making the initial chain.
-
Creating a Slip Knot: Make a slip knot using your preferred method. This is the first loop that goes on your hook. Shrink it down so it sits nicely on the hook.
-
Using the Larger Hook: Place the slip knot onto your larger crochet hook (the 5.5 mm hook). Using a larger hook for the foundation chain helps to keep the edge flexible, which is important so it does not constrict when you're working on the rest of the project.
-
Chaining Sets of Eight: Chain in sets of eight. This will form the basis of your pattern.
- For the larger scarf, chain a total of 40.
- For the smaller scarf, chain a total of 32.
-
Identifying the Back Loops (Camel Bumps): Once you've chained the required number of stitches, gently roll the chain to the side. You'll see small bumps on the back of the chain. These are called back loops or camel bumps. This is crucial for a professional-looking edge!
-
Placing Stitch Markers: Place stitch markers in every multiple of eight chains. So, if you chained 40 (as in the instructions) you'll place stitch markers at the back loop of chains 8, 16, 24, 32, and 40.
- The first one goes in the back loop right underneath the working yarn.
- Place the others in every set of 8 after that.
Stitch markers help you keep track of your stitches and ensure that your pattern remains consistent.

Row 1: The Foundation Row
With your initial chain complete, it's time to start the first row, which establishes the pattern for the entire scarf.
- Switching Hooks: Remove the loop from your 5.5mm hook, and switch to your smaller hook (4.5 mm or the size recommended on your yarn label). Put the loop back on the hook.
- Chain One: Chain one stitch. This does not count as a stitch, and is just there to get you to the right height.
- Working into the Sixth Chain: Count back six chains from your hook. Look for the back loop. If working into the back loops is too difficult, you can work into the front loops instead.
- Creating the First "Glass": Into the sixth chain from your hook, make two double crochets, chain two, and then make two more double crochets into the same chain. This creates the first "glass" of the pattern. Think of it as the shape of the bottom of a glass, where you'll be putting the stem.
- Skipping Three Chains: Skip the next three chains, counting the back loops.
- Creating the First "Olive": In the fourth chain, which is where your stitch marker is, make five double crochets. This creates the first "olive". Five double crochets next to each other looks a little like an olive.
- Alternating Glasses and Olives: Continue alternating "glasses" and "olives" across the row. Remember, a "glass" is two double crochets, chain two, two double crochets all in the same stitch, and an "olive" is five double crochets all in the same stitch. You can remove stitch markers if they get in the way. They're just there to help you keep track of your chain, as you are first starting out.
- Repeating the Pattern: Continue working this pattern until you reach the end of your chain.
- Finishing the Row: Finish the row by making one double crochet into the very last chain, right on top of the knot.
- Checking the Width: At this point, check the width of your scarf. If you want it wider, go back and add eight more chains. If you want it more narrow, remove eight chains. Always adjust in sets of eight to maintain the pattern.
Row 2: Establishing the Repeat
Row 2 solidifies the pattern and sets you up for easy crocheting ahead!
- Chain Three and Turn: Chain three, then slide your hand under your working yarn, grab your work, and turn it. This positions you to work back across the row.
- Maintaining the Pattern: This row is all about maintaining the established pattern: work a "glass" into a "glass," and an "olive" into an "olive." Remember, the "glasses" are the spaces created by the two double crochets, chain two, and two double crochets from the previous row. The "olives" are the five double crochets.
- Working into the First Glass: In the space of the first "glass" from the row below, make two double crochets, chain two, and two more double crochets.
- Finding the Center Stitch of the Olive: To work an "olive," you need to find the center stitch of the "olive" from the previous row. This is the third double crochet of the five. Make sure you get two strands of the stitch on your hook.
- Working into the Center Stitch of the Olive: Into that center stitch, make five double crochets.
- Continuing the Pattern: Continue alternating "glasses" and "olives" across the row, just as you did in Row 1.
- Finishing the Row: Finish the row with one double crochet into the top of the chain three from the beginning of the previous row. This is important for creating a straight edge.

Row 3 and Beyond: The Repeat Row
Now you've got the hang of it! Row 3 and all subsequent rows simply repeat the pattern established in Row 2. This is what makes this scarf such an easy crochet project.
- Recap of Row 3: Chain three, turn your work. Work a "glass" into a "glass" and an "olive" into an "olive" all the way along. Remember to always start and finish with a "glass".
- Working into the First Glass (Again): Make a "glass" into the first "glass" space. That is, two double crochets, chain 2, two double crochets all in the same space.
- Working into the Olive (Again): Work five double crochets into the center stitch of the "olive."
- Repeating the Pattern: Work glass into glass and olive into olive along the whole row.
- Finishing the Row (Again): Finish the row with one double crochet into the top of the chain three.
- Continuing Until Desired Length: Keep working rows until the scarf reaches the length you want, or you run out of yarn!
If you're looking for more simple projects, check out these crochet patterns that'll build your skills quickly!
Creating the Border
To give your scarf a clean, finished edge, add a border row of single crochet stitches and chains.
- Finishing Row: Chain one and turn your work.
- Creating Single Crochet: Make one single crochet right into the very first stitch. Chain two, and remember to chain loosely for this row.
- Working into the First Glass: Into the center of your first "glass," make one single crochet.
- Working into the Olive: Chain three loosely, then make one single crochet into the center stitch of the "olive."
- Continuing the Pattern: Alternate single crochet in the "glasses," and chain three, single crochet in the "olives" all the way to the end of the row.
- Finishing the Row (Again): After your last single crochet into the glass, chain two. Work one single crochet into the top of the chain three from the previous row.
- Cutting the Yarn: Chain one to secure the yarn, then cut your yarn, leaving a long enough tail to sew in with a needle later.
Finishing Touches
You're almost there! Just a few more steps to complete your easy crochet scarf.
- Securing the Yarn: Pull your hook up and your yarn through, then snug the knot down to secure it.
- Weaving in the Ends: Use a needle to weave in all the loose ends. This will prevent them from unraveling and give your scarf a professional look. Weave in the ends by threading the yarn tail through several stitches, changing direction to secure it.
- Final Result: Congratulations! You've finished your Dirty Granny Scarf!
Sharing Your Project
I'd love to see your finished scarves! Share them on social media and tag me on Instagram and Facebook. You can find me at (Find link) and (Find link). Use the hashtags #SecretYarnery, #EasyCrochet, #DirtyGrannyScarf.
Subscribe and Stay Connected
Don't forget to subscribe to my YouTube channel, Secret Yarnery for more crochet tutorials! Hit the bell icon to receive notifications about new videos so you never miss out! Subscribe to Secret Yarnery.
Additional Resources from Secret Yarnery
Here are some helpful links to help you with this project.
- Free Pattern: https://bit.ly/3YYfHLt
- Written Pattern (More Detailed): https://bit.ly/3HyCaov
- Left-Handed Tutorial: https://youtu.be/CCVLkrTOpOA or https://bit.ly/3UWNmoJ
- Behind the Scenes: https://bit.ly/3V104kL
- Newsletter: https://bit.ly/3ssa0tn
Support the Secret Yarnery
If you enjoy my tutorials and want to support my work, you can:
- Buy Me a Coffee: https://ko-fi.com/secretyarnery
- Join the Community: https://bit.ly/44UC1bH
Explore More Crochet Projects
Check out the other crochet patterns on my website and find your next project.
Crochet Must-Haves List
Here are some tools that'll come in handy as you build your skills:
- Bags - Yarn Ball Storage: https://amzn.to/36cbr3A - Keep your yarn organized and tangle-free.
- Bags - Large UFO Zipper Pouches: https://amzn.to/3uqgQ0n - Perfect for storing unfinished projects.
- Bags - Regular UFO Zipper Pouches: https://amzn.to/3DYxvLB - Ideal for smaller works in progress.
- Ball Winder: https://amzn.to/3Jzd4Y0 - Makes winding yarn a breeze.
- Baskets - WIPS: https://amzn.to/3tQK9te - Keep your works in progress tidy.
- Color Wheel: https://amzn.to/3hJN3IG - Helps you choose the perfect color combinations.
- Crochet Hooks: https://amzn.to/2p5etkC - A good set of hooks is essential.
- Foot Warmer: https://amzn.to/3RaMtn0 - Keep your feet warm while you crochet.
- Measuring Tape: https://amzn.to/3JviyD8 - Accurate measurements are key.
- Neck Light: https://amzn.to/2UYNrW4 - Provides extra light for detailed work.
- Needle Threaders: https://amzn.to/3zdCK7S - Makes threading needles easier.
- Needles - Blunt Tip: https://amzn.to/2MRffKP - For weaving in ends without splitting the yarn.
- Needles - Sharp Tip: https://amzn.to/3Rdq2ja - For sewing pieces together.
- Scissors: https://amzn.to/3EC1CHy - A sharp pair of scissors is a must.
- Stitch Markers: https://amzn.to/3GdGCYg - Essential for keeping track of stitches.
- Tea - Kericho Gold: https://amzn.to/3zrTcB8 - Enjoy a cup of tea while you crochet.
- Tins - Accessories: https://amzn.to/3EN6nxT - Keep your small accessories organized.
As an Amazon Associate, I earn from qualifying purchases.
Understanding "Glasses" and "Olives": A Visual Guide
To help you visualize the pattern, let's break down what I mean by "glasses" and "olives."
- What are Glasses? "Glasses" refer to the stitch pattern consisting of two double crochets, a chain two, and two more double crochets, all worked into the same space.
- What are Olives? "Olives" refer to the stitch pattern consisting of five double crochets worked into the same stitch.
- Why These Names? I call them "glasses" because the stitch pattern looks like the bottom of a glass, and the "olives" because they look like little olives clustered together.
Tips for Choosing Your Yarn
Choosing the right yarn can make all the difference in your project. Here are a few tips to help you select the perfect yarn for your Dirty Granny Scarf.
- Fiber Content: Consider different fiber options like wool, acrylic, cotton, or blends. Wool is warm and has a lovely texture. Acrylic is budget-friendly and easy to care for. Cotton is great for warmer weather. I suggest a 100% Wool, or an Acrylic Blend for this project.
- Yarn Weight: Pay attention to the yarn weight. This affects the thickness and drape of your scarf. Use the hook size recommended for your chosen yarn weight.
- Color Choice: Think about the colors you love to wear and choose colors that complement each other. A color wheel can be a helpful tool.
Troubleshooting Common Crochet Mistakes
Even experienced crocheters make mistakes! Here are a few common issues and how to fix them:
- Uneven Edges: Maintain even edges by consistently working the last stitch into the top of the chain three.
- Incorrect Stitch Count: Count your stitches at the end of each row to make sure you have the right number. Use stitch markers to mark the beginning and end of rows.
- Tight or Loose Tension: Try to keep your tension consistent throughout the project. Practice on a swatch to get a feel for the yarn and hook.
- Yarn Splitting: Avoid splitting the yarn by using the correct hook and being mindful of the yarn's ply.
Customizing Your Dirty Granny Scarf
One of the best things about crochet is the ability to customize projects. Here's how you can make your Dirty Granny Scarf unique:
- Width Adjustments: To change the width, add or remove chains in sets of eight.
- Length Adjustments: Adjust the length by working more or fewer rows.
- Color Variations: Use different colors for each row or section to create a striped or color-blocked effect.
- Adding Fringe or Tassels: Add fringe or tassels to the ends of the scarf for a fun, decorative touch. You can check out youtube for tutorials on how to add fringe to a crochet project.
The Benefits of Crochet
Crochet is more than just a hobby; it has many benefits for your mind and body!
- Stress Relief: Crochet is a relaxing and meditative activity that can help reduce stress and anxiety.
- Creativity and Self-Expression: Crochet lets you express your creativity and make unique, handmade items.
- Improved Dexterity and Cognitive Function: Crochet can improve your dexterity and cognitive function.
- Sense of Accomplishment: There's a great feeling of satisfaction in completing a crochet project.

How to Read a Crochet Pattern
Understanding how to read a crochet pattern is key to expanding your skills.
- Understanding Abbreviations: Learn common abbreviations like sc (single crochet), dc (double crochet), ch (chain), sl st (slip stitch), etc.
- Interpreting Instructions: Pay attention to the structure of the pattern and follow the instructions carefully.
- Gauge Swatch: Always make a gauge swatch to make sure your finished project will be the correct size.
- Pattern Support: If you need help understanding a pattern, ask for help!
With its simple repeat and beautiful texture, the Dirty Granny Scarf is a fantastic project for crocheters of all skill levels. Dive in, have fun, and create something cozy and stylish.
Left Handed?
FAQ
Q: What yarn works best for this pattern?
A: The pattern works beautifully with a wide variety of yarns. We recommend Ice Yarns Magic Glitz for a touch of sparkle or Magic Light for a non-glitter option. You can also use any yarn you prefer, just ensure you adjust your hook size accordingly.
Q: Can I customize the size of the scarf?
A: Absolutely! You can customize the width by adjusting the starting chain in multiples of 8 and the length by adding or reducing rows. Detailed instructions for sizing are included in the pattern.
Q: What tools and materials do I need?
A: You’ll need yarn (approx. 100-150 grams), a 4.5 mm crochet hook, a 5.5 mm hook for the starting chain, stitch markers, scissors, and a needle for weaving in ends.
Q: How long does it take to complete this project?
A: The Dirty Granny Scarf is a quick project that most beginners can finish within a few evenings. The repeatable pattern makes it simple to crochet while relaxing.
![]()
Christa Patel is the creative mind behind the Secret Yarnery, a trusted resource for crochet enthusiasts worldwide. With years of experience, Christa specializes in designing beginner-friendly yet stunning crochet patterns that inspire creativity and confidence in crafters of all skill levels.
As a passionate crocheter, Christa is known for her clear and approachable teaching style, breaking down complex patterns into simple, easy-to-follow steps. Through her engaging video tutorials, written patterns, and helpful tips, she has cultivated a community where crocheters can connect, learn, and share their work.
Christa’s dedication to making crochet fun and accessible shines in every project she creates, from colorful blankets to intricate borders. Whether you’re a seasoned expert or just picking up a hook for the first time, Christa's guidance will help you craft something beautiful.
For more crochet patterns, tips, and inspiration, visit her website at The Secret Yarnery, or check out her YouTube channel filled with step-by-step tutorials.
About the Author
With a passion for crafting easy, beginner-friendly tutorials and patterns, Christa inspires crafters of all skill levels to unleash their creativity worldwide. She encourages yarn lovers to connect, create, and crochet a world filled with beautiful handmade treasures!
Easy Dirty Granny Crochet Scarf Pattern- Perfect for Beginners!