Drunken Granny Easy Crochet Scarf Pattern: Quick & Simple!
|
Time to read 8 min
Product added to cart
|
Time to read 8 min
If you're looking for a crochet scarf that’s quick, easy, and beautiful, the Drunken Granny Easy Crochet Scarf might just be your new go-to project. It’s perfect for beginners, can be done in just one day, and requires only basic crochet stitches. Let's dive right in and get started on this fantastic project!
Table of contents
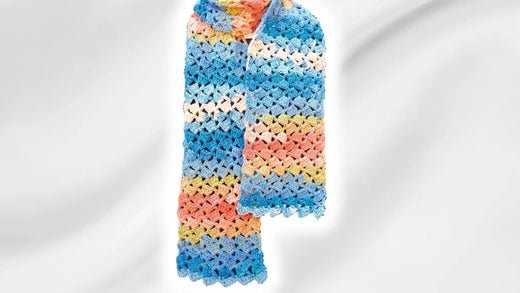
The Drunken Granny Easy Crochet Scarf is a stunning yet simple design ideal for beginners or seasoned crocheters who want a quick project without complicated patterns. The entire scarf is made using only double crochet stitches, ensuring it works up quickly and smoothly.
The scarf repeats a one-row pattern, making it super easy to memorize and perfect for crocheting while watching TV or even during long trips. The project is also excellent for last-minute gifts or for selling at craft fairs!
This scarf adds an elegant border on both ends that effortlessly gives your project a polished look. Plus, it only requires one ball of yarn, which makes it not only cost-effective but also great for stash-busting.
Yarn
For this scarf, I used one ball of Magic Light from Ice Yarns, which is 100 grams of DK weight yarn. If you don’t have that particular yarn on hand, don’t worry — you can use any yarn you have stored away. Here are the details of the yarn I used:
Crochet Hook
For my scarf, I used a 6mm crochet hook. However, you can use whatever hook size is recommended for your yarn. Just check the label!
Other Tools
Finished Size
The size of the scarf I made is approximately:
If you want to customize it, you can make your scarf either wider or narrower by adjusting your starting chain. The good news is that the pattern is very flexible. Just start with any multiple of 6 plus 4 chains, and you can easily scale the scarf to your desired width.
Before you dive into crocheting, there are a few basic steps to prepare:
Make a Slip Knot
Start off by making a simple slip knot and loop it over your hook.
Using Stitch Markers
Stitch markers can be incredibly handy, especially for beginners. As you work through your chains, I suggest placing a stitch marker on your 6th, 12th, 18th, etc., chain. This will help you keep track of your stitches.
Fun fact: You can explore more crochet patterns that make great gifts or craft fair projects.
Creating the Base Chain
To begin, you’ll want to chain six stitches. Now, rotate your chain so you can see the little camel bumps at the back. We’ll be working into these bumps later to ensure the stitches look even and smooth.
If you're new to crochet, stitch markers should be used. Place them on your chain every sixth stitch, making sure your markers are secured in place so you don’t lose count.
Completing the First Row
Once your base chain is set up, here’s where the fun starts. In the fifth chain (or the marked stitch if you're using markers), you’ll work a row of double crochet clusters:
Continue with this pattern, skipping five chains and working into every sixth chain across your base. This is how you’ll complete your first row, ending with a double crochet in the last chain.
Understanding the Repeat Pattern
Now that row one is done, it’s time to start the row that will be repeated throughout the scarf. The beauty of this scarf is the simple one-row repeat, which makes it perfect for working without constantly referring back to instructions.
This repeat pattern works up very quickly and gives the scarf its characteristic "Drunken Granny" look. It creates a lovely texture with minimal effort!
Repeating Rows
You’ll continue this repeat for as long as you want your scarf to be. For reference, I made 100 rows for my project. However, you don’t need to worry too much about counting rows. Simply continue crocheting until your scarf reaches your desired length or you are nearly finished with your yarn.
Pro Tip: Fixing Mistakes
No worries if you forget to add the chain-two space between clusters! A neat "hack" to solve this problem without frogging is working your next cluster in the gap between your stitches. You’ll place your double crochets right between the previous double crochets. It’s a great time-saver and most people won’t even notice the fix!
Want more beginner-friendly patterns and projects? Check out this collection of beginner crochet ideas.
Length Customization
Here’s another fun customization tip: If you’re running low on yarn, don’t worry, go ahead and stop whenever you reach your preferred length. Depending on your yarn choice, the drape and flow of the scarf may vary slightly, but the pattern will remain consistent.
Creating the Finished Edge
Once you’ve completed the length of your scarf, it’s time to add a beautiful, delicate border on the edges. This simple border is made by working single crochets across the top edge of your scarf.
For each space on this row, you'll work:
Repeat this all the way across for a clean, polished look on the top and bottom edges.
Mirroring the Border on the Opposite End
To finish the scarf evenly, fold your project in half and match up both ends. You’ll want the borders to look symmetrical on both sides. Repeat the same process for the opposite end of the scarf by adding the edging as before.
Once your border is done, thread a needle with the loose ends and sew them in securely. You’ve now completed your Drunken Granny Easy Crochet Scarf!
Written Patterns and More Resources
If you prefer having a written pattern, don’t forget I’ve got you covered! You can always find written patterns for this and other projects directly on my website. My patterns are written in plain English, making it easy even if you’re just getting started with reading crochet patterns. You can find more scarves and cozy crochet projects in this crochet scarf collection.
There you have it! The Drunken Granny Easy Crochet Scarf is a wonderful crochet scarf pattern that beginners can enjoy without feeling overwhelmed. It’s a great way to practice double crochets and create something practical and stylish at the same time. With the one-row repeat and easy-to-follow instructions, you'll be able to finish this scarf in no time. Plus, this scarf makes a great gift — or why not create a few to sell at your next craft fair?
I hope you enjoy making your scarf as much as I did, and I can’t wait to see your finished projects! I’m always eager to hear from you, so feel free to share your work or ask any questions you might have.
Happy crocheting!
The "Drunken Granny" technique is a crochet pattern characterized by simplicity and elegance. It uses basic crochet stitches, primarily the double crochet stitch, arranged in a one-row repeat pattern that creates a textured look.
Absolutely! While the tutorial uses Magic Light from Ice Yarns, you can use any DK weight yarn or even experiment with different weights for varied textures. Just remember, different yarns may alter the finished size of your scarf.
A 6mm crochet hook is recommended for the DK weight yarn used in this pattern. However, adjust the hook size based on the yarn you are using to ensure proper tension and drape.
To adjust the width, start with any multiple of 6 plus 4 chains for the base chain. For length adjustments, simply crochet until you achieve the desired length or until you exhaust your yarn.
If you miss a chain-two space between clusters, you can correct it by working the next cluster in the gap between your stitches instead of frogging the entire row.
To add the border, work single crochets across the edge of your scarf, incorporating chain-twos and skipping stitches to match the pattern. Repeat this process for both ends of the scarf to achieve a polished look.
Check out more beginner crochet patterns in the Secret Yarnery's collection for a variety of projects that are perfect for new crocheters.
Christa Patel
Christa Patel is the creative mind behind the Secret Yarnery, a trusted resource for crochet enthusiasts worldwide. With years of experience, Christa specializes in designing beginner-friendly yet stunning crochet patterns that inspire creativity and confidence in crafters of all skill levels.
As a passionate crocheter, Christa is known for her clear and approachable teaching style, breaking down complex patterns into simple, easy-to-follow steps. Through her engaging video tutorials, written patterns, and helpful tips, she has cultivated a community where crocheters can connect, learn, and share their work.
Christa’s dedication to making crochet fun and accessible shines in every project she creates, from colorful blankets to intricate borders. Whether you’re a seasoned expert or just picking up a hook for the first time, Christa's guidance will help you craft something beautiful.
For more crochet patterns, tips, and inspiration, visit her website at The Secret Yarnery, or check out her YouTube channel filled with step-by-step tutorials.
Easy crochet tutorial
Both right and left handed video tutorials
Downloadable PDF pattern is written in plain English - no abbreviations to decipher!
Perfect for beginners!


