Easy Crochet Shamrock Bookmark Pattern – Perfect for St. Patrick's Day!
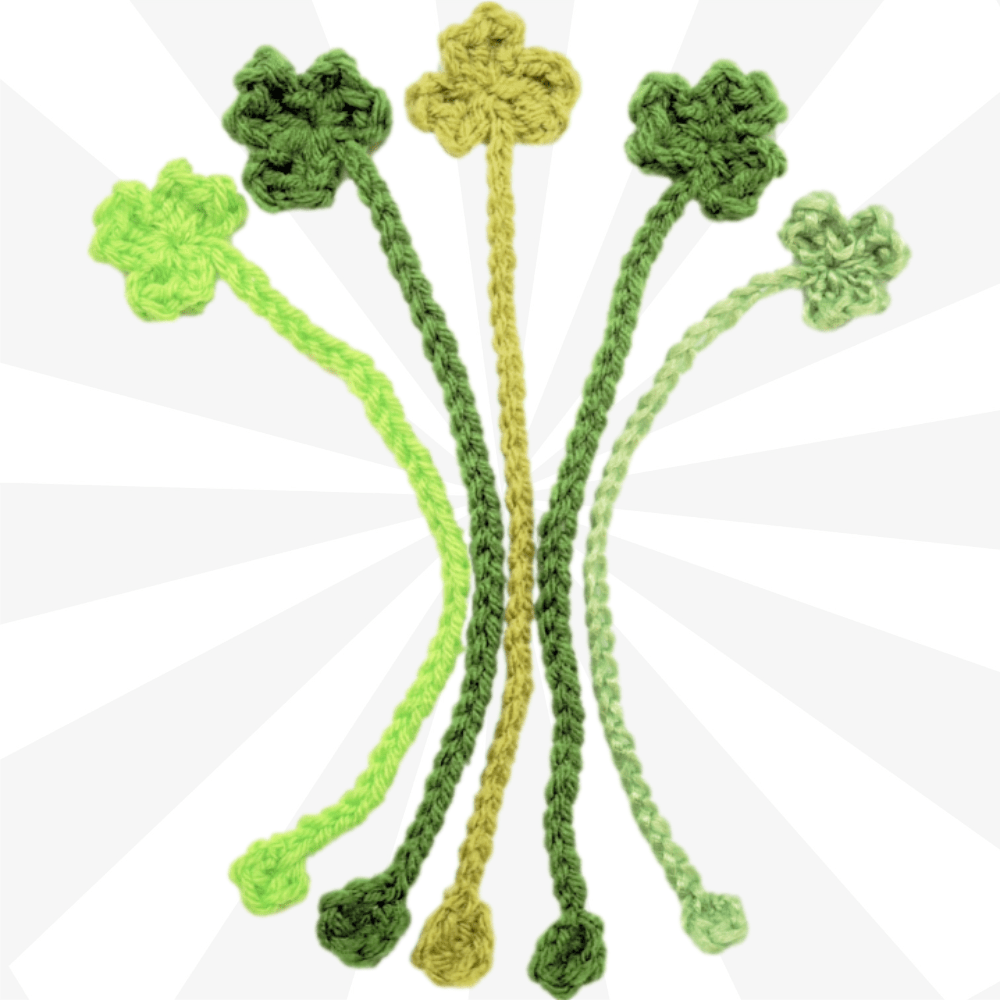
Looking for a quick and charming crochet project? This easy crochet shamrock bookmark is just what you need! Perfect for adding a touch of St. Patrick's Day spirit to your reading, or as a thoughtful little gift, this pattern is beginner-friendly and a fantastic way to use up those yarn scraps. With just a few basic stitches, you can create a cute and functional bookmark in no time.
For those who prefer a visual guide, Christa at the Secret Yarnery walks you through each step in this easy-to-follow tutorial, "Easy Crochet Bookmark ☘️ St Patrick's Day Crochet Patterns 🎁 Crochet a Shamrock." Plus, if you prefer to have a written pattern in hand, you can find it over on secretyarnery.com.
Materials You'll Need
Before we dive in, let’s gather our supplies. This project is wonderfully simple, so you likely have everything you need already!
- Yarn: The beauty of this project is that you can use virtually any scrap yarn you have lying around. While the specific yarn used in the video isn't mentioned, a worsted weight yarn is a good bet. For a traditional shamrock look, stick to shades of green, but feel free to get creative with other colors!
- Crochet Hook: A 5mm crochet hook is used in the tutorial, but you can adjust the hook size depending on the weight of your yarn. If your yarn is thinner, use a smaller hook, and vice versa.
- Needle: You’ll need a needle for weaving in those pesky ends. Blunt tip needles are especially useful for yarn. You can buy yarn at the link in the description.
- Scissors: A sharp pair of scissors will ensure clean cuts.
-
Optional:
- Stitch markers can be handy, especially for beginners, to mark the beginning of rounds or specific stitches.
- Small ruler or measuring tape to ensure chain length is accurate.
- Check out the crochet must-haves in the video description, like yarn ball storage bags and scissors .

Getting Started: The Magic Ring
The magic ring, also known as the magic loop, is a technique used to begin crochet projects worked in the round. It creates a tightly closed center, which is perfect for our shamrock.
Here’s how to make a magic ring:
- Hold the tail of your yarn over your non-dominant hand.
- Pinch the tail down on your ring finger with your thumb.
- Wrap the yarn around two fingers, making an "x."
- Wrap the yarn around your third finger and hold it underneath your thumb.
- Flip your hand over. You should see a short loop and a long loop.
- Slide your hook (hook side facing down) underneath the short loop and on top of the long loop.
- Drag the long loop underneath the short one.
- Point the hook towards yourself, bringing that loop up onto the thicker part of the hook.
- Slowly release your thumb, wiggling the yarn slightly.
- Turn your hook facing away from you, grab the long loop, turn your hook facing down, and slide it through the loop on your hook, releasing your thumb to allow it to pass through.
- Chain two.
It might sound complicated, but once you get the hang of it, it’s a breeze! A secure magic ring is essential for a neat and tidy shamrock center.
Alternative: Chain 3 and Slip Stitch
If you find the magic ring too fiddly, don't worry! You can substitute it with a chain 3 and slip stitch to join. Simply chain 3, then slip stitch into the first chain to form a small ring. This method can be preferable for softer yarns that might be difficult to tighten in a magic ring.
Chain Two
After creating your magic ring (or chain 3 and slip stitch), chain two. This chain two does not count as a stitch. We'll use it to begin our first leaf.
For visual learners, you can find many helpful videos on YouTube demonstrating the magic ring technique, just search "magic ring tutorial crochet".

Crafting the First Shamrock Leaf
Now for the fun part – creating the leaves of our shamrock! Each leaf is made up of three stitches: a treble crochet (which is called a double crochet in US terms), a half double crochet, and another treble crochet (US double crochet).
Here's how to crochet the first leaf:
-
Treble Crochet (US Double Crochet):
- Wrap your yarn twice around the hook.
- Insert your hook into the center of the magic ring, making sure to go over the yarn tail.
- Yarn over, pull the yarn through the ring (you should have four loops on your hook).
- Yarn over, pull through two loops (you should have three loops on your hook).
- Yarn over, pull through two loops (you should have two loops on your hook).
- Yarn over, pull through the final two loops.
-
Half Double Crochet:
- Wrap your yarn once around the hook.
- Insert your hook into the center of the ring.
- Yarn over, pull the yarn through the ring (you should have three loops on your hook).
- Yarn over, pull through all three loops on your hook.
-
Treble Crochet (US Double Crochet):
- Repeat the treble crochet stitch into the center of the ring, again going over the tail.
-
Chain Two:
- Chain two to complete the leaf.
-
Slip Stitch:
- Insert the hook.
- Yarn over, pull through the ring.
- Pull the loop through the loop on your hook.
- Slip stitch into the ring to secure the leaf. We're going to slip stitch twice to give us a little bit of space.
And there you have it – the first leaf of your shamrock is complete!
Creating the Second and Third Leaves
We'll create the second and third leaves in a similar way to the first.
-
Repeat Leaf Pattern:
- Chain Two: Begin the second leaf with a chain two.
- Treble Crochet, Half Double Crochet, Treble Crochet: Repeat the stitch sequence into the center of the ring.
- Chain Two: Chain two to complete the leaf.
- Slip Stitch Twice: Slip stitch twice into the ring to secure the leaf.
Repeat for the Third Leaf:
- Chain Two: Begin the third leaf with a chain two.
- Treble Crochet, Half Double Crochet, Treble Crochet: Repeat the stitch sequence into the center of the ring.
- Chain Two: Chain two to complete the leaf.
- Single Slip Stitch: Slip stitch once into the center of the ring (different from the first two leaves). We use only one slip stitch here to give it a more closed look.
With all three leaves complete, your shamrock is really starting to take shape!

Tightening the Magic Ring
Now that all three leaves are done, it's time to tighten up that magic ring!
Gently pull the tail of the yarn to tighten the ring. Be careful not to pull too tight initially. You want to be able to adjust the shape of the shamrock before fully tightening the center. Take a moment to check the shamrock's shape and adjust the leaves as needed before pulling the tail all the way tight.
Creating the Bookmark Chain
Now we'll create the chain that will form the main part of the bookmark.
- Attaching the Chain: Slip stitch to the side of the first leaf, near the ring. Find a good spot to attach (along the ring, but anywhere you can get your hook in it). Slide a loop onto your hook and slip stitch.
- Chain 30 (or Desired Length): Chain 30, or any length you want! The chain length determines the bookmark's length, so feel free to customize it based on personal preference or the size of your books. You might want a shorter chain for smaller paperbacks and a longer chain for larger hardcovers.
- Creating the Teardrop/Circle at the End: Pinch the last chain you made, then chain three more. This creates the loop for the teardrop shape at the end of the bookmark.
Forming the Teardrop
The teardrop, or small circle, at the end of the chain adds a decorative touch to the bookmark.
- Double Crochet Stitches: Locate the back loop of the third chain from the hook. We use the back loop to create a nice, clean ridge. Work two double crochet stitches into that back loop.
Here's how to do a double crochet stitch:
*   Wrap your yarn.
*   Insert the hook.
*   Yarn over, pull through the ring.
*   Yarn over, pull through two loops.
*   Yarn over, pull through the remaining loops.
- Chain Two: Chain two to complete the teardrop shape.
- Slip Stitch: Slip stitch into the same spot (the back loop) to finish the teardrop. This secures the teardrop shape.
Finishing and Weaving in Ends
We're almost there! Now it's time to finish off the bookmark and weave in those loose ends.
- Cutting the Yarn: Cut the yarn, leaving a long enough tail for sewing.
- Securing the Yarn: Pull the hook up and draw the yarn through to create a knot.
- Threading the Needle: Thread the yarn tail onto the needle.
- Attaching the Teardrop to the Base of the Shamrock: Position the teardrop at the bottom of the bookmark. Sew the teardrop to the bottom of the shamrock, ensuring it lays flat and looks neat. It’s important to secure the teardrop well, so it doesn’t dangle awkwardly.
- Weaving in the Tail: Flip the work over. Weave the tail into the back of the teardrop and cut off the excess yarn.
Securing the Magic Ring Tail
Finally, we need to secure the tail from the magic ring to prevent it from unraveling.
- Threading the Needle: Thread the magic ring tail onto the needle.
- Weaving in the Tail: Weave the tail back up the direction it came from, then weave back down to secure it. This prevents the magic ring from unraveling.
- Cutting the Yarn: Cut off the excess yarn.
Final Touches and Tips
Before you declare your bookmark complete, take a moment for these final touches:
- Check for any loose ends and weave them in.
- Ensure all knots are secure.
- Give the bookmark a final shape and adjust as needed.

Customization Ideas
Want to make your shamrock bookmark even more special? Here are some customization ideas:
- Color Variations: Use different shades of green for a more dynamic look, or experiment with other colors entirely! Variegated yarn can also add a unique touch.
- Adding Beads: Add beads to the chain for extra flair.
- Varying the Chain Length: Adjust the chain length to suit different book sizes.
- Embellishments: Add small embroidered details to the shamrock or a small charm to the end of the chain.
- Different Yarns: Experiment with different yarn weights and textures. Cotton yarn can make for a more durable bookmark.
- Monogramming: Personalize with a crocheted or embroidered initial.
Here's a written list of these ideas for ease of reading:
- Color Variations
- Adding Beads
- Varying the Chain Length
- Embellishments
- Different Yarns
- Monogramming
St. Patrick's Day Gifting Ideas
This little shamrock bookmark makes a fantastic St. Patrick's Day gift! Here are some ideas:
- Pair the bookmark with a book.
- Include it in a St. Patrick's Day gift basket.
- Give it as a small thank-you gift.
- Use it as a party favor for a St. Patrick's Day celebration.
- Attach it to a gift tag for a personalized touch.
Other gift ideas include crocheted coasters, small plants, or candy.
Beginner Crochet Tips
If you're new to crochet, here are a few tips to help you along the way:
- Tension Control: Consistent tension is key to neat and even stitches.
- Stitch Counting: Always count your stitches to ensure accuracy. Stitch markers can be helpful for keeping track.
- Reading Patterns: Familiarize yourself with basic crochet abbreviations and symbols. The "plain English" pattern on secretyarnery.com can be a great resource.
- Yarn Choice: Start with a smooth, light-colored yarn to make it easier to see your stitches.
- Hook Size: Choose the right hook size for your yarn. Check the yarn label for recommendations.
- Practice Makes Perfect: The more you practice, the better you'll become! Start with simple projects and gradually work your way up to more complex ones.
- Left handed tutorials are available on Christa's YouTube channel, as well as the right handed tutorial!
Common Mistakes and How to Avoid Them
Even experienced crocheters make mistakes! Here are some common pitfalls and how to avoid them:
- Tightening the Magic Ring Too Much: This can distort the shamrock. Gently shape the shamrock before fully tightening the ring.
- Incorrect Stitch Counts: Always double-check your stitch counts. Count after each row or round.
- Uneven Tension: Practice maintaining consistent tension. Use scrap yarn to practice your tension.
- Forgetting to Chain at the Beginning of a Row: Remember to chain at the beginning of each row. The chain affects the height of the stitches.
- Using the Wrong Hook Size: Using the wrong hook size can affect the overall look and feel of your project. Check the yarn label for the recommended hook size.
More Crochet Patterns from The Secret Yarnery
If you enjoyed this easy crochet bookmark pattern, be sure to check out other easy crochet patterns from The Secret Yarnery! You can find free patterns, St. Patrick's Day themed patterns, and more!
For experienced crocheters there are advanced patterns available for purchase. Don't forget to subscribe to the newsletter to stay updated on the latest patterns and promotions!
Be sure to also check out the crochet must-haves in the video description for these projects:
- Bags - Yarn Ball Storage
- Bags - Large UFO Zipper Pouches
- Bags - Regular UFO Zipper Pouches
- Ball Winder
- Baskets - WIPS
Connect with The Secret Yarnery
Don't forget to subscribe to the Secret Yarnery YouTube channel for more crochet tutorials and inspiration! You can also find The Secret Yarnery on social media (links in the description of the video). Share your finished bookmarks on social media using the hashtags #SecretYarnery, #EasyCrochet, and #StPatricksDayCrochet. I'd love to see your creations!
Consider joining and buying Christa a coffee to support The Secret Yarnery!
Conclusion
And there you have it – a super cute and easy crochet shamrock bookmark! This project is perfect for beginners, uses minimal yarn, and makes a wonderful St. Patrick's Day gift. I hope you enjoyed following along with this tutorial as much as I enjoyed creating it. Happy hooking!
Left Handed?
FAQs
1. Can I use any type of yarn for this project?
Yes, you can use any type of yarn, but worsted weight yarn is ideal for beginners. Cotton yarn works well for durability, while fine yarn creates a delicate appearance.
2. What size crochet hook should I use?
The tutorial uses a 5mm hook, but you can adjust based on your yarn. Use a smaller hook for thinner yarn and a larger hook for thicker yarn.
3. I struggle with the magic ring. What can I do?
If the magic ring is too tricky, you can use the alternative chain 3, slip stitch method to start your shamrock.
4. How long should the bookmark chain be?
The chain’s length is customizable. For paperbacks, 30 chains work well, but you can adjust based on the book size.
5. Can I personalize the bookmark with other designs?
Absolutely! Add embroidered initials, beads, or charms to make it special. You can also experiment with different yarn colors.
6. How do I prevent my magic ring from unraveling?
Weave in the tail securely and retrace its path to lock the shape of the magic ring.
7. How do I maintain even tension while crocheting?
Practice with scrap yarn to improve tension control. Avoid pulling too tightly or leaving loops too loose, especially with lighter yarns.
![]()
Christa Patel is the creative force behind The Secret Yarnery, a beloved crochet hub that spans a thriving YouTube channel, a dedicated blog, and an engaged crochet community. With years of experience and a passion for teaching, Christa has made crochet accessible and enjoyable for both beginners and seasoned crafters.
Her tutorials are easy to follow, filled with practical tips, and infused with her warm and encouraging teaching style. Christa specializes in creating patterns that range from simple beginner-friendly projects to complex designs for advanced crocheters. She is especially known for her infectious love for crochet and her commitment to empowering others through handmade creations.
Through The Secret Yarnery, Christa shares free patterns, expert advice, and creative inspiration to help crafters take their skills to the next level. She also offers full written patterns and advanced tutorials for those seeking a deeper dive into the art of crochet.
When she’s not crocheting, Christa loves engaging with her global crochet community, exploring new yarns and tools, and inspiring others to embrace the joy of handmade crafts. Whether you’re just starting out or looking for your next challenge, Christa’s work is perfect for sparking creativity and bringing your crochet dreams to life.
Support Christa and discover more of her work at secretyarnery.com or on her YouTube channel.
About the Author
With a passion for crafting easy, beginner-friendly tutorials and patterns, Christa inspires crafters of all skill levels to unleash their creativity worldwide. She encourages yarn lovers to connect, create, and crochet a world filled with beautiful handmade treasures!
Easy Crochet Shamrock Bookmark Pattern – Perfect for St. Patrick's Day!