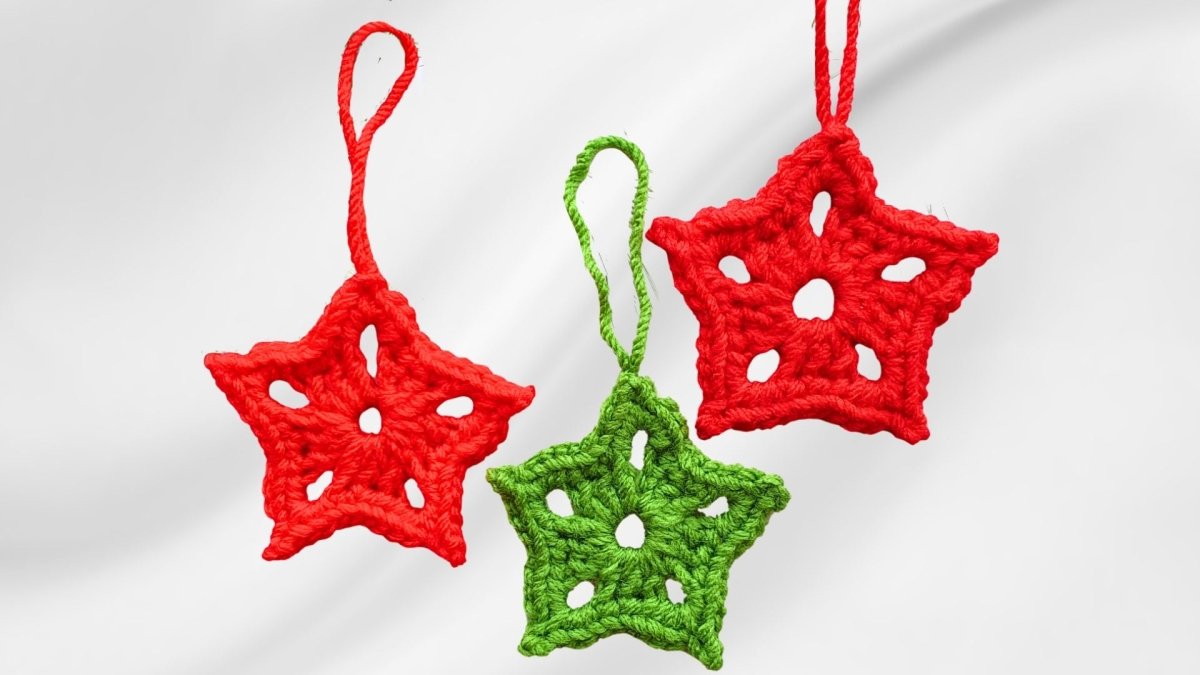
Easy Crochet Star Ornaments for Christmas – DIY Holiday Decor Pattern!
Are you looking for a simple yet festive way to add some handmade charm to your holiday decor? Or perhaps you need a last-minute gift tag idea? Then get ready to learn how to crochet these super easy Christmas star ornaments! They work up incredibly fast and only require small amounts of yarn, making them perfect for using up those leftover scraps. Plus, they're not just for Christmas! Use them as hanging decorations or embellishments throughout the year.
Table of contents
Whether you're a seasoned crocheter or just starting out, this project is designed to be fun and accessible for all skill levels. You'll be amazed at how quickly you can create a whole galaxy of these adorable stars! For those who prefer to follow a written pattern, you can find the free pattern on Secret Yarnery's website: Free Crochet Star Pattern. Alternatively, a printable PDF pattern is available for purchase here: Printable PDF Crochet Star Pattern.
Gather Your Supplies: What You'll Need
Before we dive in, let's gather the materials you'll need to create these delightful stars. The beauty of this project is its simplicity and the ability to use whatever yarn you have on hand!
Here's a list of essentials:
- Yarn: While a four-weight worsted acrylic yarn is recommended, feel free to use any yarn you have in your stash. This is a fantastic scrap-busting project!
- Crochet Hook: If you're using worsted weight yarn, a 5mm crochet hook works perfectly. For DK weight yarn, a 4mm hook is a good choice.
- Scissors: For cutting your yarn.
- Yarn Needle: A sharp-tipped yarn needle is highly recommended for weaving in your ends neatly. If you're looking for a good set, you can find one here: Sharp Tip Needles.
- Stitch Marker: This will help you keep track of your stitches, especially if you're a beginner.
The most important thing is to have fun and use what you have available. Don't be afraid to experiment with different yarn weights and colors to create unique and personalized stars! Speaking of supplies, you might find some other cool stuff in the Secret Yarnery store, like this Granny Square Project Bag.

Getting Started: The Foundation of Your Star
Now that you've gathered your supplies, let's get started on creating the foundation of your star. This involves making a simple ring, which will be the center of your star.
- Creating a Slip Knot: Begin by making a slip knot on your crochet hook. There are many ways to make a slip knot, so use whichever method you're most comfortable with. Just make sure it's snug on your hook but still able to slide.
- Chain 5: Next, chain five stitches. To do this, yarn over (wrap the yarn around your hook) and pull through the loop on your hook. Repeat this five times.
- Forming a Ring: This is where the magic begins! Insert your hook into the very first chain you made, right on top of your slip knot. Now, yarn over and pull through all loops on your hook. This creates a ring.
Tip: When making your ring, it's important to keep it open and accessible. Hold the ring open with your fingers and thumb, making sure the yarn tail is along the bottom. This will make it easier to work into the center of the ring in the next steps. Visual aids can be really helpful! Check out some crochet tutorials to see this in action.
Building the Star: Round 1 - Creating the Points
In this round, we'll start shaping the star by creating the points. This involves a series of double crochets and chains, all worked into the center of the ring.
- Chain 3 (or 2): Chain three stitches. This chain counts as your first double crochet. If you tend to make large chains, you can chain two instead – it's a matter of personal preference.
- Double Crochet x2: Make two double crochets into the center of the ring, taking care to work over your yarn tail. To double crochet, yarn over, insert your hook into the ring, yarn over, pull through a loop (you should have three loops on your hook), yarn over, pull through two loops, yarn over, and pull through the remaining two loops. Repeat this twice.
- Chain 3: Chain three stitches to form the corner space of your first point.
-
Repeat: Now, repeat the following sequence four more times to create the remaining points of the star:
- Three double crochets into the ring.
- Chain three.
Note: After completing the first four sides, you'll notice they resemble a granny square. But we need to keep going to form all five points of the star!
- Spacing Adjustments: As you work, you might find that the stitches are getting crowded in the center of the ring. Gently slide the stitches apart to create more room.
- Repeat for Fifth Point: Chain three, and three double crochets into the center of the ring.
- Joining: After completing the last point, slip stitch into the top of the initial chain-3 to join the round. This creates a closed shape with five distinct points.
This might seem a little complicated, but don't worry! With a bit of practice, you'll be crocheting these points like a pro. Maybe you will learn to crochet your very own crochet pattern.
Shaping the Star: Round 2 - Adding Definition
Now it's time to add definition to our star by working a round of single crochet stitches and creating pointed corners.
- Chain 1: Chain one stitch.
- Single Crochet: Make one single crochet into that same Stitch right there you see a little hole.
- Stitch Marker: This is a good time to place a stitch marker in the first single crochet. This will help you keep track of the beginning of the round.
- Single Crochet x2: Single crochet in the next two stitches, making sure to grab both loops (front and back) of each stitch.
-
Corner Instructions: When you reach a corner space (the chain-3 space from the previous round), work the following sequence:
- Three single crochets into the space.
- Chain three.
- Three more single crochets into the same space.
- Repeat: Repeat the sequence of single crocheting into the next three stitches and working the corner sequence in each chain-3 space around the star.
- Finishing the Round: Continue working around the entire star, repeating the sequence for each side.
- Back to the Beginning: Work back to where the stitch marker is, indicating the completion of the round.
I know that might sound like a lot of instructions, but once you get the hang of the repeating sequence, it's quite simple. If you are new to crochet then check out Christa's guide on crochet tips.

The Invisible Join: A Professional Finish
To give your star a clean, professional finish, we'll use an invisible join. This technique creates a seamless transition between the last and first stitches, making it virtually undetectable.
- Cutting the Yarn: Cut the yarn, leaving a long tail (about 12 inches). This tail will be used for the invisible join and the hanging loop.
- Pull Through: Pull the yarn through the last stitch to secure it.
- Threading the Needle: Thread the yarn needle with the long tail.
- Skipping the Marked Stitch: This is important: Skip the stitch with the stitch marker and insert your needle into the stitch after it.
- Removing the Stitch Marker: Now you can remove the stitch marker.
-
Executing the Invisible Join:
- Insert the needle under both loops of the second stitch.
- Pull the yarn through, being mindful of the tension. You want it to be snug but not too tight.
- Insert the needle back into the base of the last stitch (where the yarn came from), catching only one loop.
- Pull the yarn through and snug it down to match the other stitches.
Why use an invisible join? Because it creates a smooth, seamless finish that elevates the look of your project. It might take a few tries to get it perfect, but the effort is well worth it! Remember to maintain consistent tension throughout the join for the best results.
Securing the Tail: Weaving in the Ends
Now that we've finished the crochet, it's time to take care of those pesky yarn tails. Weaving in the ends securely ensures that your star won't unravel over time.
- Turning Over: Turn the star over to the wrong side (the back).
- Anchoring the Tail: Weave the tail back and forth a few times in the same area to create an anchor.
- Sharp Needle Advantage: A sharp-tipped needle really helps with this process, allowing you to navigate the stitches more easily.
- Directional Weaving: Weave the tail along the stitches, being careful not to pull too tightly and distort the shape of the star.
- Multiple Passes: If you're using a blunt-tipped needle, make at least three passes to secure the tail.
- Cutting the Tail: Carefully trim the excess yarn close to the surface of the star.
If you do not secure the ends properly, then it will not stay together and you will have to do it all over again!
Creating the Hanging Loop: Finishing Touches
To transform your star into an ornament or gift tag, we need to create a hanging loop.
- Working Upward: Weave the yarn toward the tip of one of the star points, working underneath the stitches.
- Emerging at the Tip: Bring the needle and yarn out at the very tip of the star.
- Loop Formation: Go back down into a slightly different spot, leaving a small amount of yarn between the entry and exit points.
- Loop Size: Work the yarn back down the other side of the point to create the hanging loop, leaving enough yarn to form a usable tag.
- Consistency: For a uniform look, use a business card or piece of cardboard as a gauge to ensure all hanging loops are the same size.
- Securing the Loop: Weave in the end of the hanging loop to secure it.
- Cutting the Tails: Cut both the hanging loop tail and the center tail.
And with that, your star is complete!

Adding Extra Flair: Picot Edging (Optional)
Want to add a little extra something to your stars? Consider adding a picot edge! A picot is a small, decorative loop that can add a touch of elegance to your project.
To add a picot, simply make a chain-3 after the chain-3 in each corner, then slip stitch back into the first chain of the picot. This creates a small loop at the tip of each point. If you'd like to see this technique in action, check out the tutorial for the six-pointed star.
Yarn Selection: Finding the Right Fit
The type of yarn you choose can significantly impact the look and feel of your crochet star.
In the video, I used:
- Acrylic Worsted Weight
- DK Weight
The best yarn to use is the yarn that you have! If you want to expand your stash, check out the yarn selection here: Yarn.
Crochet Hook Selection: Finding the Right Fit
The crochet hook used can make a big difference.
In the video, I used:
- 5mm for Worsted Weight
- 4mm for DK Weight
Choosing the right crochet hook can make the whole process easier.
Sharing Your Projects: Join the Community!
I'd love to see your finished star ornaments! Share photos of your creations on social media using the hashtag #SecretYarneryStars so we can all admire your handiwork. What yarn colors did you use? Where do you plan to hang your stars? I love hearing from you all!

Video Resources: Visual Learners Rejoice!
For those who prefer to learn by watching, here's the video tutorial:
https://www.youtube.com/watch?v=4_pnRpTrVo8
If you prefer the left-handed version, check it out here. Don't forget to subscribe to my YouTube channel for more fun crochet projects!
Troubleshooting Tips: Common Issues and Solutions
Sometimes, even with the best instructions, you might run into a few snags. Here are some solutions to common problems:
- Ring Too Tight: Try making your initial chain stitches a bit looser, or use a larger crochet hook for the foundation chain.
- Stitches Too Tight/Loose: Adjust your tension! Practice keeping your stitches consistent – not too tight, not too loose.
- Uneven Star Points: Double-check your stitch counts in each section to ensure they're consistent.
- Yarn Splitting: Try using a different type of yarn or a crochet hook with a smoother finish.
Beyond Christmas: Year-Round Uses for Crochet Stars
These crochet stars aren't just for Christmas! Here are some other ways to use them throughout the year:
- Gift Tags: They make excellent gift tags for any occasion.
- Garlands: String multiple stars together to create a festive garland for parties or celebrations.
- Appliqués: Sew them onto other projects like blankets, bags, or clothing for a touch of handmade charm.
- Keychains: Turn a small star into a cute keychain by adding a key ring.
Crochet Abbreviations: A Handy Guide
Here are some common crochet abbreviations you might encounter:
- ch = chain
- sl st = slip stitch
- sc = single crochet
- dc = double crochet
So when you are starting out it may look like gibberish! It isn't once you start to learn more.
Stitch Guide: Visual Learners Rejoice!
Here are some stitches to get you started! If you are new, it may be helpful to watch a video or two to understand how these stitches work.
- Chain: Chain stitches form the foundation of most crochet projects.
- Slip Stitch: Slip stitches are used to join rounds or move yarn across a row.
- Single Crochet: Single crochet is a basic stitch that creates a dense fabric.
- Double Crochet: Double crochet is a taller stitch that creates a looser fabric than single crochet.
Meet the Maker: Christa from The Secret Yarnery
Hi, I'm Christa, the yarn enthusiast behind The Secret Yarnery! Crochet is my passion, and I love sharing my knowledge and inspiring others to create beautiful things with yarn. I'm dedicated to helping crocheters of all skill levels learn and grow, and I'm so grateful to be a part of this amazing community. If you'd like to learn more about me, visit my About Me page on the Secret Yarnery website.
More Crochet Projects: Expand Your Skills
Ready to take on another crochet project? Here are a few suggestions for other free crochet patterns you might enjoy:
Looking for more crochet patterns? You may also like these crochet tips for easy crochet.
Understanding Yarn Weight: A Complete Guide
Yarn weight refers to the thickness of the yarn strand. Different yarn weights are suitable for different projects and create different textures.
Here's a brief overview of standard yarn weights:
- Lace: Very fine yarn, often used for delicate projects like shawls and doilies.
- Fingering: Lightweight yarn, great for socks, baby clothes, and lightweight garments.
- DK: A versatile yarn weight that's suitable for a wide range of projects, including sweaters, blankets, and accessories.
- Worsted: A medium-weight yarn that's easy to work with and ideal for beginners. It's a popular choice for blankets, scarves, and hats.
- Bulky: A thick yarn that works up quickly, perfect for cozy blankets, chunky sweaters, and quick accessories.
- Super Bulky: The thickest yarn weight, ideal for super-fast projects and creating a bold, textured look.
The Magic of Crochet Hooks: A Complete Guide
Crochet hook sizes are measured in millimeters (mm) and correspond to the thickness of the hook. The right hook size will depend on the yarn weight Here's a brief overview of materials:
- Metal: Common and economical, made of aluminum.
- Wood: Often bamboo, it has a good grip.
- Plastic: A good affordable option.
The best hook to use is the one that feels the most comfortable.

Take Your Pick: Left or Right Handed?
The video above will show you how to do this craft for right-handed people. But it is also available for left-handed people!
- Left Handed Video: Left Handed Video
- Right Handed Video: Right Handed Video
The videos are very similar but show how to do the steps depending on your dominant hand.
Crochet Must Haves: Expand Your Arsenal
Here are some Crochet must haves:
- Bags - Yarn Ball Storage: Used to store Yarn Balls. (https://amzn.to/36cbr3A)
- Bags - Large UFO Zipper Pouches: Used to store large UFO projects. (https://amzn.to/3uqgQ0n)
- Bags - Regular UFO Zipper Pouches: Used to store regular UFO projects. (https://amzn.to/3DYxvLB)
- Ball Winder: Used to wind balls. (https://amzn.to/3Jzd4Y0)
- Baskets - WIPS: Used to store works in progress. (https://amzn.to/3tQK9te)
- Color Wheel: Used to help decide on colors. (https://amzn.to/3hJN3IG)
- Crochet Hooks: Used for crochet. (https://amzn.to/2p5etkC)
- Foot Warmer: Used to keep your feet warm. (https://amzn.to/3RaMtn0)
- Measuring Tape: Used to measure the size of the project. (https://amzn.to/3JviyD8)
- Neck Light: Used to have light to see. (https://amzn.to/2UYNrW4)
- Needle Threaders: Used to thread the needle. (https://amzn.to/3zdCK7S)
- Needles - Blunt Tip: Used for sewing. (https://amzn.to/2MRffKP)
- Needles - Sharp Tip: Used for sewing. (https://amzn.to/3qEGZWk)
- Scissors: Used for cutting. (https://amzn.to/3EC1CHy)
- Stitch Markers: Used to mark a stitch. (https://amzn.to/3GdGCYg)
- Tea - Kericho Gold: Used to drink. (https://amzn.to/3zrTcB8)
- Tins - Accessories: Used for Accessories. (https://amzn.to/3EN6nxT)
- Yarn: Used for crochet. (http://bit.ly/39EZwZX)
Wrapping Up: Spread the Holiday Cheer
I hope you enjoyed learning how to crochet these easy and adorable Christmas star ornaments! They're a fun and rewarding project that's perfect for adding a personal touch to your holiday decorations or creating heartfelt gifts for loved ones. So grab your yarn, hook, and let’s get to it! Don't forget to share your creations with the community, and most of all, have fun! I wish you happy crocheting!
Left Handed?
FAQs
1. What type of yarn works best for these crochet stars?
Any yarn can be used for this project! However, worsted-weight acrylic yarn or DK weight yarn is recommended for beginners. These weights are easy to work with and help the star hold its shape.
2. Do I have to use a specific crochet hook size?
Not necessarily! Use the hook size that matches your yarn weight:
- 5mm for worsted weight yarn.
- 4mm for DK weight yarn. The star's size will vary based on your hook and yarn choice.
3. How long does it take to make one star?
Each star can typically be completed in 15-20 minutes, depending on your skill level. They're quick and easy, even for beginners!
4. What can I use crochet stars for besides ornaments?
- Gift tags
- Garlands
- Keychains
- Appliqués on clothing or blankets
- Year-round decorations for other holidays or events
![]() 5. I’m new to crochet. Can I still make these stars?
5. I’m new to crochet. Can I still make these stars?
Absolutely! This guide is written for all skill levels. If you're new, take your time, reference the tutorials linked in the guide, and practice the stitches before starting.
6. How do I stop my yarn from splitting?
Yarn splitting usually happens with dull hooks or loosely spun yarns. Use a smoother crochet hook and ensure consistent tension to reduce splitting.
7. What is an invisible join, and is it necessary?
The invisible join is a technique that creates a seamless finish for the stars, making the project look professional. While it’s not absolutely necessary, it greatly improves the final appearance, especially if the stars are being gifted.
8. Can I customize the size of the stars?
Yes! Use a smaller hook and finer yarn for smaller stars, or a larger hook and bulky yarn for bigger stars.
9. What if my star points look uneven?
Double-check your stitch count to ensure consistency. Also, blocking the star with steam or water can help shape it properly.
![]()
Christa Patel is the creative mind and founder of The Secret Yarnery, a vibrant hub for crochet enthusiasts worldwide. Passionate about all things yarn, Christa combines her years of crochet experience with a love for teaching to inspire both beginners and advanced crafters. Through her engaging video tutorials, written patterns, and crochet tips, she has built a warm and supportive community for makers to learn, grow, and connect.
Christa believes crochet is more than just a craft—it's a way to express creativity and share handmade joy with others. Known for her approachable teaching style, she has a knack for making complex patterns accessible to everyone. Whether you're picking up a hook for the first time or honing your skills, Christa's guidance can help take your crochet projects to the next level.
When she’s not crocheting, Christa is designing new patterns and interacting with her global audience. You can explore more of her work on her blog, YouTube channel, and website, The Secret Yarnery.
- Learn More About Christa: About The Secret Yarnery
- Follow Christa on YouTube: The Secret Yarnery YouTube
Join Christa and the Secret Yarnery community to crochet, share, and discover endless yarny inspiration!
About the Author
With a passion for crafting easy, beginner-friendly tutorials and patterns, Christa inspires crafters of all skill levels to unleash their creativity worldwide. She encourages yarn lovers to connect, create, and crochet a world filled with beautiful handmade treasures!
Easy Crochet Star Ornaments for Christmas – DIY Holiday Decor Pattern!