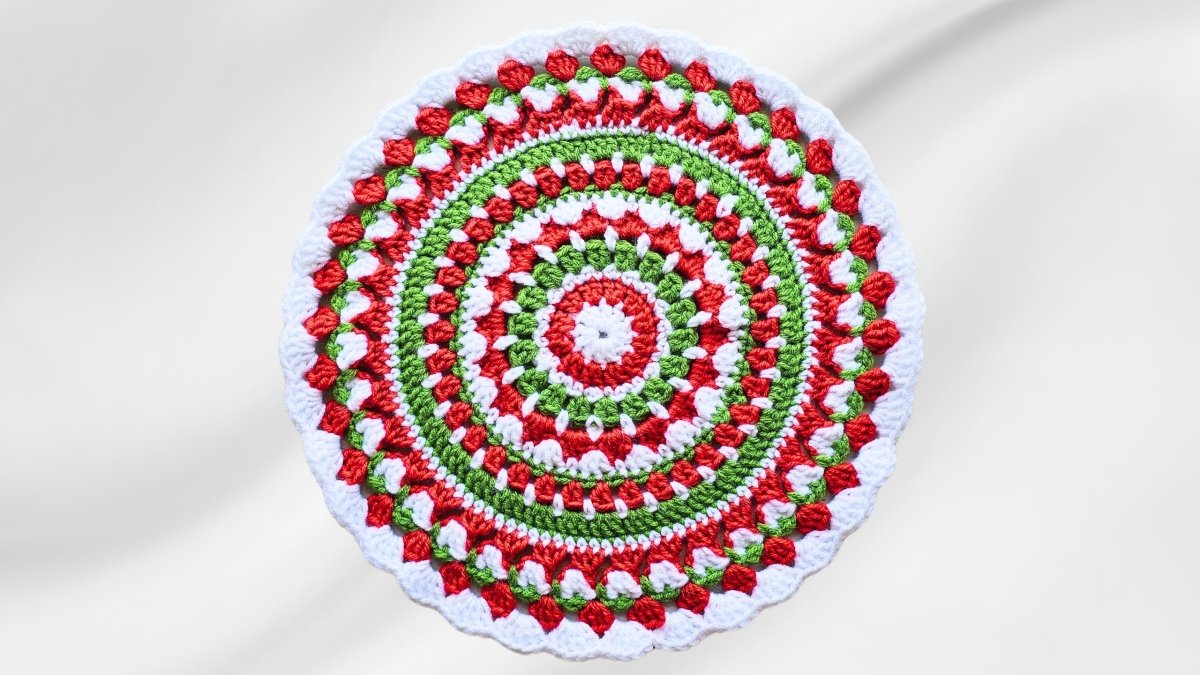
Crochet a Festive Christmas Mandala Placemat – Easy Step-by-Step Guide
Ready to add a touch of handmade charm to your holiday table? This blog post is your guide to creating a beautiful Christmas mandala crochet placemat! Inspired by Krista's video tutorial from The Secret Yarnery, I'll break down each step to make it easy for you. Whether you're decking out your dining area or looking for the perfect handmade gift, this project will bring festive cheer to your season. And the best part? This pattern is designed to be beginner-friendly, so anyone can join in on the fun. If you want the free written pattern Krista uses, you can find it over on her website at secretyarnery.com. Let's get started!
Table of contents
 Understanding the Pattern Round 1: Creating the Center Circle Round 2: Increasing the Circle Round 3: Single Crochet and Increases Round 4: Double Crochet Clusters Round 5: Single Crochet and Chain Spaces Round 6: Shell Stitches Round 7: Double Crochet and Single Crochet Round 8: Single Crochet Around Round 9: Double Crochet Pairs Round 10: Chain Spaces and Single Crochet Round 11: Three Double Crochets in Each Space Round 12: Single Crochet Round 13: Three Double Crochet Decrease Round 14: Double Crochet Shells Round 15: Single Crochet and Chains Round 16: Four Double Crochet Clusters Round 17: Final Round of Shells The Invisible Join Quick Stitch Fix Finishing Touches Show Off Your Project! Subscribe and Stay Hooked Share and Inspire! Explore More Crochet Crochet Must Haves FAQs
Gather Your Supplies
Before diving in, gather all the materials you'll need:
- Yarn: Red, green, and white worsted weight acrylic yarn. Savor and Savor 100 are recommended. However, any worsted weight yarn will do the trick.
- Crochet Hook: A 5.5 mm crochet hook is ideal for this project.
- Other Tools: Don't forget a pair of scissors and a darning needle for weaving in those ends.
Looking for more crochet must-haves? Check out this list:
- Bags - Yarn Ball Storage
- Bags - Large UFO Zipper Pouches
- Bags - Regular UFO Zipper Pouches
- Ball Winder
- Baskets - WIPS
- Color Wheel
- Crochet Hooks
- Foot Warmer
- Measuring Tape
- Neck Light
- Needle Threaders
- Needles - Blunt Tip
- Needles - Sharp Tip
- Scissors
- Stitch Markers
- Tea - Kericho Gold
- Tins - Accessories
- Yarn
Understanding the Pattern
What makes this pattern so special? It's designed by Krista to be accessible, even if you're new to crochet patterns. Each round introduces a different stitch, keeping the project engaging and fun. The written pattern includes a space to note which color yarn you're using for each row. It's all about making it easy and enjoyable.
Tip: Don't be afraid to play around with color changes to give your placemat a unique look.
Round 1: Creating the Center Circle
Every mandala starts with a center. Let's create ours:
-
Slip Knot: Make a slip knot, leaving a short tail.
-
Chain 3: Chain three. This counts as your first stitch.
-
Slip Stitch to First Chain: Slip stitch into the very first chain you made to form a ring. Hold the tail while you work to secure it.
-
Chain 3: Chain three again.
-
Double Crochets: Make 11 double crochets into the center ring. If you run out of room just slide the stitches you already did back.
-
Total Stitches: You should have a total of 12 stitches (the initial chain 3 + 11 double crochets).
-
Join: Slip stitch to the top of the first chain 3 to join the round.
-
Secure: Chain 1, cut the yarn, and pull through to secure. Snip off the starting tail.
Round 2: Increasing the Circle
Time to make that circle bigger! In this round, you'll increase the number of stitches.
-
Join New Color: Join your next color in the second stitch after the join from the previous round. Slip stitch to join, leaving a tail.
-
Chain 2: Chain two. This counts as the first stitch.
-
Double Crochet Increase: Make one double crochet in the very same stitch.
-
Two Double Crochets in Each Stitch: Work two double crochets into each stitch around the entire round.
-
Join: Slip stitch to the top of the chain two to join.
-
Secure: Chain 1, cut yarn, and pull through to secure.
Round 3: Single Crochet and Increases
Ready to add some single crochet stitches and increases? Here's how:
-
Join New Color: Join your starting color (or another color of your choice) in the second stitch after the join. Slip stitch to join, leaving a tail.
-
Chain 1: Chain one. This counts as the first single crochet.
-
Increase Pattern: Work one single crochet into the next stitch, then two single crochets into the following stitch. Repeat this pattern around.
-
Join: Slip stitch to the chain one to join.
-
Secure: Chain 1, cut yarn, and pull through to secure.
Note: Christa mentions that she will show how to fix a stitch that may look a little different later in the video.

Round 4: Double Crochet Clusters
Now for a bit of texture! This round creates a special effect with double crochet clusters.
- Join New Color: Join your next color in the second stitch after the join. Slip stitch to join, leaving a tail.
- Chain 2: Chain two. This counts as the first stitch.
- Double Crochet: Make one double crochet in the same stitch.
- Skip and Cluster: Skip the next stitch, and work two double crochets into the following stitch.
- Repeat: Repeat the "skip one stitch, two double crochets in the next stitch" pattern around the entire round.
- Join: Slip stitch to the top of the chain 3 to join.
- Secure: Chain 1, cut yarn, and pull through to secure.
Round 5: Single Crochet and Chain Spaces
Let's create some open spaces for the next round:
- Join New Color: Join your next color by working into a space between a set of double crochets. Slip stitch to join, leaving a tail.
- Chain 3: Chain three. This counts as a single crochet and chain 2.
- Single Crochet and Chains: Work one single crochet into the next space, then chain three.
- Repeat: Continue the pattern of "single crochet into the space, chain three" around the entire round.
- Join: Slip stitch between the legs of the first slip stitch to join.
- Secure: Chain 1, cut yarn, and pull through to secure.
Round 6: Shell Stitches
Time to add those decorative shell stitches!
- Join New Color: Join your next color into a chain space. Slip stitch to join, leaving a tail.
- Chain 1: Chain one. This counts as the first single crochet.
- Shell: Make three double crochets and one single crochet, all into the same chain space.
- Repeat: Jump to the next chain space and repeat the shell stitch (single crochet, three double crochets, single crochet). Continue around the entire round.
- Join: Slip stitch into the first chain to join.
- Secure: Chain 1, cut yarn, and pull through to secure.

Round 7: Double Crochet and Single Crochet
This round will define the "hills" and "valleys" of the pattern.
- Join New Color: Join your next color in the single crochet at the bottom of a "valley". Slip stitch to join, leaving a tail.
- Chain 2: Chain two. This counts as the first double crochet.
- Double Crochet Increase: Make two double crochets into the same stitch.
- Single Crochet: Skip a stitch, and work one single crochet into the second stitch (the tallest stitch of the "hill").
- Repeat: Alternate between three double crochets in the "valley" and one single crochet on the "hill" around the entire round.
- Join: Slip stitch to the top of the chain 3 to join.
- Secure: Chain 1, cut yarn, and pull through to secure.
Round 8: Single Crochet Around
Time for a simple round that creates a solid base for the next row!
- Join New Color: Join your next color in the second stitch after the join. Slip stitch to join, leaving a tail.
- Chain 1: Chain one. This counts as the first single crochet.
- Single Crochet: Work one single crochet into each stitch around the entire circle.
- Join: Slip stitch into the first chain one to join.
- Secure: Chain 1, cut yarn, and pull through to secure.
Round 9: Double Crochet Pairs
More double crochet clusters are coming up to create texture!
- Join New Color: Join your next color in the second stitch after the join. Slip stitch to join, leaving a tail.
- Chain 2: Chain two. This counts as the first double crochet.
- Double Crochet: Make one double crochet in the same stitch.
- Skip 1, Double Crochet Pair: Skip the next stitch, and work two double crochets into the stitch after that.
- Repeat: Continue the pattern of "skip one stitch, two double crochets in the next stitch" around the entire round.
- Join: Slip stitch to the top of the chain 3 to join.
- Secure: Chain 1, cut yarn, and pull through to secure.

Round 10: Chain Spaces and Single Crochet
Now we're making open spaces for the next textured round:
- Join New Color: Join your next color in a space between pairs of double crochets. Slip stitch to join, leaving a tail.
- Chain 3: Chain three.
- Single Crochet, Chain 2: Jump to the next space and make one single crochet, chain two.
- Repeat: Repeat this pattern around the entire round.
- Join: Slip stitch into the first chain to join.
- Secure: Chain 1, cut yarn, and pull through to secure.
Round 11: Three Double Crochets in Each Space
Adding more volume with this one!
- Join New Color: Join your next color in any chain space. Slip stitch to join, leaving a tail.
- Chain 2: Chain two.
- Three Double Crochets: Make three double crochets into the same space.
- Repeat: Three double crochets into each chain two space around the circle.
- Join: Slip stitch to the top of the chain three to join.
- Secure: Chain 1, cut yarn, and pull through to secure.
Round 12: Single Crochet
This single crochet round will add definition.
- Join New Color: Join your next color in the second stitch after the join. Slip stitch to join, leaving a tail.
- Chain 1: Chain one.
- Single Crochet: One single crochet into each stitch around the entire circle.
- Join: Slip stitch to the top of the chain one to join.
- Secure: Chain 1, cut yarn, and pull through to secure.

Round 13: Three Double Crochet Decrease
This round creates decorative peaks along the edge.
- Join New Color: Join your next color in the second stitch after the join. Slip stitch to join, leaving a tail.
- Chain 1: Chain one.
- First Double Crochet Decrease: Start a double crochet in each of the next three stitches, leaving the last loop of each on your hook.
- Yarn Over and Pull Through: Yarn over and pull through all four loops on the hook to create a three double crochet decrease.
- Chain 3: Chain three.
- Repeat: Repeat the decrease and chain 3 pattern around the entire round.
- Join: Slip stitch into the side of the first peak to join.
- Secure: Chain 1, cut yarn, and pull through to secure.
Round 14: Double Crochet Shells
It's time to build shells into the chain spaces from the previous round.
- Join New Color: Join your next color by giving one of the peaks a little pull. You can see the stitch where we are going to build our next row. Slip stitch to join, leaving a tail.
- Chain 2: Chain two.
- Two Double Crochets: Make two double crochets into the same stitch.
- Chain 1: Chain one.
- Three Double Crochets Shell: Work three double crochets into each of the peaks.
- Repeat: Three double crochets into each peak with a chain one in between.
- Join: Slip stitch to the top of the chain three to join.
- Secure: Chain 1, cut yarn, and pull through to secure.
Round 15: Single Crochet and Chains
This round creates a decorative, textured edge.
- Join New Color: Join in the middle stitch of any shell. Slip stitch to join, leaving a tail.
- Chain 2: Chain two.
- Single Crochet and Chains: Going underneath the peaks.
- Repeat: Repeat this pattern around the entire round.
- Join: Slip stitch into this chain space to join.
- Secure: Chain 1, cut yarn, and pull through to secure.
Round 16: Four Double Crochet Clusters
Adding more volume to the shells!
- Join New Color: Join your new color in one of these drop-down single crochets. Slip stitch to join, leaving a tail.
- Chain 2: Chain two.
- Four Double Crochets: Cluster stitch of 4.
- Repeat: Four double crochets and a chain 1 into each of these drop-down stitches.
- Join: Slip stitch to the top of that chain three to join.
- Secure: Chain 1, cut yarn, and pull through to secure.
Round 17: Final Round of Shells
Let's complete the mandala with a final row of shells.
- Join New Color: Join any spot with a space between the previous shells. Slip stitch to join, leaving a tail.
- Chain 2: Chain two.
- Five Double Crochets: Five double crochets into the same space.
- Repeat: Five double crochets into each of the spaces around the circle.
- Join: Slip stitch to the top of the chain three to join.
- Secure: Chain 1, cut yarn, and pull through to secure.
You can either use a slip stitch or an invisible join!

The Invisible Join
Want a seamless finish? Try the invisible join:
- Cut the yarn and pull your hook up and through.
- Thread your needle.
- Go right into the top two loops of the chain at the top of the chain three.
- Keep an eye on where it's coming from (this little hole). Put your needle right back down under that loop.
- Sew in your tail, and you're all done!
Quick Stitch Fix
Krista shares how to fix any stitches that look a little more open than the rest. Check out the video around the 41:36 mark!
- Thread the tail end.
- Go behind and find the tail, pulling it to the front of your work where we want it to be.
- Loop that yarn over, pulling the yarn. Go under the opposite thread.
- This shuts it right up like the rest of the stitches. Now you can sew that tail in like you normally would.
This stitch fix can be beneficial for the spots where you joined your yarn.
Finishing Touches
- Weave in all loose ends using a darning needle.
- Make sure all tails are securely woven in to prevent unraveling.
- Give your placemat a gentle block if needed to help it lay flat.
Show Off Your Project!
Christa would love to see your finished projects! Here's how you can share:
- Tag The Secret Yarnery on Instagram (@secretyarnery) or Facebook (The Secret Yarnery).
- Upload your photos to the Facebook group, The Secret Yarnery Crochet Community.
Subscribe and Stay Hooked
Want more easy crochet tutorials?
- Subscribe to The Secret Yarnery's YouTube channel.
- Hit the notification bell so you don't miss any new videos.
Share and Inspire!
Let's spread the crochet love!
- Share this tutorial with your fellow crochet enthusiasts.
- Inspire others to create their own festive Christmas mandala placemats.
Explore More Crochet
The Secret Yarnery offers a treasure trove of crochet patterns and crochet tutorials for all skill levels. Whether you're a seasoned pro or just picking up a hook, there's something for everyone. You might also want to check out this guide to easy crochet projects for beginners.
Don't miss these helpful tutorials as well:
With a little yarn and a hook, you can transform your holiday decor.
Crochet Must Haves
Here are a few must-have crochet supplies:
- Bags - Yarn Ball Storage
- Bags - Large UFO Zipper Pouches
- Bags - Regular UFO Zipper Pouches
- Ball Winder
- Baskets - WIPS
- Color Wheel
- Crochet Hooks
- Foot Warmer
- Measuring Tape
- Neck Light
- Needle Threaders
- Needles - Blunt Tip
- Needles - Sharp Tip
- Scissors
- Stitch Markers
- Tea - Kericho Gold
- Tins - Accessories
- Yarn
So, grab your hook and yarn and get ready to crochet your way to a festive holiday season!
FAQs
1. What skill level is required for this pattern?
This pattern is beginner-friendly! With clear instructions and step-by-step guidance, it's perfect for crocheters of all levels.
2. What materials will I need to complete this placemat?
You’ll need:
- Worst-weight acrylic yarn in red, green, and white (or colors of your choice).
- A 5.5 mm crochet hook.
- Scissors and darning needles for finishing.
3. Can I customize the size of the placemat?
Yes! To increase or decrease the size, adjust the number of rounds or experiment with different yarn and hook sizes.
4. What stitches are included in this pattern?
The pattern includes basic stitches like single crochet, double crochet, shell stitches, clusters, and chain spaces. Don’t worry—each round is explained in detail to guide you through.
5. Does the pattern include a color guide?
Yes! The instructions include details on when to change colors to achieve the festive look. However, you can personalize it with your own color choices.
6. What do I do if I’m stuck on a specific step?
Feel free to reach out for support or refer to video tutorials for additional guidance. Our community is here to help!
7. How long will it take to complete?
The time to complete depends on your skill level and pace, but most crocheters finish this pattern in a weekend or less.
Christa Patel is the creative force behind The Secret Yarnery, a vibrant online community dedicated to celebrating the art of crochet. With years of experience and a passion for teaching, Christa is known for her beginner-friendly tutorials, stunning patterns, and approachable style. Her mission is to inspire crocheters worldwide by making creative projects accessible to all, no matter their skill level.
Based in Nairobi, Kenya, Christa combines her love for crochet with joyful, colorful designs that brighten any space and occasion. Through her popular YouTube channel, website, and social media, she’s built a thriving community where enthusiasts can learn, share, and connect.
Christa believes crochet is more than a craft—it's a form of self-expression and a chance to bring people together through creativity. Her patterns, like the Festive Christmas Mandala Placemat, reflect her unique blend of simplicity, elegance, and fun. She’s dedicated to helping her followers fall in love with crochet one stitch at a time.
Stay connected with Christa at The Secret Yarnery and join her in spreading the joy of handmade projects!
About the Author
With a passion for crafting easy, beginner-friendly tutorials and patterns, Christa inspires crafters of all skill levels to unleash their creativity worldwide. She encourages yarn lovers to connect, create, and crochet a world filled with beautiful handmade treasures!
Crochet a Festive Christmas Mandala Placemat – Easy Step-by-Step Guide