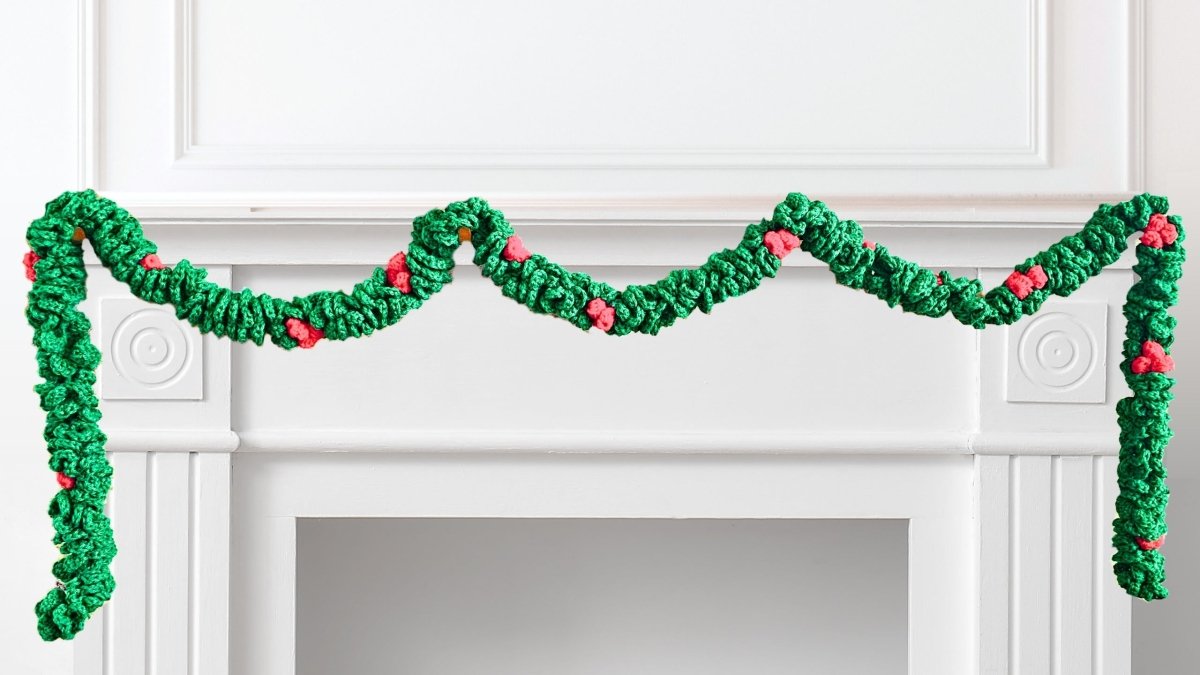
How to Crochet a Handmade Evergreen Garland with Berries
Are you looking for a timeless, handmade holiday decoration that can be reused year after year? The crochet evergreen garland with berries is the perfect festive project to elevate your home décor this Christmas season. Not only is it a stunning, elegant addition to any mantle or doorway, but it’s also incredibly simple to make, whether you’re a beginner or a seasoned crocheter. Let me guide you step-by-step to create this holiday masterpiece
Why Choose Handmade Holiday Decorations?
There’s something magical about handmade decorations. They bring a personal touch to your holiday setup that store-bought options can’t replicate. This evergreen crochet garland is a wonderful way to add charm and warmth to your home, while also being practical and reusable. Plus, it’s an excellent stash-busting project for those leftover yarn balls you’ve been saving.
Materials You’ll Need
Before we jump into the tutorial, gather these materials:
- Yarn: 400 grams (4 balls) of size 4 worsted weight acrylic yarn (10-ply in Australia). Budget or scratchy yarns work perfectly.
- Crochet Hook: A 6 mm crochet hook.
- Stitch Marker: To track progress through the pattern.
- Needle: For sewing in ends.
- Scissors: A sharp pair for trimming yarn tails.
If you’re new to crochet, check out my collection of beginner crochet patterns, which can help get you started with the basics
Creating Your Evergreen Garland
Step 1: Starting Your Garland Base
To begin, make a slip knot and chain to your desired length. For a typical garland that measures 6 feet, chain a loose 6 feet of stitches. There’s no specific stitch count needed, which makes this project beginner-friendly.
Pro Tip: Don’t pull your chains too tight. A loose chain is easier to work into and results in a smoother project.
Step 2: Row 1 - Building Double Crochet Clusters
To kick off Row 1, count back three chains from your hook and start your first double crochet into that chain. Work three double crochets into the same chain to begin forming the garland’s texture.
From here, crochet four double crochets into every chain along your foundation chain. Don’t stress about perfectly even stitches—any natural curling is part of the charm. That curling is what makes it look like evergreen boughs.
Once you’ve reached the last chain, Row 1 is complete. You’re ready to move on to Row 2.
Step 3: Row 2 - Adding Texture and Dimension
For Row 2, chain 2 and turn your work. In the first stitch, create four double crochets and slip stitch into the same stitch to lock it in place. This creates the foundational look of your evergreen leaves.
For each following stitch:
- Start with a half double crochet.
- Crochet four double crochets.
- Finish with a slip stitch into the same stitch.
Use a stitch marker in the first completed set to track your progress. This helps keep you motivated since this row uses up a lot of yarn and can feel like slow progress. Work this repeat pattern until the end of the row. Once done, secure your yarn with a chain and cut it, leaving enough tail for sewing in.

Adding Festive Berries
Optional but highly recommended, adding berry clusters to your garland provides a festive pop of color. Each berry cluster can have up to three berries, but you’re welcome to customize with fewer depending on your style.
Step 1: Creating a Berry Cluster
Start by leaving a 3-inch yarn tail for tying onto the garland later. Make a slip knot and chain three. In the first chain, begin five double crochets but don’t complete them. Leave the last loop of each crochet on the hook until there are six loops in total.
Once all loops are on your hook, yarn over and pull through all six loops. Chain three to secure your berry. Repeat the process on top of your previous berry to create a cluster.
Step 2: Securing Your Cluster
After forming a cluster of two or three berries, use your yarn tail to tie the cluster to your garland. Pick open spots where the garland base is visible and double-knot the cluster securely. Trim any excess tails for a neat finish.
Tips for Customizing Your Garland
- Adjust Length: Add more yarn if you prefer a longer or bulkier garland.
- Play with Colors: Try white yarn for a snowy look or use bright red for a traditional holiday vibe.
- Berry Variations: Experiment with single or double-berry clusters for variety.
- Explore Other Holiday Patterns: Check out the Berry Easy Crochet Garland pattern for even more festive inspiration.
Left Handed?
Share Your Projects!
I can’t wait to see how your crochet garlands turn out! If you’re looking for additional inspiration or want to try more advanced projects, check out all my written crochet patterns. Share your finished garlands with me through social media or tag #SecretYarnery. Your creativity keeps our crochet community thriving!
Let’s make this holiday season extra special with handmade touches that truly shine. Stay hooked!
FAQs
1. Can I use different yarn weights for this project?
Yes, you can. Using lighter or heavier yarn alters the garland’s thickness and texture. Adjust your crochet hook size accordingly. For beginners, stay close to the recommended materials for best results.
2. How long does it take to complete the Garland?
On average, it takes 3-5 hours, depending on the length you choose and your crochet speed. Adding berries or other details can take an extra hour or two.
3. Can I make this without adding berries?
Absolutely! The garland looks stunning on its own. Berries are a decorative option to add extra charm but are not mandatory.
4. What’s the best way to hang the garland?
Use small hooks, clear push pins, or string to secure the garland along mantles, staircases, or doorways. Avoid heavy nails or adhesives to preserve your project.
5. Can I customize the garland for other holidays?
Yes! Swap green and red yarns with colors like white, blue, or pastel tones to match other seasonal themes.
6. What if I run out of yarn midway?
No worries! Simply continue with another ball of yarn. Tie the new yarn through a seamless knot and weave the ends into the stitches for a clean finish.
7. How many berry clusters should I add?
This depends on your personal style! Typically, adding a cluster every 8–12 inches along the garland works well for balanced decoration.
Christa Patel is a crochet designer and crafting expert with years of experience sharing tutorials, tips, and patterns with the global crochet community. As the founder of The Secret Yarnery, Christa has built a reputation for creating accessible and creative crochet designs that cater to all skill levels. Her goal is to inspire beginners and experienced crafters alike to embrace the joys of handmade projects.
Christa offers a wide range of crochet resources, including:
Step-by-step tutorials: Detailed guides that simplify even the most intricate crochet patterns.
Community engagement: Active participation in online forums and crafting groups to foster connection and creativity.
Extensive pattern library: A growing collection of free and paid patterns to suit every style and occasion.
With a loyal following across platforms like YouTube and Instagram, Christa’s approachable teaching style and commitment to quality have made her a trusted name in the crafting world. When following her guides, you’re not just learning—you're building a skill and joining a passionate community of makers. For more inspiration and tips, visit The Secret Yarnery.
About the Author
With a passion for crafting easy, beginner-friendly tutorials and patterns, Christa inspires crafters of all skill levels to unleash their creativity worldwide. She encourages yarn lovers to connect, create, and crochet a world filled with beautiful handmade treasures!
Crochet Evergreen Garland with Berries: Easy DIY Holiday Decoration