How to Make an Easy Heart Granny Square
Who doesn't love a crochet project that's both adorable and versatile? With a central heart transformed into a classic granny square, this pattern is perfect for both beginners and experienced crocheters. It’s simple, fun, and a fantastic way to impress your friends with your creativity. Whether you’re making blankets, coasters, or bunting, this easy heart granny square design fits right in.
Check out the full tutorial in the video below, where every step is explained in detail:
Table of contents
Let’s dive into the details, tools, techniques, and steps you'll need to create this charming square.
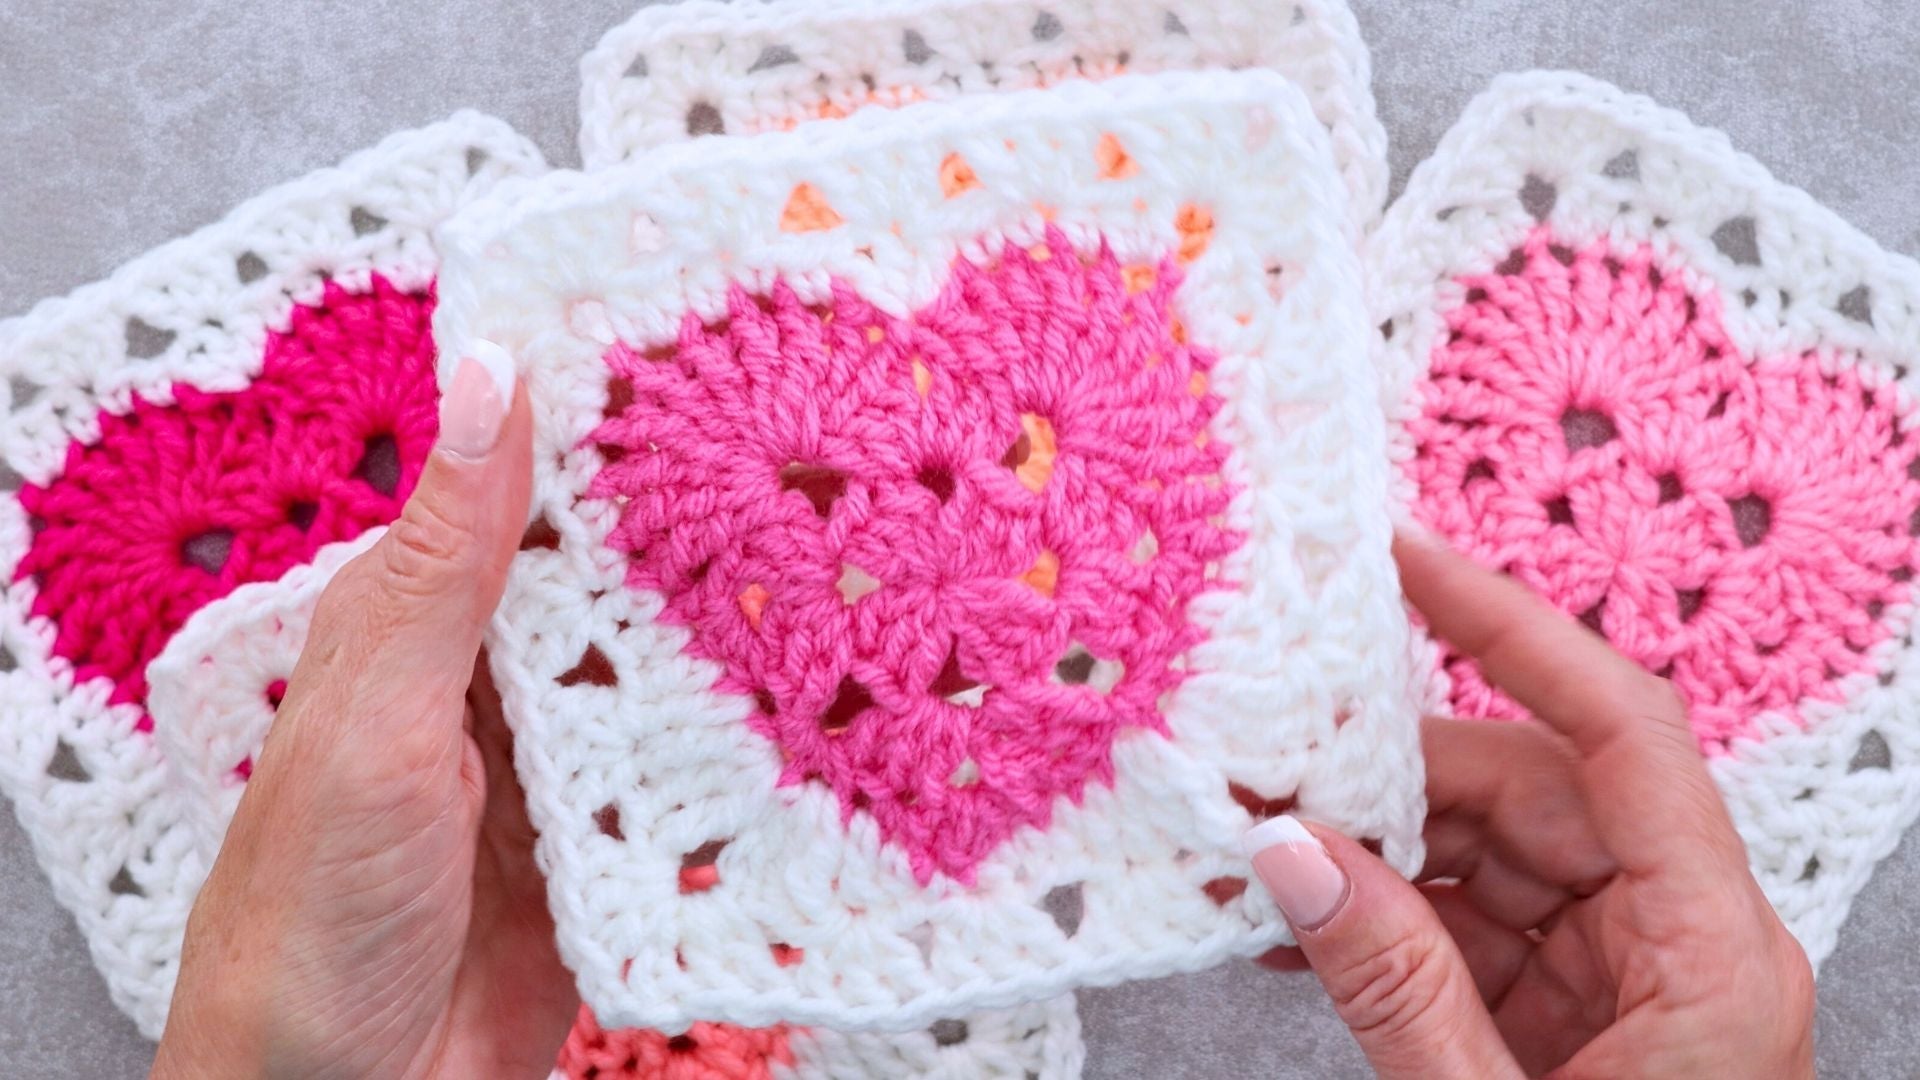
What Is an Easy Heart Granny Square?
An easy heart granny square combines the charm of a crochet heart with the versatility of a granny square. It starts with a heart at the center and is finished into a square shape using granny-style stitches. What’s great is how flat and seamless the final piece is, making it perfect for combining with other squares in larger projects.

Why You'll Love This Project
Ever wish you could mix a classic design with a little extra flair? That’s exactly what this easy heart granny square offers. It’s a creative twist on the traditional granny square, resulting in a fun and unique look. Plus, since it's compatible with other granny squares, you can use it to create cohesive blankets or decorative pieces. This design is a great way to spice up your crochet projects without requiring a lot of extra time or materials.
Materials You’ll Need
To get started, gather the following materials:
- Yarn: Size 4 worsted weight acrylic yarn (5 grams for the center, 7 grams for the edge).
- Crochet hook: A 6 mm hook (or the size recommended on your yarn label).
- Scissors: For trimming yarn.
- Yarn needle: To sew in ends for a neat finish.
For more inspiration on projects using similar materials, check out the granny square heart bunting pattern on my site.

Choosing the Ideal Yarn and Hook
This project works best with a size 4 worsted weight acrylic yarn due to its softness and ease of use. You’ll only need about 5 grams for the center and 7 grams for the border, making it a stash-friendly project. Whether you're using a classic red for Valentine’s vibes or experimenting with multicolored yarn for a unique touch, this heart granny square always turns out stunning.
The video demonstrates using a 6 mm hook, which creates a finished 5.5-inch square. If you’re working with different yarn weights, feel free to adjust your hook size based on your yarn label and personal stitch preference.
Handy Tools: Scissors and Needle
Don’t underestimate these small yet powerful tools! A sharp pair of scissors ensures clean cuts, and a yarn needle helps weave in ends neatly. If you’re looking for durable, sharp-tip needles, I always recommend checking out high-quality options to make weaving ends less tedious. Having reliable tools like these makes a big difference in the final result.
Navigating the Video with Timestamps
For detailed guidance, the tutorial video provides helpful timestamps:
- 0:12 Introduction to heart granny squares
- 1:27 Tools and materials overview
- 9:12 Shaping the heart
- 13:20 Turning the heart into a square
- 19:13 Adding a border
- 24:40 Finishing touches
If you need to pause or revisit steps, you can use these timestamps to keep track.

Starting With a Magic Ring
The project begins with a magic ring, a crucial technique in crochet. This method creates a tightly closed center, which is ideal for the heart’s foundation. To make a magic ring:
- Hold the yarn tail over your non-dominant hand and wrap it around two fingers.
- Cross it to form an “X,” then bring the hook under the first strand and grab the second strand.
- Pull it through, twist your hook, and chain one to secure the loop.
Are you new to the magic ring? It may feel tricky at first, but with practice, your confidence will grow. As an alternative, you can use a chain three ring—it’s simpler and totally beginner-friendly.
Forming the First Round
After securing your magic ring, start with a chain-three, followed by sets of three double crochets into the ring. Work over the tail of the yarn to keep the structure secure. Each group of three double crochets creates one side of the square. Repeat this four times, pulling the tail to close the ring and form the base of the square.

Shaping the Heart
Once you’ve crafted the square’s center, it's time to shape it into a heart. This involves creative stitch combinations, including single crochets, half doubles, and trebles. Pay careful attention to the spacing to ensure the heart takes form perfectly. Following the step-by-step instructions in the video will make this process stress-free.
For a written guide on similar heart-shaped crochet projects, visit the tutorial on how to crochet hearts step-by-step for additional ideas and tips.
Turning the Heart Into a Granny Square
This round transforms your heart into a complete square. Using the granny stitch pattern (clusters of three double crochets), start at a corner and work your way around the heart. Stitch three double crochets into each corner space, followed by chain-two stitches to create defined corners. Work evenly across each side to ensure your square remains flat.
Stitch markers can help beginners keep track of corners and achieve even spacing throughout the square.

Adding the Final Border
The final border ties the design together and ensures equal proportions. This edge helps the heart granny square fit perfectly with traditional squares in blankets, pillows, or other projects. Follow the usual granny square stitch sequence: three double crochets into spaces between clusters, with corners receiving an extra chain-two space for flexibility.
For more inspiration on unique square patterns, check out the Color Changing Granny Square 2.0.
Finishing Touches
To wrap up your heart granny square, weave in your ends with your yarn needle. Tighten the center ring if needed to ensure the heart stands out. Once all the tails are in place, your square is ready for use.
This easy heart granny square works perfectly for larger projects like blankets or even small accessories like coasters. If you’re feeling adventurous, take a look at this quick 15-minute heart granny square hack to craft even faster versions!
Left Handed?
Conclusion
aking an easy heart granny square is as fun as it is rewarding. It’s an excellent beginner-friendly project with room for customization, mixing creativity with classic techniques. Whether you’re planning a heartfelt gift or a cozy blanket for yourself, this design is sure to bring joy. Grab your yarn and let your creativity flow—happy crocheting!
FAQs
1. What skill level is needed to make a heart granny square?
This pattern is beginner-friendly. If you know basic stitches—single crochet, double crochet, treble crochet, and slip stitch—you can make a heart granny square. Video tutorials are available if you need extra help.
2. Can I use different yarn weights?
Yes! You can use any yarn weight for these squares. Just adjust your hook size to match the yarn. Thicker yarn gives a larger square, while thinner yarn makes a smaller one.
3. How many squares do I need for a blanket?
It depends on the size you want. For a baby blanket (about 30 x 40 inches), make around 35-40 squares. For a throw (about 50 x 60 inches), make 80-96 squares, depending on your square size.
4. How do I join my heart granny squares?
You can use different methods—slip stitch, single crochet, whip stitch, or flat braid join. All create sturdy and neat seams. Choose the one you like best.
5. Can I make the heart a different color from the border?
Absolutely! Use one color for the heart and another for the square border. This adds fun contrast and style to your project.
6. Why is my square curling or not lying flat?
Make sure your stitch count is accurate and keep your tension even. Blocking your finished squares helps them lie flat.
7. How can I make my heart granny square bigger?
Add more rounds of granny square stitches or a border around your finished square to increase its size.
![]()
Christa Patel is the creative mind behind The Secret Yarnery. She is a passionate crochet designer and teacher with years of experience making patterns simple, fun, and easy for everyone. Christa’s friendly tutorials, clear step-by-step guides, and creative ideas help crafters of all skill levels enjoy crochet.
From her home studio, Christa shares her love of yarn, color, and design with a growing online community. She believes crochet should be relaxing and joyful, not stressful. On The Secret Yarnery YouTube channel and blog, Christa offers free patterns, tutorials, and tips to inspire makers around the world.
Want to join the fun? Subscribe to The Secret Yarnery, follow on social media, and connect with other crochet lovers. Christa is always ready to cheer you on and answer your questions. Stay hooked!
About the Author
With a passion for crafting easy, beginner-friendly tutorials and patterns, Christa inspires crafters of all skill levels to unleash their creativity worldwide. She encourages yarn lovers to connect, create, and crochet a world filled with beautiful handmade treasures!
Easy Heart Granny Square Tutorial - Perfect for Beginners in 2025