How to Crochet a Beautiful Heart Coaster: Step-by-Step Guide
Creating a crochet heart coaster is a fun, easy, and satisfying project you can whip up in no time. Whether you’re looking to make a thoughtful gift for Valentine’s Day, jazz up your coffee table, or use up scrap yarn, this tutorial from The Secret Yarnery has you covered! With just a few supplies and some basic crochet techniques, you’ll be crafting these adorable coasters in no time. Ready to get started? Let’s go!
Table of contents
What You'll Need to Make the Crochet Heart Coaster
Here’s a quick rundown of the supplies you’ll need to create your crochet heart coasters:
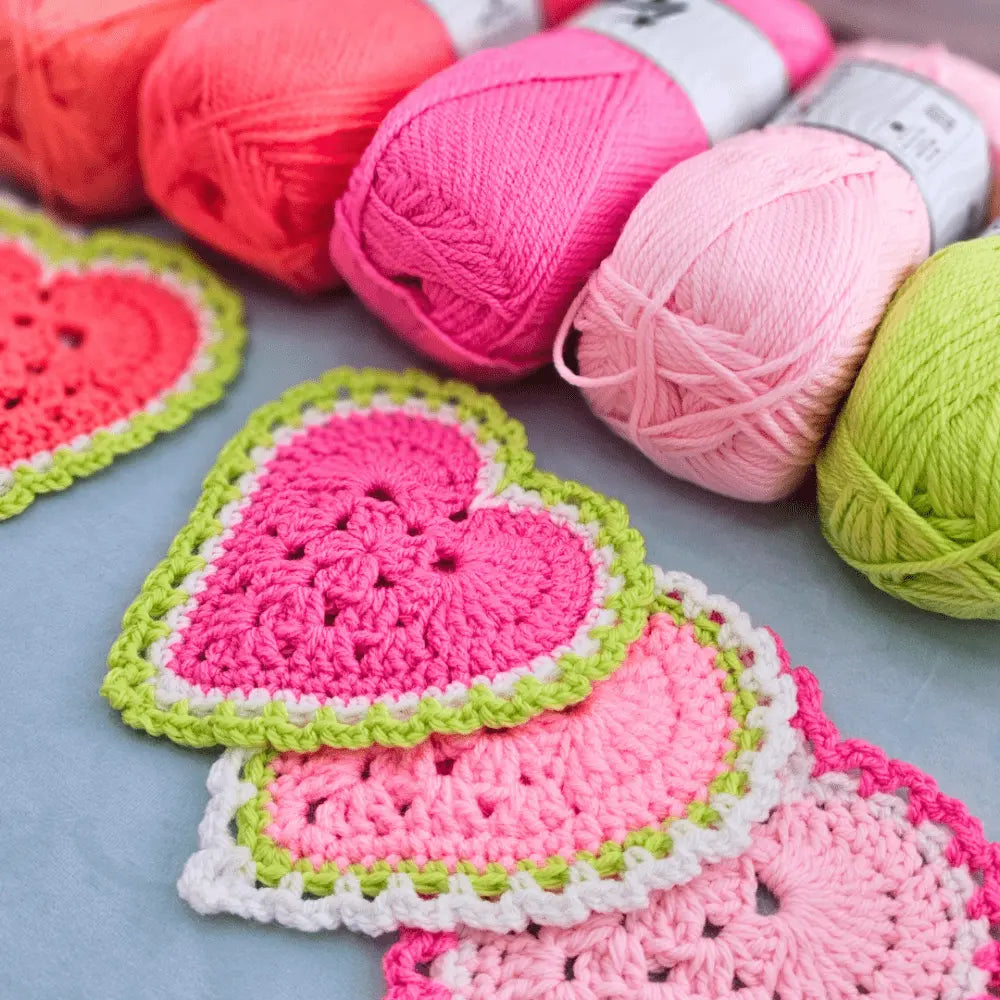
- Yarn: Choose two or three colors. Scrap yarn works perfectly for this project, making it both fun and resourceful.
- Hook: A 5 mm crochet hook is recommended for these coasters.
- Stitch Marker: Handy for keeping track of your starting points.
- Scissors: For neatly trimming your yarn ends.
- Needle: Used to sew in your loose yarn ends.
If you prefer a written pattern, you’ll find detailed, plain-English instructions here!
Choosing the Best Yarn and Colors
When making your crochet heart coaster, you’ve got options! Most worsted weight (size four) yarns work beautifully for these coasters. If you’re in Australia or use a different weight system, an 8-ply, 10-ply, or DK weight yarn can also work.
Using multiple colors adds charm to your coaster. Here are combinations to consider:
-
Pink, red, and white for a classic Valentine’s vibe.
-
Bright rainbow hues for a modern twist.
-
Soft pastel tones for a subtle, cozy look.
The great thing about this project is that you can dive into your yarn stash and experiment.
If you'd like to try other similar crochet projects, check out these simple crochet patterns.
Setting Up Your Workspace
Before you start stitching, take a moment to set up your crafting space. A clean, organized area with good lighting makes all the difference. Keep your tools and yarn within easy reach and grab a comfortable chair—you might want to make more than one of these coasters!
Making the Perfect Slip Knot
The slip knot is where it all begins. Create a short (about 2-inch) tail to work over and make a secure knot on your hook. Hold it snug but not too tight—it should slide smoothly on your hook.
Need more inspiration for starting projects like this? Take a look at this comprehensive tutorial collection.
Starting the Foundation Chain
For the heart coaster, begin with three chain stitches. This base sets the foundation for transforming your yarn into a ring. Use firm but relaxed tension—just enough to keep the chain even and consistent without being stiff.
Forming the Ring Base
After your initial chain, insert your hook into the first chain stitch to form a ring. Here’s a tip: keep the yarn tail under your hook as you work. It helps anchor your stitches and makes for a tidier finish.
Create a U-shape with the yarn under your hook and slip stitch to secure the ring. This loop will become the center of your coaster
Building the First Round of Double Crochets
Now it’s time to add double crochets into the ring. Count them out as you go: two double crochets in, chain two, then repeat. Keep working around the ring and gently slide your stitches if you need more room.
Want even more crochet tips and tricks? Take a peek at these helpful guides.
Using a Stitch Marker
A stitch marker in the center of your ring will help you keep track of where each round starts. This small step prevents confusion and ensures your coaster stays symmetrical.
Shaping the Granny Square Base
With your groundwork laid, move on to the granny square foundation. Each corner of the square uses a simple pattern: three double crochets, chain two, and then three more double crochets into the same space.
Repeat this process for all four corners, and voilà—you’ve got the foundation for your heart coaster! Make sure to join the last corner neatly with a slip stitch at the top of the chain.
For easy beginner patterns, explore this crochet beginner's resource.
Transforming the Square into a Heart
Here’s where it gets fun—turning that square into a heart! Each side space becomes the rounded curves of your heart, while the bottom forms the point. For the curves, you’ll crochet 12 treble stitches into a single space.
It might look crowded (and that’s okay!), but this creates the signature “puffed” heart look. Slip stitch into the next space to secure your work before moving to the other side.
Finishing the Heart Shape
After completing both rounded tops, transition to working down the sides and into the point. Alternate between single, double, and half-double crochet stitches to create the heart’s “fat” body. Use increases to give even more shape and depth to the design.
Be sure to finish off each section neatly before moving on. Proper finishing ensures your heart looks polished and symmetrical.
Adding the Edging and Border
For a more finished look, crochet along the heart’s edge using single crochets. Work evenly on all sides and add three single crochets at the heart’s tip.
Want a fancier finish? Add a chain-three scalloped border around the edge. This elevates the design and adds an extra touch of charm.

Final Steps
The last step is to sew in loose ends using a yarn needle. Pull tight, trim, and you’ve got a beautiful crochet heart coaster ready to use or gift!
Check out this simple granny square coaster pattern for more inspiration.
Why Crochet Heart Coasters Make the Perfect DIY Project
These coasters are not just pretty—they’re practical too! Their quick-making process, customization possibilities, and ability to use leftover yarn make them an irresistible project for beginners and pros alike.
Whether you want to add a little dazzle to your table setting or make heartfelt gifts for loved ones, this project is as enjoyable as it is useful.
Enjoyed making these? Dive into more creative ideas at The Secret Yarnery blog.
So, what are you waiting for? Grab your yarn, relax with your favorite show (or this tutorial video again), and crochet your heart out!
How long does it take to make a crochet heart coaster
It typically takes 30 minutes to an hour to complete one coaster, depending on your crochet experience and speed.
What type of yarn is best for these coasters
Worsted weight (size four) yarn works best, but 8-ply, 10-ply, or DK yarn can also be used. Look for yarn that is sturdy, absorbs moisture well, and doesn’t fray easily.
Can I adjust the size of the coaster
Yes! You can use thicker yarn or a larger crochet hook to make a bigger coaster, or thinner yarn and a smaller hook for a smaller one.
What else can I do with this heart pattern?
You can use this pattern to create garlands, appliques, ornaments, or even sew them onto other craft projects for a decorative touch.
Left Handed?
![]()
Christa Patel is a passionate crochet artist, crafting enthusiast, and the creator behind The Secret Yarnery. With years of experience in fiber arts, Christa specializes in simplifying intricate crochet designs, making them accessible to beginners and inspiring for seasoned crocheters. Her signature tutorials and patterns focus on fun, practical projects that encourage creativity and community.
Through her engaging step-by-step guides, Christa has become a trusted voice in the crafting world, helping countless makers develop confidence in their crochet skills. Her love for vibrant colors, resourceful materials, and thoughtful designs shines through in every project she shares.
Find more of Christa Patel's designs, patterns, and tutorials on The Secret Yarnery website or subscribe to her inspirational crochet journey on YouTube. Whether you're just starting out or looking for fresh creative ideas, Christa’s expertise will guide you every step of the way.
About the Author
With a passion for crafting easy, beginner-friendly tutorials and patterns, Christa inspires crafters of all skill levels to unleash their creativity worldwide. She encourages yarn lovers to connect, create, and crochet a world filled with beautiful handmade treasures!
How to Crochet a Heart Coaster Step-by-Step (2025 Guide)