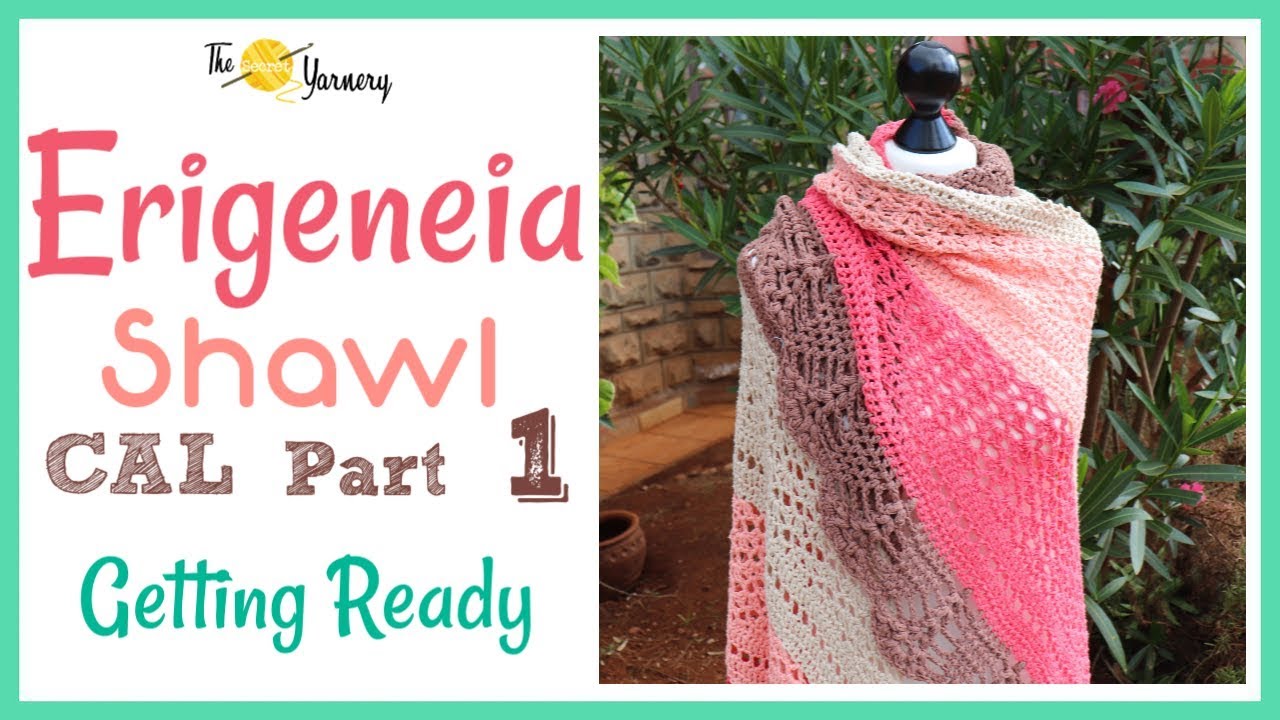
Crochet Along with The Secret Yarnery: Erigeneia Crochet Shawl - Part 1 Prep!
I'm excited to share with you my experience with the Erigeneia Crochet Shawl, a fantastic crochet along (CAL) project hosted by Christa at The Secret Yarnery. In this post, I'll guide you through everything you need to get started with this beautiful shawl.
The Erigeneia Shawl is a free pattern designed by Silke Terhorst, available on Ravelry. What I love about this pattern is that it comes with written instructions, photos for the tricky parts, and charts for both the shawl repeat and the edging. This makes it accessible to crocheters of different skill levels.
Table of contents
Get Ready to Crochet Your Erigeneia Shawl
This CAL is a great opportunity to learn new skills, get feedback, and be part of a community that shares your passion for crochet. The project will be released in five parts, with a new part every Friday. This first part is all about getting ready, so you can gather your supplies and understand the pattern.
What is the Erigeneia Shawl Crochet Along?
A Crochet Along (CAL) is a group project where crocheters work on the same pattern together over a set period. Christa from The Secret Yarnery is hosting this CAL to guide you through each step of the Erigeneia Shawl pattern. The CAL will cover the first triangle, color changes, and the trim.
Finding the Free Erigeneia Shawl Pattern
The Erigeneia Shawl pattern is available for free on Ravelry. Christa highlights that the pattern includes written instructions, photos for tricky parts, and charts for both the shawl repeat and the edging. Having all these resources makes the pattern accessible to crocheters of different skill levels.

Gathering Your Crochet Supplies
To make your Erigeneia Shawl, you'll need a few basic supplies.
Recommended Yarn and Hook Size
The pattern designer, Silke Terhorst, used a 4.5 mm crochet hook and sport weight yarn (approximately a 2 weight). She used approximately 750 meters of yarn. Her yarn was a 50% cotton, 50% acrylic blend, with 360 meters per 100 grams. You can adjust the hook size and yarn weight to your preference. Keep in mind, you might need more or less yardage for a different sized shawl.
Yarn Choice Tips
Krista suggests using color-changing yarn cakes that transition from dark to light or light to dark for an easy gradient effect. If you prefer, you can change colors manually, as Krista and some of her fellow crocheters are doing. If you choose to change colors, plan your color placement in advance. Krista is planning to use four colors: a darker brown, natural, peach, and coral for the trim.
Yarn Quantity Estimates for Multiple Colors
If you're changing colors, you'll need varying amounts of each color. Estimate about one ball (100g) for your first color. Estimate about two balls for your second color. Estimate about three balls for your third color. For the trim, estimate about one-third of the total yarn quantity used for the shawl body. As the shawl grows, you'll use more yarn in each section. Adjust these estimates based on your chosen yarn weight, hook size, and desired shawl size.
Hook Size Experimentation
Christa shares her experience of making a sample with a 5 mm hook and size 3 natural cotton. One section measured 9 inches using this combination. This helped her estimate the final width of the shawl to be around 36 inches (9 inches x 4 sections). She is also considering using a 5.5 mm hook for a looser gauge.

Planning Your Colorway
This section provides ideas for planning your color choices.
Christa's Colorway
Christa plans to use a darker brown for the top, followed by natural, peach, and a coral color for the trim. She envisions the coral trim adding a "super swishy" effect.
Inspiration from Fellow Crocheters
Christa mentions that some of her friends are using bamboo yarn. One colorway includes a harvest gold, natural beige, and charcoal gray combination. Another crocheter is incorporating a blue colorway.
Understanding the Pattern
This section will help you understand how to read the pattern and charts.
Pattern Features
The Erigeneia Shawl pattern includes written instructions, photos for tricky parts, a chart for the shawl repeat, and a chart for the edging. Having both written instructions and charts caters to different learning styles. The photos are helpful for visualizing complex stitch combinations.
Learning to Read Crochet Charts
Christa emphasizes that working through this CAL will help you become more comfortable reading crochet charts. Understanding charts can simplify complex patterns and provide a visual representation of the stitches. The CAL will help you connect the written instructions to the chart symbols, making it easier to follow along.

Getting Ready for Part 2
This section is a quick recap of what to do before the next part of the CAL releases.
Your To-Do List Before Next Friday
Download the free Erigeneia Shawl pattern from Ravelry. Choose your yarn and hook. Consider the recommended yarn weight and hook size, but feel free to experiment. Decide on your colorway. Will you use a single color, a color-changing yarn cake, or multiple colors? Purchase or gather your yarn. Make sure you have enough of each color based on the estimated yarn quantities. Familiarize yourself with the pattern. Read through the written instructions and study the charts.
Stay Connected
Subscribe to The Secret Yarnery's YouTube channel so you don't miss the next part of the CAL! You can find more crochet tutorials and patterns on their YouTube channel.
Conclusion
The goal of this post is to help you prep for the CAL. Hopefully, you have all the information you need to start crocheting the Erigeneia shawl! The Erigeneia Crochet Shawl is a beautiful and rewarding project that's perfect for crocheters of all skill levels. With its free pattern, easy-to-follow instructions, and beautiful design, it's a great way to improve your crochet skills and create something truly special. Happy crocheting!
Part 2
Erigeneia Shawl CAL Part 2 - Rows 1-5
I'm excited to share with you the second part of the Erigeneia Shawl Crochet-Along (CAL), covering rows 1 to 5. This CAL is designed by Silke Terhorst, and I'll be guiding you through each step. Before we begin, let's talk about what a CAL is. A Crochet-Along is a fun way to crochet a project with a community of people who are working on the same project at the same time. It's a great way to learn new skills, get support, and make new friends who share your passion for crochet.
In this blog post, we'll be covering the first five rows of the Erigeneia Shawl. The video tutorial is split into two parts due to its length, so be sure to check out the second part for rows 6 to 13. You can find the right-handed and left-handed video tutorials on YouTube.
Row 1: Getting Started
Let's start with Row 1. To begin, make a slip knot and slip stitch onto your hook. Then, chain 4 (this will form the center ring). Slip stitch into the first chain to form a ring. Now, chain 4 (this counts as the first treble crochet), and then make 5 double crochets into the center of the ring. Chain 1, and then make 5 more double crochets into the center of the ring. Finally, make 1 treble crochet into the center of the ring. Remember to work over the tail as you crochet.
Row 2: Building the Foundation
For Row 2, start by chaining 4 and turning your work. Then, make 2 double crochets into the top of the treble from the previous row (the same stitch as the chain 4). Make 1 double crochet into each stitch across to the chain 1 space (you should have 5 double crochets). In the chain 1 space, make 2 double crochets, chain 1, and then 2 more double crochets. Now, make 1 double crochet into each stitch across to the last chain (you should have 5 double crochets). Finally, make 2 double crochets and 1 treble crochet into the top of the chain 4 from the previous row.

Row 3: Introducing the Mesh
In Row 3, we'll introduce the chain spaces that create the mesh effect. Start by chaining 4 and turning your work. Make 1 double crochet into the same stitch as the chain 4. Chain 1, and then make 1 double crochet into the next stitch. Now, repeat the following sequence across to the chain 1 space: chain 1, skip 1 stitch, 1 double crochet into the next stitch. In the chain 1 space, make chain 1, 1 double crochet, chain 1, 1 double crochet, chain 1. Repeat the sequence across to the last chain, and then make chain 1, 1 double crochet, 1 treble crochet into the top of the chain 4 from the previous row.
Row 4: Filling in the Gaps
For Row 4, start by chaining 4 and turning your work. Make 2 double crochets into the same stitch as the chain 4. Make 1 double crochet into the next stitch, and then repeat the following sequence across to the chain 1 space: 1 double crochet into the chain space, 1 double crochet into the next stitch. In the chain 1 space, make 2 double crochets, chain 1, 2 double crochets. Now, repeat the sequence across to the last chain, and then make 2 double crochets, 1 treble crochet into the top of the chain 4 from the previous row.
Row 5: Adding Density
In Row 5, we'll add another row of solid double crochets. Start by chaining 4 and turning your work. Make 2 double crochets into the same stitch as the chain 4. Make 1 double crochet into each stitch across to the chain 1 space. In the chain 1 space, make 2 double crochets, chain 1, 2 double crochets. Now, make 1 double crochet into each stitch across to the last 4 chains, and then make 2 double crochets, 1 treble crochet into the top of the chain 4 from the previous row.

Visual Summary: Rows 1-5
Here's a visual summary of the first five rows. You can see how the mesh effect is starting to form.
Tips for Success
To ensure success with this project, here are a few tips:
-
Pay attention to your stitch count to avoid mistakes.
-
Maintain consistent tension to keep your stitches even.
-
Use stitch markers to mark the beginning and end of rows if you need to.
-
Refer to the chart frequently to stay on track.
Troubleshooting Common Problems
If you encounter any problems, here are a few common issues and their solutions:
-
Incorrect stitch count: Count your stitches carefully and make adjustments as needed.
-
Uneven edges: Check your tension and make adjustments to keep your edges even.
-
Difficulty reading the chart: Take your time and refer to the chart frequently to stay on track.

Customization Ideas
Here are a few ideas for customizing your Erigeneia Shawl:
-
Use different yarn colors to create a unique look.
-
Add fringe or tassels to give your shawl a decorative touch.
-
Adjust the size of your shawl by changing the hook size or adding more rows.
The Erigeneia Shawl CAL Part TWO - Rows 1 to 5 Wrap-Up
That's it for the first five rows of the Erigeneia Shawl CAL. In the next video, we'll cover rows 6 to 13. Don't forget to subscribe to The Secret Yarnery's newsletter and YouTube channel for more crochet tutorials and updates. I'll be changing colors in the next row, so stay tuned for that. Happy crocheting!
Part 3
Erigeneia Shawl CAL Part 3: Crochet Along Rows 6-17!
Welcome to the Erigeneia Shawl CAL Part 3, where we will be crocheting rows 6-17 of this beautiful shawl. I'm excited to share this journey with you, and I'm sure you'll love the progress we'll make. Before we begin, make sure you have all the necessary materials, including your yarn, hook, and the pattern.
Color Change Magic: Starting Row 6
Row 6 is where the lacework or shells begin, and it's a great place to start a new color. To change colors, you'll need to follow a few simple steps. First, slide your hook down to the same stitch where you finished the last row. Then, poke your hook into the stitch, grab a loop of your new yarn, and bring it up through the stitch. Leave a longer tail, about five inches, to sew in with a needle later. Now, put the loop on your hook, bring it up, and pull the old yarn through the stitch. Pull the new color a little bit, just so it's hanging out there for a minute or two. Take your old yarn and weave it in through the back loops of your shawl, about six stitches forward. This way, when you're stitching into it, it kind of disappears, and you won't have to sew it in as much later.
Decoding Row 6: Shells and Spaces
Now that we've changed colors, let's start Row 6. Look for your dots or circles on the chart, and you'll see that we're starting with a chain 5, which counts as a treble crochet and a chain 1. Turn your work, and we'll begin our first small shell. To make a small shell, you'll need to double crochet, chain 2, and double crochet all into the same stitch. After that, skip three stitches and make a big shell in the fourth stitch. A big shell consists of two double crochets, a chain 1, and two double crochets. Alternate between small and big shells every fourth stitch, and don't forget to match the other side.
Row 7: Small Shells and Big Spaces
In Row 7, we'll start with a chain 5, which counts as a double crochet and the top of the small shell. Turn your work, and we'll create a small shell at the beginning of the row. Then, we'll make a big shell into the small shell below. Continue alternating between big shells in small shell spaces and small shells in big shell spaces. When you reach the tip of the shawl, make sure to put a stitch marker in the top of the treble crochet so you can easily find it later.
The Tip of the Shawl: Row 7 Edition
At the tip of the shawl, we'll make a small shell into the first chain one spot, chain 1, and treble crochet into the center of the three double crochets from the previous row. Chain 1 and make another small shell into the next chain one spot. Continue alternating shell patterns back down the row, and don't forget to finish with a small shell into the fourth chain at the end.
Row 8: Alternating Shells and Treble Focus
In Row 8, we'll start with a chain 5, which counts as a treble crochet and a chain 1. Turn your work, and we'll begin with a big shell into the small shell at the end. Alternate shell patterns all the way to the tip, making sure to check the beginning, tip, and end of each row. At the tip, we'll make double crochet, chain 2, double crochet, chain 2, double crochet all into the top of the treble crochet.
The Tip of the Shawl: Row 8 Edition
Continue alternating shells back down the row, and don't forget to finish with a big shell into the chain space at the end. Chain 1 and treble crochet into the chain 3, and you'll have completed Row 8.

Row 9: Building Big Shells
In Row 9, we'll start with a chain 3, which counts as a double crochet. Turn your work, and we'll create a big shell right on the end of the shawl. Alternate shell patterns back along the row, making sure to match the other side. At the tip, we'll make a big shell into the first small shell space, chain 1, and treble crochet into the double crochet.
The Tip of the Shawl: Row 9 Edition
Chain 1 and make another big shell into the small shell on the other side. Continue alternating shells back down the row, and don't forget to finish with a small shell into the last big shell, chain 1, and big shell into the top of the chain 4.
Row 10: Chain Five and Shell Alternation
In Row 10, we'll start with a chain 5, which counts as a treble and a chain 1. Turn your work, and we'll make a small shell into the big shell. Alternate shells to the tip, making sure to put a stitch marker in the top of the treble crochet. At the tip, we'll make a small shell into the chain one space, two double crochet, chain 1, three double crochet, chain 1, two double crochet all into the top of the treble crochet.
The Tip of the Shawl: Row 10 Edition
Continue alternating shells back down the row, and don't forget to finish with a small shell into the big shell on the very end, chain 1, and treble crochet into the top of the chain 3.
Row 11: Small Shell Start
In Row 11, we'll start with a chain 5. Turn your work, and we'll create a small shell at the beginning of the row. Alternate shell patterns to the tip, making sure to put a stitch marker in the top of the treble crochet. At the tip, we'll make a small shell into the first chain one spot, chain 1, and treble crochet into the center stitch.
The Tip of the Shawl: Row 11 Edition
Chain 1 and make another small shell into the next chain one spot. Continue alternating shell patterns back down the row, and don't forget to finish with a small shell into the fourth chain down at the end.
Row 12: Big Shell Start
In Row 12, we'll start with a chain 5. Turn your work, and we'll begin with a big shell into the first small shell. Alternate shell patterns to the tip, making sure to check the beginning, tip, and end of each row. At the tip, we'll make double crochet, chain 2, double crochet, chain 2, double crochet all into the top of the treble crochet.

The Tip of the Shawl: Row 12 Edition
Continue alternating shells back down the row, and don't forget to finish with a big shell into the chain space at the end, chain 1, and treble crochet into the chain 3.
Row 13: Double Crochet Row
In Row 13, we'll start with a chain 4. Turn your work, and we'll make two double crochets into the first stitch. One double crochet into each stitch until the chain 1 space, then follow the pattern. At the tip, we'll make three double crochets into the space, two double crochet, chain 1, two double crochet into the center double crochet.
The Tip of the Shawl: Row 13 Edition
Three double crochets into the next space, and continue with the pattern. One double crochet into the chain space, and two double crochets and a treble crochet into the top of the chain 4.
Understanding the Pattern Repeat: Rows 14-17
Now that we've completed the charted section, we'll repeat the pattern from Row 2 to Row 13 until we achieve the desired length. Remember to change colors at Row 6, and don't forget to put a stitch marker in the top of the treble crochet at the tip of the shawl.
Row 14: Double Crochet Foundation
In Row 14, we'll start with a chain 4. Two double crochets into the first stitch, and one double crochet into each stitch until the chain 1 space. Chain 1 space: two double crochets, chain 1, two double crochets. One double crochet into each stitch back down the row, and two double crochets and a treble crochet into the top of the chain 4.
Conclusion
Congratulations on completing Rows 6-17 of the Erigeneia Shawl CAL! You're one step closer to finishing this beautiful shawl. Remember to stay tuned for the upcoming border CAL on March 23rd, and don't hesitate to reach out if you have any questions or need help with any of the rows. Happy crocheting, and I look forward to seeing your finished projects!
Part 4
Erigeneia Shawl Border Tutorial
I'm excited to share with you this comprehensive guide on how to crochet the beautiful Erigeneia Shawl border. This tutorial is perfect for those who have completed the main body of the shawl and are now looking to add a stunning border to finish it off.
Tools and Materials
Before we dive into the tutorial, let's go over the tools and materials you'll need:
-
Yarn: Choose a yarn that complements the color of your shawl. You can find a variety of yarns on Amazon or check out the yarn selection on secretyarnery.com.
-
Crochet Hook: A Clover hook is highly recommended for this project. You can find Clover hooks on Amazon or check out the hook selection on secretyarnery.com.
-
Scissors: You'll need a good pair of scissors to cut your yarn as you work.
-
Yarn Needle: A yarn needle is necessary for weaving in ends.
-
Stitch Markers (optional): If you find it helpful to mark your stitches, you can use stitch markers.
Getting Started: Understanding the Border Chart
The border chart is based on the original Erigeneia shawl pattern available on Ravelry. The chart is broken down into individual rows for easier following. The key to symbols includes circles (chains), "T" shapes (double crochet), and the puff stitch symbol.
Row 1: Foundation of the Border
To start the border, you'll need to join your yarn to the last stitch of the shawl. If you're changing colors, join the new color to the last stitch. If you're continuing with the same color, you can wait for now. Next, create a chain of 6. Then, work 7 double crochets into the next 7 double crochets of the shawl, skipping the first treble. It's essential to skip the treble to maintain the pattern. After that, chain 2, skip 2 stitches, and work a puff stitch into the third stitch. To make a puff stitch, wrap your yarn around the hook, insert the hook into the stitch, yarn over, and pull up a loop. Repeat this process two more times, then yarn over and pull through all loops on the hook. Continue this pattern down one side of the shawl, repeating the sequence of 7 double crochets, chain 2, skip 2, and puff stitch.
Mastering the Puff Stitch
The puff stitch is a crucial element of the Erigeneia Shawl border. To create a puff stitch, follow these steps:
- Wrap your yarn around the hook.
- Insert the hook into the stitch.
- Yarn over and pull up a loop. Repeat this process two more times.
- Yarn over and pull through all loops on the hook.
- Chain 1 to secure the puff stitch. Tips for evenness: Pull the loops up to the same height to maintain an even texture.
Row 1: Creating the Corner
When you reach the tip of the shawl, you'll need to work directly into the corner space. Chain 2, then work three puff stitches into the corner space, each separated by a chain 1. After completing the corner, chain 2, skip 2 stitches, and begin working the pattern back down the opposite side of the shawl.
Row 1: Finishing the Row
To finish the first row, chain 2, then treble crochet into the top of the initial chain 4 from the starting row.
Row 2: Building the Pyramids
The second row of the border involves building the pyramids. Chain 2, puff stitch into the top of the treble from the previous row. Then, chain 2, puff stitch into the top of the treble from the previous row. Work 6 double crochets in the spaces between the double crochets of the previous row. Chain 2, puff stitch, chain 2, puff stitch into the top of the puff stitch from the previous row. Repeat this pattern down the side of the shawl.

Row 2: The Tip of the Shawl
When you reach the tip of the shawl, work two puff stitches into the top of the puff stitch from the previous row, separated by a chain 2. Then, chain 2, puff stitch, chain 2, puff stitch into the top of the puff stitch from the previous row.
Row 2: Finishing the Row
To finish the second row, chain 2, then treble crochet into the top of the last chain of the previous row.
Row 3: Introducing Chain Spaces
The third row of the border introduces chain spaces. Chain 7, turn. Work a puff stitch, chain 2, puff stitch into the chain 2 space of the previous row's puff stitch cluster. Chain 3, then work 5 double crochets in the spaces between the double crochets of the previous row. Chain 3, then work a puff stitch, chain 2, puff stitch into the chain 2 space of the previous row's puff stitch cluster.
Row 3: Tip of Shawl
When you reach the tip of the shawl, chain 3, then work a puff stitch, chain 2, puff stitch into the chain 2 space of the previous row's puff stitch cluster. Chain 3, then work a puff stitch, chain 2, puff stitch into the chain 2 space of the previous row's puff stitch cluster.
Row 3: Finishing the Row
To finish the third row, chain 3, then treble crochet into the top of the last puff stitch you made of the previous row.
Row 4: Expanding the Chain Spaces
The fourth row of the border expands the chain spaces. Chain 7, turn. Work a puff stitch, chain 2, puff stitch into the chain 2 space of the previous row's puff stitch cluster. Chain 4, then work 4 double crochets in the spaces between the double crochets of the previous row. Chain 4, then work a puff stitch, chain 2, puff stitch into the chain 2 space of the previous row's puff stitch cluster.
Row 4: Tip of Shawl
When you reach the tip of the shawl, chain 4, then work a puff stitch, chain 2, puff stitch into the chain 2 space of the previous row's puff stitch cluster. Chain 3, then work a puff stitch, chain 2, puff stitch into the chain 2 space of the previous row's puff stitch cluster.
Row 4: Finishing the Row
To finish the fourth row, chain 4, then treble crochet into the top of the last chain of the previous row.
Row 5: Clusters of Three
The fifth row of the border involves clusters of three. Chain 3, turn. Work three puff stitches into the chain 2 space of the previous row's puff stitch cluster, each separated by a chain 2. Chain 3, then work 3 double crochets in the spaces between the double crochets of the previous row. Chain 3, then work three puff stitches into the chain 2 space of the previous row's puff stitch cluster, each separated by a chain 2.

Row 5: Tip of Shawl
When you reach the tip of the shawl, chain 3, then work three puff stitches into the chain 2 space of the previous row's puff stitch cluster, each separated by a chain 2. Chain 3, then work three puff stitches into the chain 2 space of the previous row's puff stitch cluster, each separated by a chain 2.
Row 5: Finishing the Row
To finish the fifth row, chain 3, then work 2 double crochets in the space of the last chain of the previous row.
Row 6: Connecting the Clusters
The sixth row of the border connects the clusters. Chain 3, turn. Work a puff stitch, chain 2, puff stitch into the first chain 2 space of the previous row's cluster of three puff stitches. Chain 3, then work a puff stitch, chain 2, puff stitch into the second chain 2 space of the previous row's cluster of three puff stitches. Chain 3, then work 2 double crochets in the spaces between the double crochets of the previous row.
Row 6: Tip of Shawl
When you reach the tip of the shawl, chain 3, then work a puff stitch, chain 2, puff stitch into the chain 2 space of the previous row's puff stitch cluster. Chain 2, then work a puff stitch, chain 2, puff stitch into the chain 2 space of the previous row's puff stitch cluster.
Row 6: Finishing the Row
To finish the sixth row, chain 3, then work 2 double crochets in the space of the chain and double crochet into the top of the chain of the last row.
Row 7: The Final Flourish
The seventh and final row of the border is the last step in completing your Erigeneia Shawl. Chain 3, turn. Skip to the chain space from the previous row, then work a puff stitch, chain 2, puff stitch. Skip to the chain space from the previous row, then work three puff stitches, each separated by a chain 2. Repeat this pattern down the side of the shawl, working puff stitches and double crochets as indicated.
Row 7: Tip of Shawl
When you reach the tip of the shawl, jump straight into the stitches. Work a puff stitch, chain 2, puff stitch into the chain space from the previous row. Then, work three puff stitches, each separated by a chain 2, into the chain space from the previous row.
Row 7: Finishing the Row
To finish the seventh row, double crochet into the space of the chain and double crochet into the top of the chain of the last row.
Finishing Touches: Weaving in the Ends
Once you've completed the border, it's essential to weave in all loose ends to prevent unraveling. Use a yarn needle to sew in the ends along the back of the work.
Celebrate Your Finished Erigeneia Shawl!
Congratulations! You've completed the beautiful Erigeneia Shawl. Take pride in your newly bordered shawl and enjoy wearing it.
You can check out the free pattern here.
Share Your Projects!
We'd love to see your finished Erigeneia Shawl. Share photos of your project on social media using the hashtag #ErigeneiaShawl and tag us @secretyarnery. You can also join our Facebook group to share your projects and connect with other crochet enthusiasts.
More Crochet Resources
For more crochet patterns, tutorials, and resources, visit our website at secretyarnery.com. You can find a wide range of free crochet patterns, including afghans, amigurumi toys, and accessories. We also offer printable PDF patterns and left-handed tutorials for those who need them.
Stay Connected!
To stay up-to-date with the latest crochet patterns, tutorials, and news, subscribe to our newsletter or follow us on social media. You can also join our YouTube channel for video tutorials and crochet tips.
Thank You!
Thank you for following along with this tutorial and for being part of the Secret Yarnery community. We're honored to have you as part of our crochet family and can't wait to see what you create next!
Christa Patel is the creative mind behind the Secret Yarnery, a trusted resource for crochet enthusiasts worldwide. With years of experience, Christa specializes in designing beginner-friendly yet stunning crochet patterns that inspire creativity and confidence in crafters of all skill levels.
As a passionate crocheter, Christa is known for her clear and approachable teaching style, breaking down complex patterns into simple, easy-to-follow steps. Through her engaging video tutorials, written patterns, and helpful tips, she has cultivated a community where crocheters can connect, learn, and share their work.
Christa’s dedication to making crochet fun and accessible shines in every project she creates, from colorful blankets to intricate borders. Whether you’re a seasoned expert or just picking up a hook for the first time, Christa's guidance will help you craft something beautiful.
For more crochet patterns, tips, and inspiration, visit her website at The Secret Yarnery, or check out her YouTube channel filled with step-by-step tutorials.
About the Author
With a passion for crafting easy, beginner-friendly tutorials and patterns, Christa inspires crafters of all skill levels to unleash their creativity worldwide. She encourages yarn lovers to connect, create, and crochet a world filled with beautiful handmade treasures!
Erigeneia Crochet Shawl