How to Crochet a Beautiful Hibiscus Flower Granny Square: Step-by-Step
Are you ready to create a masterpiece with just a hook, some yarn, and a little guidance? The Hibiscus Flower Granny Square is a beautiful crochet pattern that merges elegance with simplicity—ideal for crocheters of all levels. I'm Christa from The Secret Yarnery, and today, I’ll walk you through this fun and rewarding project.
This pattern is not just about making a granny square; it’s part of the Bloomscape CAL 2023, a series celebrating creative flower designs. Whether you’re joining the CAL or simply looking for a lovely crochet flower granny square to add to your repertoire, this tutorial has everything you need.
What Makes the Hibiscus Flower Granny Square Special?
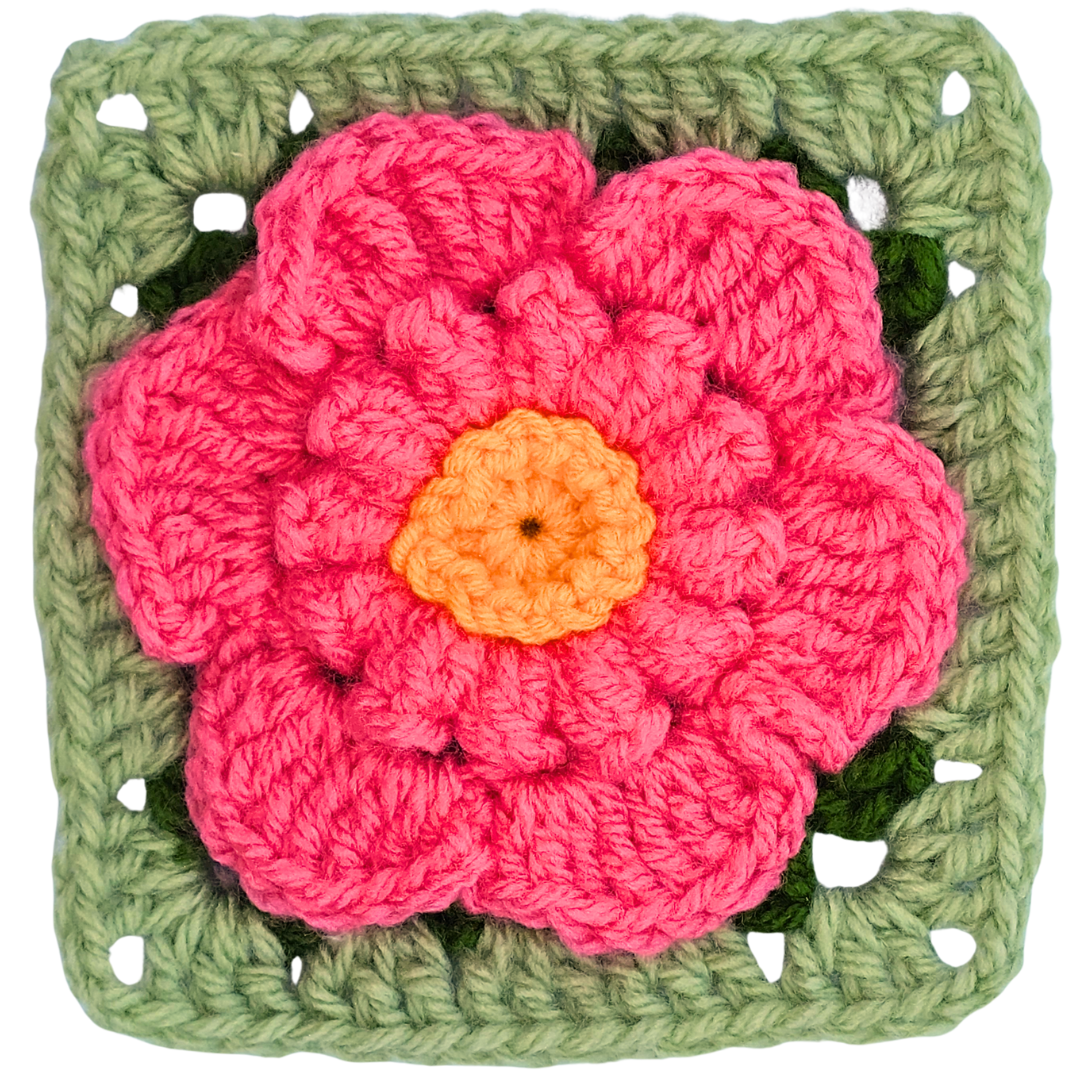
The Hibiscus Flower Granny Square stands out with its vibrant, multilayered petals that give a 3D effect. Unlike many designs, this isn’t an applique stitched to a square; the entire flower is integrated, creating a seamless and polished look. Its versatility makes it perfect for blankets, pillows, or standalone projects.
Plus, the pattern is practical for beginners and seasoned crocheters alike, using basic stitches with step-by-step instructions to guide you through every loop and chain.
You can also explore other granny square patterns available in the Granny Squares Collection.

The Bloomscape CAL 2023 Series
This granny square is part 12 of the Bloomscape CAL 2023—a year-long crochet-along where we create one flower-inspired square every month. By December, participants will have a spectacular floral-themed blanket. Imagine the joy of watching your garden of squares bloom as the year progresses! If you're new to this, you can learn more about crochet-along projects here.
Easy-To-Follow for All Skill Levels
Worried it might be too tricky? Don’t be! This pattern uses simple crochet stitches like double crochets, trebles, and popcorn stitches. If you're a beginner, it's a perfect opportunity to practice and master new techniques. For advanced crocheters, it’s a quick and satisfying project you can customize with different colors and textures.
I’ve even designed this pattern in plain English, making it accessible for everyone. You’ll feel like I’m sitting right beside you, guiding you through every step. For complementary floral patterns, check out some ideas in the Plants & Flowers Collection.

Materials You'll Need
Before you start, gather these materials:
- Yarn: Four colors of worsted weight acrylic yarn. I recommend "Favorite" from Ice Yarns.
- Crochet Hook: A 5 mm hook for a balanced stitch size.
- Other Tools: Scissors and a needle for sewing in your yarn tails.
Using the right materials ensures your square looks beautiful and holds up over time.
Why Sewing in Ends Matters
Securing your yarn tails is key to a polished look. A blunt-tip needle is perfect for weaving in ends without splitting the yarn. After completing each round, take some time to sew in tails to ensure your work stays neat and durable. Trust me, this small step makes a big difference!
For some beginner-friendly flower crochet tips, see this helpful guide on Crochet Flowers for Beginners.

Setting Up Your Workspace
A clutter-free, well-lit workspace can do wonders for your focus. Keep your materials neatly arranged—scissors, yarn, hook, and needle—all within arm’s reach. This way, you can follow along with the tutorial without interruptions.
Starting the Magic Ring
The foundation of this project is the magic ring, an ingenious technique that creates a snug, neat center for the hibiscus. While you can use a chain-three ring if you prefer, the magic ring is the better option for preventing gaps.
Steps to Create the Magic Ring:
- Position Yarn: Place the yarn tail over your non-dominant hand and hold it with your ring finger and thumb.
- Wrap Yarn: Wrap the yarn around your index and middle fingers to form an “X.”
- Insert Hook: Slide the hook under the short strand and back over the long one.
- Pull Loop: Catch the long yarn with your hook, pull it through, and chain one to secure.
Congratulations! You’ve just made your magic ring.

Building the Hibiscus Flower: Round-by-Round
Once the magic ring is ready, it's time to bring the flower to life. Below is a simple breakdown of the steps:
Round 1: Laying the Foundation
Work 11 double crochets into the center of the ring, including the chain for a total of 12 stitches. Pull the tail to close the ring tight and join with a slip stitch. This creates a perfect base for your flower.
Round 2: Adding Structure
This round introduces front-post single crochets, which give the flower its signature texture. Work one front-post single crochet around each stitch, chaining one in between. Complete the round with 12 evenly spaced stitches.
Round 3: Creating Petals with Popcorn Stitches
Switch to your petal color and build the vibrant petals of your hibiscus. Each petal is made using the popcorn stitch, followed by chain-two spaces. Spread these stitches evenly around the circle.
Popcorn stitches give the petals a 3D effect and can turn any project into an eye-catching piece. You can find additional tips in Patterns - Tagged Crochet Flower.
Rounds 4–7: Shaping the Flower and Square
The next rounds work to shape the flower into a square. These include treble crochets, chain spaces, and neat corner formatting. By the end of Round 7, you’ll start seeing your hibiscus transitioning into a granny square.
Round 8: Finishing as a True Granny Square
Use a neutral or contrasting yarn to make your square uniform. Work three double crochets into every space, with corners formed by three double crochets, two chains, and another three double crochets. This step turns your project into a classic granny square that fits seamlessly with other squares.

Wrapping it All Together
Your finished Hibiscus Flower Granny Square is a work of art! It’s vibrant, textured, and versatile—a piece that can either stand alone or meld beautifully into larger projects. Whether you're adding it to a blanket or using it as a motif for pillows, the possibilities are endless.
If you're looking for related project ideas, the Color Changing Granny Square 2.0 is a great next step.
Ready to Create More?
I hope you love this pattern as much as I do! Don’t forget to share your creations and check out new designs on my website. Dive into more crochet patterns and elevate your skills with The Secret Yarnery. Happy crocheting!
FAQs
1. What type of yarn should I use for the Hibiscus Flower Granny Square?
You can use worsted weight acrylic yarn. It's strong, durable, and great for crochet projects. The "Favorite" line from Ice Yarns is a good option, but any similar yarn will work.
2. Can beginners crochet the Hibiscus Flower Granny Square?
Yes, absolutely! This pattern is beginner-friendly and uses basic stitches like double crochets, trebles, and popcorn stitches. Plus, the tutorial provides step-by-step guidance to help you through the process.
3. How do I join the Hibiscus Flower Granny Squares for a blanket?
You can use a slip stitch, single crochet, or whip stitch to join your granny squares. Choose a method that creates the finish you like most. Tutorials on how to join granny squares are widely available online.
4. How long does it take to complete one granny square?
Depending on your skill level, each Hibiscus Flower Granny Square can take anywhere from 1–2 hours. With practice, you may complete them even faster.
5. What is the magic ring, and why should I use it?
The magic ring technique creates a tight, gap-free center for your crochet projects. This is especially useful for designs like the Hibiscus Flower Granny Square, where a neat base is key.
6. How many colors should I mix into the pattern?
The standard pattern uses four colors, but you can customize it with any combination that fits your project or personal taste. Experiment with bold contrasts or subtle shades for different effects.
7. Can I wash a blanket made with these granny squares?
Yes, you can wash the blanket, provided you use washable yarn. Follow the yarn label's care instructions to ensure longevity and vibrancy.
8. What projects can I make using the Hibiscus Flower Granny Square?
This versatile square can be used for blankets, pillows, tote bags, wall hangings, and even table runners. It’s perfect for adding a touch of floral elegance to any project.
9. Do I need to block granny squares before joining them?
Blocking helps squares align perfectly, making them easier to join. While it’s optional, blocking is recommended if you want a polished and professional look.
10. Where can I find more patterns like this?
You can explore more flower-inspired patterns and granny square collections on The Secret Yarnery's website. There’s plenty of inspiration for new projects!
![]()
Christa Patel is the creative force behind The Secret Yarnery, a hub for crochet enthusiasts worldwide. With years of experience and a passion for the craft, Christa transforms simple yarn into stunning works of art. Her engaging tutorials, clear instructions, and creative patterns have made her a trusted name in the crochet community.
Christa's love for crochet began as a hobby but quickly grew into a lifelong mission to share her skills and inspire others. Whether you're a beginner or an experienced crocheter, Christa's projects, like the Hibiscus Flower Granny Square, provide something for everyone. She believes crocheting is not only a craft but also a therapeutic escape that brings joy and relaxation.
When she's not crocheting, Christa enjoys connecting with her audience through her vibrant YouTube channel and blog. Her inclusive and friendly teaching style ensures that every crafter feels guided and encouraged. If you're looking to expand your crochet skills, discover new patterns, or simply find inspiration, Christa has you covered.
Follow Christa on The Secret Yarnery to explore more exciting patterns, crochet-along projects, and tips to enhance your crochet journey!
About the Author
With a passion for crafting easy, beginner-friendly tutorials and patterns, Christa inspires crafters of all skill levels to unleash their creativity worldwide. She encourages yarn lovers to connect, create, and crochet a world filled with beautiful handmade treasures!
How to Crochet a Beautiful Hibiscus Flower Granny Square: Step-by-Step