Crochet a Daisy Granny Square Blanket: Easy Steps for a Masterpiece!
Have you ever wanted to create a beautiful, handmade blanket that’s both eye-catching and comforting? The Daisy Granny Square Blanket is the perfect project for you! Whether you're a seasoned crocheter or just picking up a hook for the first time, this pattern is wonderfully simple to follow. The finished blanket is not only a stunning piece of art but also a versatile addition to any home, adding a touch of warmth and personality.
In this blog post, I'll walk you through every step of creating your own Daisy Granny Square Blanket. I’ll cover everything from the materials you'll need and pattern details to easy-to-follow instructions and essential joining techniques. And to help you along the way, I suggest watching the video tutorial.
Why Crochet a Daisy Granny Square Blanket?
Crocheting is more than just a hobby, it's a way to unwind and create something beautiful with your own two hands. This particular project is especially rewarding because it's so customizable. You can choose your favorite colors, play with different textures, and end up with a unique blanket that reflects your personal style. Plus, a handmade blanket makes a thoughtful and cherished gift for loved ones, or a cozy addition to your own home!

The Charm of Granny Squares
What exactly is a granny square? It's a small, typically square piece of crochet fabric, worked in the round from the center outward. Granny squares have been around for generations, with their origins tracing back to the 19th century. They gained popularity during the Victorian era as a way to use up leftover yarn scraps.
These squares are incredibly versatile. What makes granny squares so fun is that they can be arranged in countless ways to create different patterns and designs. I can make a bold statement, a subtle pattern, or anything in between. I love the endless possibilities!
Meet Christa from The Secret Yarnery
The pattern for this gorgeous Daisy Granny Square Blanket comes from Christa, the creative mind behind The Secret Yarnery YouTube channel. Christa is an expert crocheter with a gift for explaining techniques in a clear, easy-to-understand way. Whether you're a beginner or have been crocheting for years, you'll appreciate her step-by-step instructions and helpful tips. Plus, if you're a left-handed crocheter, Christa has got you covered with left-handed versions of her tutorials!
Pattern Overview
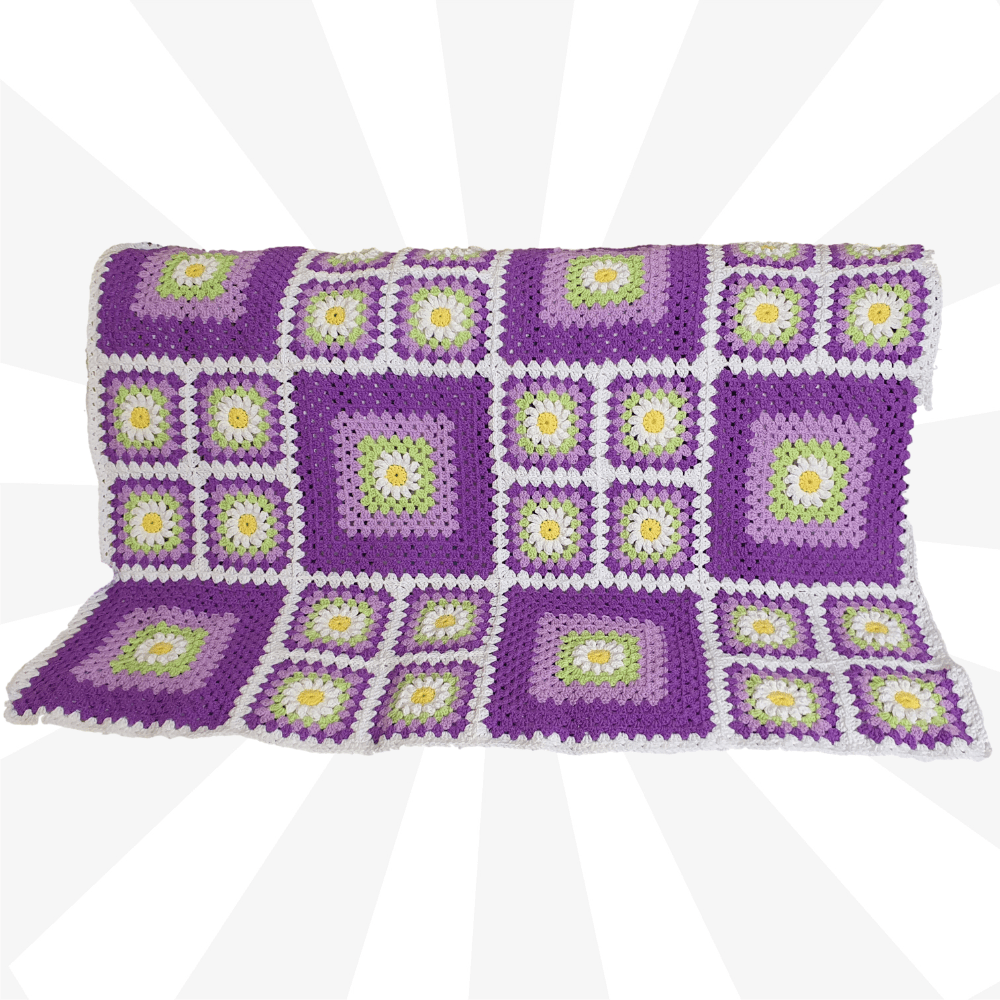
So, what will the final product look like? Christa's finished blanket measures 42 inches wide by 54 inches tall (107 cm by 137 cm). But don't let that limit you! One of the best things about this pattern is that you can easily adjust the size to fit your needs.
To make a blanket the same size as Christa's, you'll need 24 small Daisy Granny Squares and six large Daisy Granny Squares. You'll start by crocheting the individual squares, then join them together to form larger blocks. Finally, you'll join the blocks to create the finished blanket. I'll also be covering different joining methods to give a seamless look. If you prefer to follow a written pattern, you can find one available on The Secret Yarnery website.
![]()
Materials You'll Need
Ready to gather your supplies? Here's what you'll need to make your own Daisy Granny Square Blanket:
-
Yarn: Worsted weight acrylic yarn in 5 different colors. Christa used Ice Yarns Favorite, but you can use any yarn you like.
- Yellow: 50 grams
- Green: 100 grams
- Lavender/Lilac: 200 grams
- Dark Purple: 300 grams
- White: 500 grams
- Crochet Hook: 6 mm
-
Tools:
- Scissors (https://amzn.to/3EC1CHy)
- Needle for sewing in ends (https://amzn.to/2MRffKP)
Choosing Your Colors
The color palette is where you can really let your creativity shine! I encourage you to choose colors that you love and that complement your home decor. If you're looking for inspiration, try using a color wheel to find harmonious combinations. Or, for a more minimalist look, you could even stick to a single color. The options are endless!
Abbreviations
Here are a few common crochet abbreviations that you might encounter in this pattern:
- ch = chain
- st = stitch
- sc = single crochet
- dc = double crochet
Creating the Small Daisy Granny Squares
The foundation of this blanket is the small Daisy Granny Square. Don't worry, it's easier than it looks! To get started, check out the full tutorial for the small granny squares here. You can also find the pattern here. The tutorial includes detailed, step-by-step instructions that will guide you through every stitch.

Making the Large Daisy Granny Squares
Want to add some variety to your blanket? You can easily adapt the small granny square pattern to make larger squares. Here's how Christa does it:
- 2 rows of green
- 3 rows of the lighter shade
- 5 rows of the darkest shade
Remember, you can adjust the number of rounds and colors to create your own unique design.
Joining Small Squares into Larger Blocks
Once you've crocheted all your small and large squares, it's time to start joining them together. The first step is to join the small daisy granny squares into larger blocks. To do this, you'll need to join four small squares to create one large block. I recommend using the "continuous join-as-you-go" method. This method is super efficient because it only leaves you with two ends to sew in per block!
Here's a quick overview of how it works:
- Lay two squares side by side.
- Join yarn in the corner space of the first square.
- Work a row of granny stitches (3 double crochets in each space) along the first square.
- Without chaining, work three double crochets into the corner space of the next square.
- Continue working granny stitches along the second square.
- At the corner, chain 2 and work 3 more double crochets into the same corner space.
- Continue working around the block.
Joining: Turning Corners
Turning corners might seem tricky, but it's actually quite simple. When you reach a corner, follow these steps: Chain two, then work three more double crochets into that same corner space. After that, keep working around the square, making three double crochets into each space.
Joining The New Blocks
When adding new blocks to the blanket, I find it helpful to keep my finished work on top. This makes it easier to see where to place your stitches. After making three double crochets into that corner space, look for the matching space on the block above. Then, slip stitch to join. After that, wrap your yarn and do three double crochets into the next space on the block you’re working on. By repeating these steps you'll have finished the start to this join!

Joining: Joining The Second Row
When adding new rows, wrap your yarn and make three double crochets into that corner space. Again, keep your finished work on top! Now, look for the matching space on the block above and slip stitch to join. Wrap your yarn, and into the next space on the block you're joining, make three double crochets.
Joining Blocks: On The Corner
When joining blocks on the corner, it’s important to create a neat, secure connection. The goal is to join kitty corner, going from one corner to the opposite corner. Slip stitch into this next corner, the opposite corner, to join. This secures the corner and gives your blanket a professional look.
Joining Blocks: One Side
When joining one side of the next block, wrap your yarn and make three double crochets into that corner space. Then, lay everything flat and look for the next space. Slip stitch to join, wrap your yarn, and make three double crochets into the next space.
Joining Blocks: Second Row
Once you've joined one side, rotate your work. On the block you're working on, work all the way around on all three sides. Remember to make three double crochets to finish that corner space. Then, slip stitch kitty corner, jumping across to the opposite side. Find that corner space in between those stitches and slip stitch to join.
Joining Blocks: Slip Stitching
To seamlessly join blocks, put your hook down into that first space, bring your yarn up, and slip stitch to join. Wrap your yarn and make three double crochets into the block you're working on. Keep repeating this process, slip stitching into each space to create a secure and attractive seam.
Joining Blocks: Connecting
Before you start connecting your blocks, lay them all out. You can see which blocks to pick up and join as you go. I like to work on the empty sides first. So, if you're joining on three sides, finish that one side first. If you're only joining on two sides, then finish two sides of your square first.

Joining Blocks: Slip Stitching To Finished Work
To continue, slip stitch down into the finished work. Hook down, yarn up, and slip stitch to join. Wrap your yarn and make three double crochets into the same corner space. Pull your hook toward you to see your stitches on the block we've completed. Put your hook down into that next space, bring your yarn back up, and slip stitch to join. Wrap your yarn. Do three double crochets into the next space on the block you are joining. Look for the next space in the block you have finished. Put your hook down, bring your yarn up, and slip stitch to join. Wrap your yarn.
Joining Blocks: Joining Corners
For the center join, find that space in between the blocks. Put your hook down into that space and make one slip stitch. That's it! Keep going with three double crochets into each space and slip stitch into the block you have finished. Wrap your yarn, and make three double crochets into the block you are working on.
Joining Blocks: New Blocks Above
Always keep new blocks above, and slip stitch into that space. Wrap your yarn. Into that corner space on the block we’re joining, make three double crochets. Slip stitch into that next space on the block. Do three double crochets into the next space. Keep going this way until we get to this join.
Joining Blocks: Tension
It’s important to maintain the right tension. The joins are where all of the tension will be, so you want these parts to be secure, but not too tight.
Joining Blocks: Four Sides
You might have some blocks where you have to join on all four sides. You’re going to do it exactly the same as you have been doing, nothing new, except for how to start. I'm going to show you how to start.
Joining Blocks: Starting On The Corner
Skip the row of granny stitches. Just start joining. Hook into that corner space. Loop of yarn on your hook. Bring it through, slip stitch with both strands to join, drop your tail. Hold it along your work, we could work over it. Chain two. Slip stitch down into your work. Grab your yarn, and bring it up, and slip stitch to join. Wrap your yarn, and do two double crochets into this corner space to start the corner. Keep going from here, joining as we always have been. This block will join on all four sides.
Joining Blocks: All Squares Joined
When all the blocks are joined, it’s time to move on to the border.

Border Edging: Thickness
The edge needs to be the same thickness as our joins in the middle. The joins are two rows, so we're going to put another row on the outside. You can get written crochet patterns if you prefer, but in this tutorial, I'll show you how to navigate the join areas to keep your stitch count perfect.
Border Edging: Navigating Joins
I'm going to show you how to navigate these join areas so that your stitch count remains perfect.
The joint counts as three stitches, or one shell. So, into your first corner before the join, do one double crochet. Start your second double crochet, but don't finish it. Leave those two loops on your hook. Now, start another double crochet into the corner space on the other side of the join. You should have three loops on your hook. Wrap your yarn and take off all three loops, then make one more double crochet into that same corner space.
Border Edging: How To Keep Stitch Count Correct
At every join, we have two corners: one before the join and one after the join. Before the join, make one complete double crochet. Then, start a second double crochet into that first corner space, but leave it on your hook. Into the space after the join, start another double crochet. You should have three loops on your hook. Finish those together, then wrap your yarn and make one full double crochet (a complete double crochet) into that corner space after the join.
Finishing the Border
When you get back to where you started, make three double crochets into that last corner space. Chain two, and slip stitch to the top of that chain three to join. Chain one to secure your yarn, then cut your yarn, leaving a long enough tail to sew in with a needle later. Pull your hook up and your yarn through, then snug that down to secure.
Finishing Touches: Sewing in the Ends
The final step in completing your Daisy Granny Square Blanket is to weave in all the loose ends. This is an important step because it secures your work and prevents the ends from unraveling over time. Use a yarn needle to weave the ends back and forth through the stitches on the wrong side of the blanket, making sure to change direction several times. Trim any excess yarn close to the surface.
Blocking Your Blanket (Optional)
Blocking is a process that helps to even out the stitches and give your finished project a more polished look. While it's optional, it can make a big difference in the overall appearance of your blanket.
There are several different blocking methods you can use, including wet blocking and steam blocking. For an acrylic blanket, steam blocking is generally the preferred method. Simply hold a steam iron a few inches above the blanket, allowing the steam to penetrate the fibers. Be careful not to touch the iron directly to the blanket, as this can melt the acrylic yarn.

Customization Ideas
Want to make your Daisy Granny Square Blanket truly one-of-a-kind? Here are a few ideas to get your creative juices flowing:
- Color combinations: Experiment with different color palettes, such as pastels, brights, or a monochromatic scheme.
- Yarn types: Try using different yarn weights or fibers to add texture and interest. Cotton yarn will create a lightweight blanket, while wool yarn will be warmer and cozier.
- Border variations: Get creative with your border! Try a simple single crochet border, a picot edge, or a shell stitch border.
- Size adjustments: To make a different size blanket, simply adjust the number of squares you crochet.
- Alternative layouts: Play around with different ways to arrange the granny squares. You could arrange them diagonally, randomly, or in a specific pattern.
Care Instructions
To keep your Daisy Granny Square Blanket looking its best, follow these care instructions:
- Wash on a gentle cycle with mild detergent.
- Dry on low heat or air dry to prevent shrinkage.
- Avoid using bleach or fabric softeners.
Troubleshooting Tips
Encountering a few bumps along the road to finishing this blanket? Don't worry, I've got you covered!
- Squares not lining up: Adjust your tension or add/remove stitches to make the squares the same size.
- Seams puckering: Use a looser tension when joining the squares.
- Blanket edges wavy: Block the blanket to even out the edges.
- Yarn splitting: Use a crochet hook with a smoother finish.
- Stitch Count Is Off: Double-check your stitches on the row before your current one.
Common Crochet Mistakes
Keep an eye out for these common crochet mistakes. Make sure to chain 1 or 2 when turning corners. Not using the same dye lot can ruin your project as well. And watch where you are putting the hook. It's easy to put the hook in the wrong spot.
![]()
More Granny Square Projects
Once you've mastered the Daisy Granny Square Blanket, why not try your hand at other granny square projects? You can use granny squares to make scarves, bags, pillows, and more! Check out other crochet patterns on The Secret Yarnery website or YouTube channel for more inspiration.
Share Your Creations
I would love to see your finished Daisy Granny Square Blankets! Share photos of your creations on social media using the hashtag #SecretYarneryDaisyBlanket so that I and other crocheters can admire your work.
Connect with The Secret Yarnery
Want to stay up-to-date on all the latest crochet patterns, tutorials, and inspiration? Here's how you can connect with me and The Secret Yarnery:
- YouTube channel: https://bit.ly/3VvXdCd
- Website: https://secretyarnery.com
- Newsletter: https://bit.ly/3ssa0tn
- Left Handed 👈🏼 Crochet Tutorials
FAQs
1. Can beginners crochet the Daisy Granny Square Blanket?
Yes! This project is beginner-friendly with clear, step-by-step instructions, video tutorials, and easy-to-learn techniques. If you're new to crocheting, start with the smaller squares to build confidence.
2. How much time does it take to complete the blanket?
The time required depends on your crochet speed and available time. On average, beginners may take a few weeks, working a little each day, while experienced crocheters can complete it in under two weeks.
3. Can I use different types of yarn?
Absolutely! While the pattern uses worsted weight acrylic yarn, you can choose any type of yarn. Just ensure your yarn weight is consistent to maintain the size and appearance of the blanket.
4. How do I adjust the size of the blanket?
You can easily adjust the blanket's size by adding or reducing the number of granny squares. To make a larger blanket, crochet more squares; for a smaller one, crochet fewer squares.
5. What joining method is best for this blanket?
The "continuous join-as-you-go" method works best for this project, as it's efficient and leaves minimal ends to sew in. However, you can use other joining methods based on personal preference.
6. Do I have to block the blanket after finishing?
Blocking is optional but recommended. It helps even out the stitches and gives your blanket a polished, professional appearance, especially if the edges are wavy.
7. What if my squares aren’t the same size?
This is often caused by inconsistent tension. You can try blocking the squares individually to even out differences or adjust your tension when crocheting future squares.
8. How do I care for the finished blanket?
Wash the blanket on a gentle cycle using mild detergent. Tumble dry on low or air dry. Avoid bleach or fabric softeners, and follow the washing instructions for the specific type of yarn you’ve used.
9. Can I customize the colors?
Yes! Customization is encouraged. Use colors that reflect your style or match the decor of your home. You can also try different patterns or themes for a unique look.
10. What tools should I have as a beginner?
Aside from yarn and a crochet hook (6 mm for this pattern), make sure to have scissors, a yarn needle, stitch markers, and a measuring tape. These tools will make the process much easier.
![]()
Christa Patel is the talented creator behind The Secret Yarnery, a thriving online space for crochet enthusiasts. With years of experience and a true passion for the art of crochet, Christa has become a trusted mentor for crocheters of all skill levels. Her clear, detailed tutorials and innovative patterns make learning crochet accessible and enjoyable for everyone.
Through her YouTube channel and website, Christa shares a wide range of crochet projects, from simple beginner patterns to more advanced designs. She is known for her engaging teaching style and knack for breaking down complex techniques into easy-to-follow steps. Christa’s love for crochet is evident in every video and blog post, inspiring crafters worldwide to pick up their hooks and get creative.
Beyond crafting, Christa connects with her audience through her cheerful personality and encouraging words. She also provides valuable tools such as written patterns, color ideas, and customization tips, ensuring that no one feels left behind in their crafting journey. Whether you’re a lifelong crocheter or just getting started, Christa’s guidance and creativity will inspire you to create beautiful handmade pieces to cherish.
For more of her amazing work, follow her on:
- YouTube: @TheSecretYarnery
- Website: The Secret Yarnery
- Social Media: Catch her updates on Instagram, Facebook, and Pinterest.
About the Author
With a passion for crafting easy, beginner-friendly tutorials and patterns, Christa inspires crafters of all skill levels to unleash their creativity worldwide. She encourages yarn lovers to connect, create, and crochet a world filled with beautiful handmade treasures!
Crochet a Daisy Granny Square Blanket: Easy Steps for a Masterpiece!