Crochet Plant Tutorial: How to Make a Beautiful DIY Vine Plant (Step by Step)
Love the look of lush green vines but don’t want the upkeep of real plants? I’ll show you how to make an adorable DIY crochet plant that adds a pop of green and a handmade touch to any space. This easy step by step project features textured vines, lovely leaves, and a fun “dirt” base that fits perfectly in your favorite pot or container. Whether you’re just starting with crochet or have dozens of projects under your belt, you can make this project your own with custom colors and creative touches. Ready to get started? I have a free written pattern and plenty of tips over at my website.
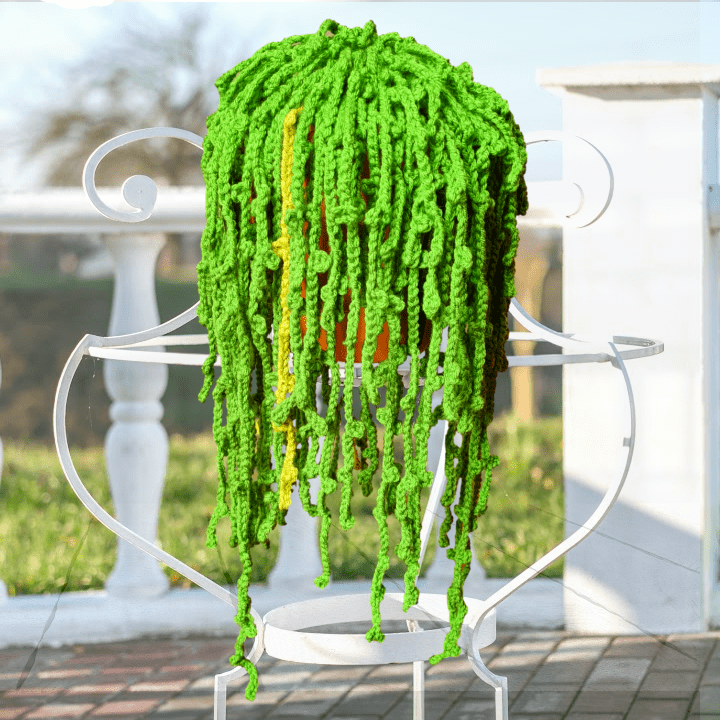
Overview of the Vine Crochet Plant
I created this crochet plant tutorial to help you bring handmade greenery into your space in a fun, non-intimidating way. With these vines and leaves, you don’t need a green thumb—just a hook and some yarn! The cheerful look of the vine crochet plant brightens up a windowsill, desk, or kids' room, and is completely maintenance-free.
All the materials you’ll need are listed here, and if you want to see each step in action, the video tutorial above covers everything with clear chapters and easy-to-follow visuals. The free crochet pattern is also available here, so you can follow at your own pace and print it for reference.
Materials Needed for the Crochet Plant
To make your crochet plant, grab the following supplies:
- 5 mm crochet hook (for vines and leaves)
- 6 mm crochet hook (for the dirt base)
- 200g green yarn (with a small amount of a different shade for color variation)
- Brown yarn (for the dirt)
- Hollow fiber stuffing (polyfill)
- Stitch markers
- Sharp tapestry/darning needle
- Scissors
- Terra cotta pot or container of your choice
If you’d like to see what tools and yarns I use, check out my Amazon Store recommendations for crochet must-haves.

Preparing to Crochet: Basic Setup
Start with a slip knot, making sure to leave a long enough tail for sewing inwards with your needle later. Keeping good tension here helps your stitches look neat—a loose foundation will lead to uneven leaves and floppy vines.
Begin with chaining—the base for both the vines and the dirt circle. Stitch markers will be your best friend, especially as you work in the round for the dirt base. They help you keep track of the start of each round, making the whole process far less stressful.
Tip: If you struggle with loose leaves or skipping stitches, pause after each section to check your tension. It’ll pay off with a polished final project.
Step-by-Step: Making the Vine Crochet Leaves
The vines are fun and repetitive. I like to mix up their lengths so the finished plant looks full and natural. Follow these steps to make realistic leaves:
- Make a slip knot with a long tail and place it on your 5 mm hook.
- Chain 7. Pinch the last chain so you know where it is.
- Chain 4 more to start your first leaf.
- Roll the chain to the side and find the fourth chain from your hook. Insert your hook into the back loop of this chain.
- Slip stitch to make the tiny leaf tip ("picot").
- Chain 4 to start the next leaf, pinch, and chain 4 more. Slip stitch into the fourth chain to finish the leaf.
- For the vine, chain anywhere from 3 up to 10 before making another leaf (I like to mix these up for a natural look).
- Repeat until your vine is the desired length.
Tip: Always make your leaves with a chain of 4. This keeps the leaves looking uniform, no matter the spacing between them.

Creating Multiple Vines with Varied Lengths
To fill out your pot, I recommend making at least 24 inches of vine for an average plant, but you don’t have to be exact. Fold the vines in half and hold them together to gauge when you have enough.
A variety of sizes helps the finished plant look full and less predictable. Here’s a suggested set:
| Vine Length | Quantity |
|---|---|
| 15" | 6 |
| 20-21" | 12 |
| 28" | 12 |
| 34" | 12 |
Mixing short, mid, and long vines is the secret to a lush effect.
Sewing in Yarn Tails on Vine Ends
Once you’re happy with your vines, it’s time to finish them neatly. Thread your needle with the yarn tail left at the vine’s end. Look for the chain 7 at the end of each vine and fold it into a little bud shape. Sew up the center of the chain a few times—first up, then back down, and up again. This keeps the tip tidy and secure.
A sharp needle works best, especially when stitching through multiple strands. After sewing, tug gently and trim the excess yarn.
Beginning the Dirt Base: Making a Crochet Circle
Ready for the “dirt”? Here’s how to create a sturdy, round base that fits in your pot.
- Using the 6 mm hook and your green yarn, make a slip knot and chain 3.
- Join the first and last chain together with a slip stitch to form a ring.
- Chain one, then make six single crochets (sc) in the center of the ring, working over the tail for tidiness.
- Insert your stitch marker into the first stitch so you know where each round begins.
Each round will expand the base and keep it nice and flat.

Increasing Rounds to Expand Dirt Base
To expand your circle evenly, you’ll add six stitches per round. Move your stitch marker up after every new round’s first stitch.
Here’s the standard pattern:
- Round 1: 6 single crochets in the ring (6 total stitches).
- Round 2: Two single crochets in each stitch (12 total).
- Round 3: 1 single crochet, then 2 in next—repeat around (18 total).
- Round 4: 1 single crochet in next 2 stitches, 2 in next—repeat (24 total).
- Round 5: 1 single crochet in next 3 stitches, 2 in next—repeat (30 total).
- Round 6: 1 single crochet in next 4 stitches, 2 in next—repeat (36 total).
- Round 7: 1 single crochet in next 5 stitches, 2 in next—repeat (42 total).
- Round 8: 1 single crochet in next 6 stitches, 2 in next—repeat (48 total).
Keep increasing, always making sure to add six stitches per round. When in doubt, check that you’re getting six increases each round to avoid accidental shaping.
Changing Yarn Color for the Dirt Pattern
When you reach the size you want (usually about 7 inches for a medium plant), change to brown yarn for a realistic dirt effect.
Finish the last single crochet of the current round, but don’t complete the final yarn-over. Instead, pick up the brown yarn and use it to finish the stitch. Continue with brown, moving your stitch marker so you keep your rows even. Hold the yarn tails along the back to keep the changeover neat.
Tip: Always finish the last yarn-over of a stitch with the new color to make transitions clean and almost invisible.

Final Rounds to Match Pot Size for Dirt
Keep increasing the base by adding one more single crochet between each increase for each round. Compare the flat circle to your pot—when the edges almost touch the rim, you’re ready to move to the next step. Every pot is different, so don’t worry if you need a round or two more or less.
Write down the number of single crochets between each increase in your last round. This makes it simple to match sizes when making more plants or creating the lid.
Creating Vertical Basket Sides from the Dirt Base
Now you’ll build up the sides of the basket:
- Single crochet into each stitch around for about two inches (no increases now).
- Use a second stitch marker to note where you start working sides—this keeps your rounds tidy.
- Keep working single crochets in a spiral until the sides are tall enough for your pot—usually five more rounds.
It helps to pause, fold the sides up, and check the basket height against your container. The basket should look like a shallow hat when you’re done.
Finishing Basket Edge with Slip Stitch
Once your basket’s sides are the right height, finish the edge with a simple slip stitch:
- Slip stitch into the stitch where you began the round.
- Chain one and cut your yarn, leaving a long enough tail for weaving in.
- Pull through and tug to secure the end.
A neat slip stitch edge keeps the top looking tidy and professional—little finishing details make a big impact!
Making the Second Dirt Circle Layer
You’ll need a second dirt circle, identical in size to the one for your basket base. Make it following the same steps as before, matching the count and color change. Leaving your yarn attached at the end will make assembly smoother.

Attaching Short Vines to the Dirt Base
It’s time to bring your plant to life by attaching vines.
- Thread a long piece of matching yarn onto a blunt needle.
- Fold each short vine a little unevenly for variety, then loop it onto the yarn.
- Insert the needle into a stitch on the dirt base, pull the yarn through, and pull the vine up snug.
- Tie a knot on the backside of the dirt and repeat, spacing short vines evenly around the circle.
Attaching the short vines first gives you a base to build up the fullness as you layer medium and long vines.
Adding Mid-Length and Long Vines to Outer Rows
After finishing the innermost ring of short vines, start on the next row with mid-length and long vines.
- Skip ahead a row from the edge of the dirt base.
- Fold each vine in half as before and attach them through the stitches or spaces in the second row, alternating lengths and placements.
- Varying the positions and skipping some spaces creates a more natural, wild look.
Take your time and arrange the vines so the finished plant doesn’t look too uniform.
Let your creativity loose—there’s no wrong way to layer your vines!
Securing and Knotting Off Vine Attachments
Once all the vines are attached, knot your yarn securely on the underside of the dirt base. Double or triple knotting helps keep everything snug and prevents any vines from coming loose. If any vines feel loose or saggy, you can tack them down with a discreet extra stitch.
Patience pays off here—taking a little extra time to stitch neat knots makes your crochet plant sturdy and long-lasting.

Joining the Second Dirt Circle (Lid) to the Base
Now for assembly! You’ll need to align and join the top of the basket (the dirt with vines) and the second dirt circle (lid).
- Insert your hook through the first stitch of the lid and first stitch of the base.
- Yarn over and pull through both stitches for a single crochet.
- Continue around, making one single crochet through each pair of stitches (lid and base).
- Work in small sections, checking that the stitches line up.
Stop a few stitches before finishing to leave a gap for stuffing.
Be careful not to skip or double-count stitches. If you need to fudge one stitch at the end, do it near your yarn tails so it’s easy to hide!
Stuffing the Plant Body
With a small opening left, stuff your plant with hollow fiber stuffing. Aim for a flat, firm hockey-puck shape—not an overstuffed ball. Massage the fiber toward the outer edges to help the plant hold its shape in the pot.
Don’t overstuff. Too much fill will make the lid bulge and stretch out your stitches.
When you’re happy with the shape, remove the stitch marker, put your hook back in, and finish closing the seam by single crocheting the last stitches together.
Securing and Weaving in Final Yarn Tail
After the final stitch, chain one and cut the yarn, leaving a tail. Pull the yarn through and give a gentle tug to snug it down. Using your needle, weave the tail through the center of the dirt section—go in and out in a few directions to anchor it. Trim off the excess yarn flush with the dirt surface; your heartleaf plant is finished and secure.
Organizing Your Workspace and Timeline
Here are my best tips for staying organized:
- Make vines in batches by length; group them with rubber bands or snack bags.
- Keep all yarn tails from vines ready for sewing at once.
- Track your rounds and stitch counts on a sticky note for each dirt base.
- Write down color changes and hook sizes for quick reference if making more than one plant.

Troubleshooting Common Issues
My leaves look uneven or floppy.
This usually means your tension is too loose. Try holding the yarn a little tighter or using a smaller hook.
Stitch counts are off in my dirt base.
Check after each round that you have the right number of stitches. If you find a mistake, you can frog (undo) that round and fix it before moving on.
Lid and base don’t line up when joining.
Double-check your stitch count on both pieces. If needed, add or skip a stitch at the end for alignment, especially where you’ll sew in the tail.
Basket sides bulge or sag.
This is often caused by loose stitches. A tighter stitch or one extra round can help the sides stay upright.
Variations and Customization Ideas
Personalize your crochet plant any way you like:
- Use different green yarns for realistic shading or a whimsical look.
- Make more or fewer leaves on each vine, or try longer or shorter leaf shapes.
- Switch up hook sizes for bigger or smaller plants.
- Display in nontraditional containers like teacups, tiny baskets, or glass jars.
- Add playful embellishments like beads as “dew drops” or attach little crochet flowers.
Let your imagination lead—the basic pattern is just the starting point!
Care and Display Tips for Your Crochet Plant
- If your crochet plant gets dusty, give it a gentle shake or use a soft brush to clean it.
- Keep it away from moisture to avoid misshaping.
- Rotate the vines and leaves every so often to keep them looking fresh.
- Pair your crochet plant with real or artificial plants for a mixed arrangement on a windowsill or shelf.
A handmade plant lasts forever with just a little care!
Additional Resources and Next Steps
Ready to grow your skills? The Secret Yarnery website always has new free crochet patterns and step by step guides like this one. For written versions and downloadable patterns, check out the easy crochet vine plant pattern.
Looking for left-handed video tutorials or project inspiration? Explore my full library and consider subscribing to my YouTube channel for weekly crochet videos and live Q&A.
If you’re looking for supplies, visit my Amazon crochet essentials list for yarns, hooks, and handy tools I love.
Making a crochet plant is a relaxing, rewarding way to add personality and a touch of green to your home, and it makes a thoughtful gift for plant-loving friends. If you try this project, share your progress and finished vines with our crochet community. Stay hooked, and happy crocheting!
FAQs
What skill level is this crochet plant?
Beginner friendly. You should know how to chain, slip stitch, and single crochet. The vines are repetitive and great for practice.
What yarn works best?
Worsted weight acrylic or cotton. Acrylic holds shape well; cotton gives crisp leaves. Use two green shades for depth and brown for the dirt base.
What hook sizes should I use?
5 mm for vines and leaves, 6 mm for the dirt base and basket sides. If your stitches look loose, size down by 0.5 mm.
How much yarn do I need?
About 200 g of green total, plus a small amount of a second green for variation, and some brown for the dirt. Scrap yarn works for leaves.
How do I make leaves look even?
Keep tension steady and always use a chain of 4 for each leaf. If leaves flop, tighten your tension or use a smaller hook.
My circle is curling or cupping. What did I do wrong?
You likely missed or added increases. Each round should grow by 6 stitches. Count each round before moving on.
How do I size the dirt base to fit my pot?
Lay the flat circle inside the pot. When it nearly reaches the inner rim, stop increasing. Then work straight single crochet rounds for the sides.
Can I make the plant bigger or smaller?
Yes. Use thicker yarn and larger hooks for a bigger plant; thinner yarn and smaller hooks for a mini version. Adjust vine lengths to match.
How many vines do I need?
For a full look, make about 24 inches of vines total per cluster and mix lengths. The sample set uses a mix of 15, 20–21, 28, and 34 inches.
How do I attach vines securely?
Fold each vine, stitch through the dirt base, and knot on the underside. Double knot. Add a tiny tack stitch if a vine sags.
Do I need wire to shape the vines?
No. The chain-and-picot leaves drape naturally. If you want stiffer vines, lightly steam-block or use a slightly smaller hook.
How do I change color cleanly for the dirt?
Finish the last yarn-over of the final stitch in green with brown. Then continue in brown. Carry or weave tails along the back.
![]()
Christa Patel is the maker behind Secret Yarnery, where she shares easy, joyful crochet patterns, tutorials, and weekly videos for makers of all levels. She loves turning simple stitches into beautiful, useful projects, from cozy blankets to whimsical crochet plants.
When she’s not filming step-by-step tutorials or answering questions in live Q&A, Christa is testing yarns, refining beginner-friendly patterns, and cheering on her global crochet community. Her goal is to help you feel confident with a hook in hand, one stitch at a time.
About the Author
With a passion for crafting easy, beginner-friendly tutorials and patterns, Christa inspires crafters of all skill levels to unleash their creativity worldwide. She encourages yarn lovers to connect, create, and crochet a world filled with beautiful handmade treasures!
Learn how to Crochet a Plant the Easy Way - Step by Step