Crochet a 3D Shell Blanket – Guzzling Granny Pattern for Beginners!
Have you ever wanted to create a blanket so soft and squishy, you just want to snuggle up with it forever? I'm excited to share how to make the Guzzling Granny Crochet Blanket! This 3D shell blanket is not only visually appealing but also incredibly cozy. It's the perfect project for adding a touch of handmade warmth to your home or creating a heartfelt gift for a loved one.
About the Guzzling Granny Blanket
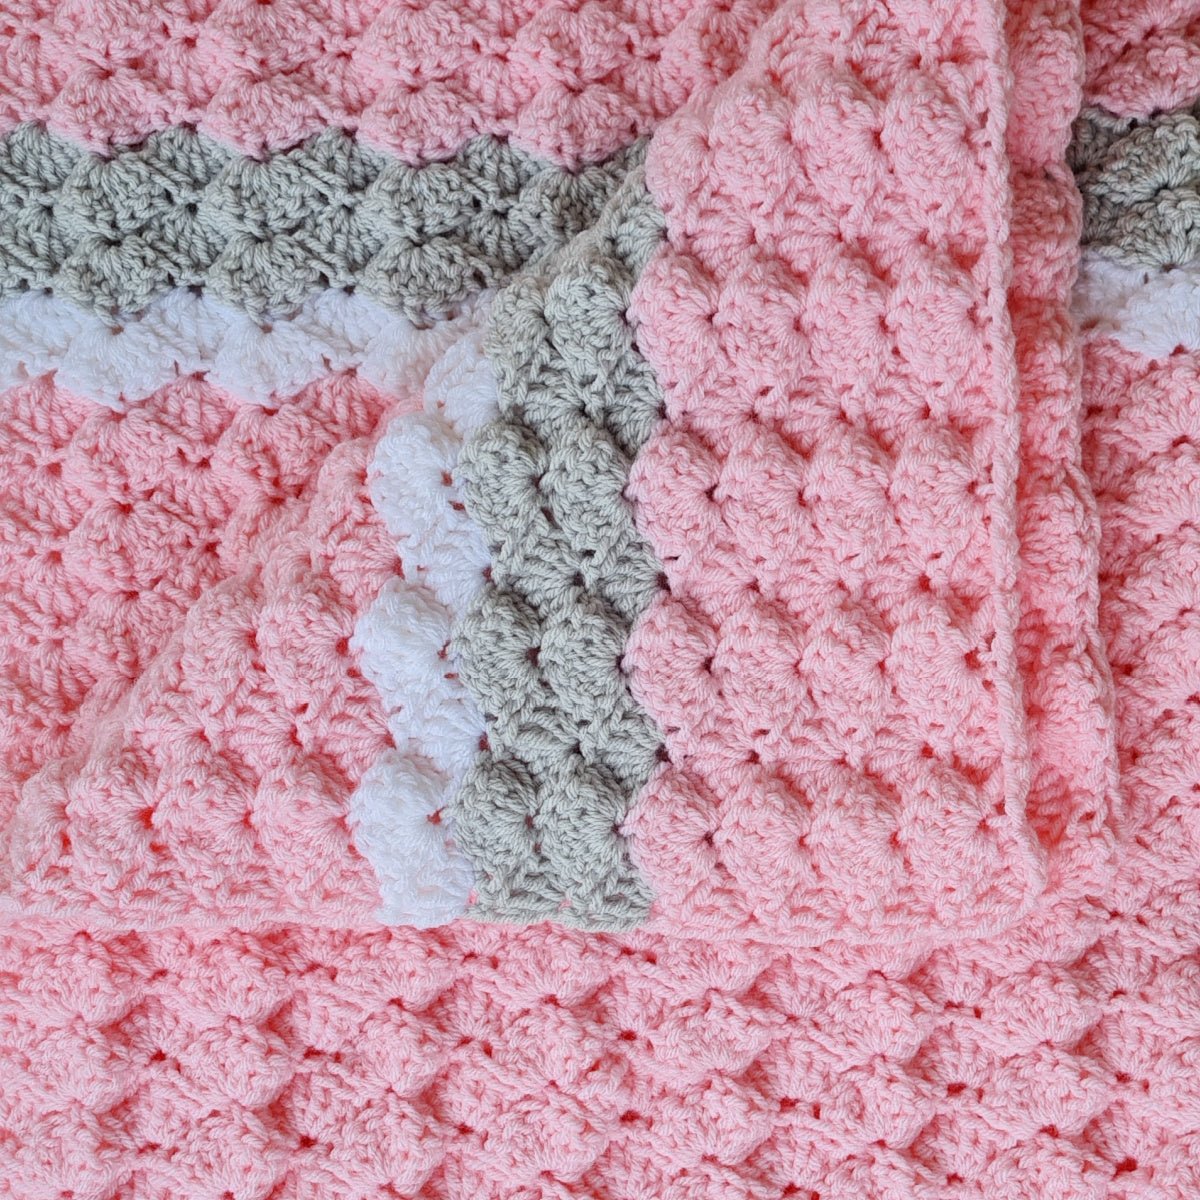
What makes the Guzzling Granny Blanket so special? It's all about the texture! The 3D shell stitch creates a wonderfully cozy and soft feel. This makes it ideal for babies with delicate skin. However, it’s equally perfect for anyone who loves a comfy and warm blanket to snuggle under on chilly evenings.
The pattern is easy to follow, even if you're new to crochet. The repetitive nature of the stitch pattern makes it a relaxing and enjoyable project.

Inspiration Behind the Design
You might be wondering, where did the name "Guzzling Granny" come from? Well, this design "guzzles" yarn. It creates a dense and plush blanket that's extra warm. The overall aesthetic is a blend of vintage charm and modern comfort. It evokes the cozy feeling of a traditional granny square blanket but with a unique 3D twist. You can explore other crochet patterns on my website!
Why This Project is Great for New Crocheters
If you're just starting your crochet journey, the Guzzling Granny Blanket is a fantastic project to build your skills and confidence. Here’s why:
- It reinforces basic stitches like single crochet and double crochet.
- The repetitive pattern makes it easy to memorize.
- You'll quickly see progress, which builds confidence.
Materials You'll Need
Before you start, gather your materials. Here's what you'll need to make your own Guzzling Granny Blanket:
-
Yarn: For this project, I used Savor from Ice Yarns, which comes in 200-gram skeins.
- You'll need more than 100 grams of your second stripe color.
- You'll need a small amount of white.
- The rest will be your main color.
- If you're not using Savor, look for a similar weight yarn that is soft and cozy. Fiber content is key.
- You can find similar yarns here: Pink http://bit.ly/38dCwlD, White http://bit.ly/35znrJr, Grey http://bit.ly/3uQVgQS.
- Hook: A 7-millimeter crochet hook is ideal for this pattern. Keep in mind that hook size can vary depending on your tension, so adjust accordingly. You can find a hook here: https://amzn.to/34oe7W9.
-
Other Essentials:
- 17 stitch markers (if you're making the same size as in the video).
- A needle for weaving in ends.
- Scissors.
![]()
Getting Started: Making the Foundation Chain
Let's get started! The first step is creating the foundation chain.
Creating the Slip Knot
Start by making a slip knot. Any method you normally use will work just fine. Shrink that knot down and pop it onto your hook.
Chaining the Foundation
Now, we're going to chain in sets of eight. Chain one, two, three, four, five, six, seven, and eight. These sets of eight are important for the pattern repeat.
Placing Stitch Markers
Next, put your thumb on those pretty little v's, the nice part of your stitches. Gently roll it to the side. We want to look right underneath our working yarn for this very first back loop. These little camel bumps are our back loops. We want to look for the one right underneath our working yarn. Pop a stitch marker into that eighth chain, into that eighth back loop.
Now chain eight more: one, two, three, and eight. Do the same thing again. Just roll that chain to the side, look for that back loop right underneath the working yarn, and pop a stitch marker into that stitch. Pause the video and keep working along, chaining eight and popping in a stitch marker until you have chained 136 or whatever width you'd like your blanket to be.
If you're making a blanket a different size, you're going to want to chain quite a few extra chains, extra sets of eight, because our chain will shrink up quite a bit when we work into it. Make a longer chain than the width of the blanket you want to make. When you have finished your 17 stitch markers, or whatever width you're making your blanket, go ahead and chain six more: one, two, three, four, five, and six.
Adding Extra Chains
Rolling that chain to the side, we want to be looking for that back loop right underneath our working yarn. That is our first chain. We want to look for the second one, our second chain, the second back loop from your hook. That is where we're going to start our blanket.
![]()
Row 1: Creating the First Row of Shells
Now that we have our foundation chain ready, let's start creating the first row of shells.
Starting the First Single Crochet
Into the second chain, the second back loop, just poke that back loop onto your hook and make one single crochet, just like that. Now, we're going to skip three chains: one, two, three. For this pattern, for starting out, I'm going to be working into the back loops. That's going to help our blanket look really pretty and finished, so the top of the blanket will match the bottom of the blanket. But if that's hard for you, you can just work into your chain like you normally do.
Making the First Shell
Skip three back loops: one, two, and three of these little camel bumps. We're going to work into the fourth, and that is right before our stitch marker. Our stitch markers are here just to help us keep track of our chain. Into the fourth chain, wrap your yarn and make seven double crochets into that very same stitch, just into that back loop. So seven double crochets: there is two, three, four, five, six, and seven. Seven double crochets all into that very same stitch, just like that.
Completing the Repeat
Now, we're going to skip three chains again, so three stitches. Roll that chain to the side. The first stitch has our stitch marker in it, so that is one, two, three. We are looking for number four, our fourth back loop right there. Into the fourth chain, one single crochet there. That is one repeat right there.
Wrap yarn again, roll your chain to the side, look for that fourth chain. So we're going to skip three: one, two, three. Working into the fourth, and again that's right before our stitch marker. Into that chain before your stitch marker, slide that back loop onto your hook and make seven double crochets: here is one, two, three, four, five, six, and seven. That is seven double crochets into the same stitch.
Now get your chain untwisted. We want to count three more chains. The first one has that stitch marker in it, so that is one, two, three. We want to go into the fourth chain, and now we're going to do a single crochet. So one single crochet into the fourth chain, just sliding that back loop onto your hook. One single crochet. Now we're going to skip three chains again, and you can see why these stitch markers are so handy. They're really helping us keep track of where we're going. We always want that fourth chain to be the one right before our stitch marker. So wrap your yarn, seven double crochets into the fourth chain. There is one, two, three, four, five, six, and seven. There's our seven double crochets all into the same stitch. I'm going to skip three chains again and work into the fourth.
Just hold your chain to the side. You want to be looking for those back loops. The first one has our stitch marker in it right there underneath our work a little bit. So there is one, two, three. We want to go into the fourth chain right here with a single crochet. So one single crochet. Skip three chains again, and the fourth chain will be right before our stitch marker right here. So into the fourth chain, seven double crochets: one, two, three, four, five, six, and seven. Now you can pause the video and keep working your way along, doing your seven double crochets into the fourth chain, that one before the stitch marker, skipping three chains and working into the fourth with a single crochet. Repeat that all the way along your chain. I'll meet you when you get closer to the end of your chain.
Finishing the Row
At the end of your row, you'll have four chains left. Skip your three: one, two, three, and into that very last back loop right here, we are going to do four double crochets. So into that last back loop, just slide it onto your hook. Four double crochets: one, two, three, and four. That is the end of row one.
![]()
Row 2: The Repeat Row
To start row two, and every row of our blanket, this is also the repeat. So to start your row, chain one and turn your work. The very first stitch, you can just kind of trace up that double crochet right here. This is your very first stitch. You want two loops of that stitch on the top of your hook.
Working into the Valley
Go in, we're going to make one single crochet into the very first stitch. That is the start of our row. Now, for this pattern, we're going to be doing all of our shells into this stitch right here at the bottom of each valley. Wrap your yarn and into the valley. If you need help looking for that stitch, just pull both sides and you'll see that opening. You want to go right into the center of that stitch right there, and that'll give you your two loops on the top of your hook. So seven double crochets into the valley: one, two, three, four, five, six, and seven, all into that same stitch, just like that.
Working on Top of the Hill
Now, into the top of our hill, we are going to be doing our single crochet. We're going to skip three stitches: one, two, three. We're going to work into the fourth, and the fourth stitch of it is a little bit going down the hill on the other side. So we've climbed up the hill, a little bit going on the down is where you're going to put in your hook. You're going to put in your hook right there. So into the fourth stitch, or the top of your heel, one single crochet. Now, we're going to work into the valley, so just give that a little pull and you'll see where that stitch is. We're going to wrap our yarn and do seven double crochets into the valley: one, two, three, four, five, six, and seven. Just make sure you have seven, especially as you're working on your blanket.
Finishing the Row
For me, I just put my thumb where that starts, where that fan starts, and I go one, two, three, and I put my thumb in the middle and I just kind of eyeball that there's four left. That is faster for me than going one, two, three, four, five, six, seven. I just go there, it starts there's three and there is four. So that is seven. Now into the top of your next fan or your next hill, right at the center stitch, you can skip three, go into the top of that hill, make one single crochet, just like that. Wrap your yarn into the valley, let's give that a little pull into the valley, seven double crochets: one, two, three, four, five, six, and seven. If yours is scrunched up, that's normal. That's what your pattern is going to do. It's going to start getting a nice little texture to it. Into the top of your next hill, one single crochet, just into that fourth stitch. Now you can pause the video and keep working along, doing seven double crochets into the valley and one single crochet into the top of your hill. I'll meet you when we get to the end of the row.
At the end of our row, we have our fan. You can still separate that with your fingers to see where your seven stitches are. So after our seven stitches on this little slope going down, that is our single crochet. You want to go right into that stitch. It's a bit on a hill. You want to put your hook in, make sure you have both strands of that stitch on your hook. So wrap your yarn to finish our row, put your hook into that very last stitch just there, make four double crochets to end the row: there's one, two, three, and four, just like that. So that finishes row two and the repeat row. You can explore other crochet patterns on my website!
Checking Your Blanket Width
This is just a sample size, of course, but after you've finished row two, this is going to be the width of your blanket. So it's a good time to get a measuring tape and just measure because that is going to be the approximate size of your blanket. If you want to change it, now is the time to do it.

Repeating Row 2 to Reach Desired Length
Keep repeating row 2 until your blanket is the height you want it to be. If you want to do the same stripes that I did, I did eight rows of pink, four rows of gray, two rows of white, and then 59 rows of pink. Then I reversed it, so two rows of white, four rows of gray, and ended it with eight rows of pink. So keep going until your blanket is the height you want it to be or until you want to change colors.
The Stripe Pattern
The stripe pattern from the video is as follows:
- 8 rows of pink
- 4 rows of gray
- 2 rows of white
- 59 rows of pink
- Reverse the pattern
Feel free to customize the stripe pattern to your liking. You can do a solid color, random stripes, or an ombre effect. The pattern is only a suggestion, not a requirement!
Changing Colors Seamlessly
I'll show you how to change colors right now. At the end of the row that you want to change colors, we don't want to finish that very last double crochet. I'm going to take that double crochet out. I've done three double crochets. Now we're going to do the fourth double crochet a bit different because we're going to change colors. Start your double crochet. Wrap your yarn, take off your two loops, but leave those last two loops on your hook. Get your new color of yarn. Put a loop long enough to sew in with a needle later. Put that loop on your hook. Hold that tail down with your work, your old tail. Drag your new loop through. Drop your new tail. Now we have two tails to hold along with our work and do your chain one. Turn your work. You can pull these tails down so they kind of behave a little bit and pinch them along with your work and just do your first single crochet with your new color yarn. Now you can let go of those tails and just keep going with your normal pattern.
That is how you change colors, and you can just sew in your tails to the matching color when you're done.
Adding the Border: The Final Touch
Now we're just going to make our top of our blanket match the bottom of our blankets. We're just going to put on this nice little row of single crochet just so our top of the blanket matches the bottom. We have finished with our regular four double crochets into the last stitch. So we're going to chain one and turn our work. So same as we always do, one single crochet into that first stitch, chain two: one and two. Now into our valley, one single crochet, chain two: one, two. Into the top of our hill, that fourth stitch, one single crochet, chain two. Into the valley, one single crochet, chain two: one and two. Into the top of the hill, one single crochet, chain two: one and two.
Finishing the Border
Now you can pause the video and keep working along, doing a single crochet into the valley, one single crochet, a chain two: one, two, a single crochet into the top of the hill, one single crochet, chain two, all the way along your row. Pause the video and keep working your way along, doing a chain two and a single crochet into the valley, a chain two and a single crochet into the hill all the way along until you reach the end of your blanket. At the end of your row, do your last chain two: one and two, and into your last single crochet, one single crochet, and chain one. Cut your yarn, leaving a long enough tail to sew in with a needle later. Pull your hook up and your yarn through, and snug that down to secure.
Weaving in the Ends
After weaving in your tails you are finished with this blanket. Sew in your tails and you're finished!

The Final Stitch
The final stitch is completing the pattern. After weaving in your tails you are finished with this blanket.
Taking Care of Your Crochet Blanket
To keep your Guzzling Granny Blanket soft and cozy for years to come, here are some care instructions:
- Washing: Check the yarn label for specific washing instructions. Hand wash or machine wash on a gentle cycle. Use cold water and a mild detergent.
- Drying: Lay flat to dry. Avoid using a dryer, as it can shrink or damage the blanket.
- Storing: Store the blanket in a cool, dry place. Fold neatly or roll up to save space.
Different Size Alterations
Here are some common blanket sizes and how they relate to the Guzzling Granny Blanket:
- Baby Blanket Size: 36x36 inches
- Receiving Blanket Size: 40x40 inches
- Crib Size Blanket: 45x60 inches
- Toddler Blanket Size: 45x60 inches
- Throw Blanket Size: 50x60 inches
- Twin Size Blanket: 66x90 inches
- Full Size Blanket: 80x90 inches
- Queen Size Blanket: 90x100 inches
- King Size Blanket: 108x100 inches
To change the width of the blanket, adjust the stitch marker count in your foundation chain. To add extra length, simply add extra rows by repeating Row 2.
Other Projects to Consider
Once you've mastered the Guzzling Granny Blanket, why not try these other fun crochet projects?
- A scarf of the same pattern
- Pillowcases of the same pattern
- Changing colors to make designs in the blanket
- Granny squares
- Other crochet patterns from the Secret Yarnery
Trying new projects and practicing techniques is a great way to expand your crochet skills. Different hook sizes and yarn weights can create different effects.
Left Handed?
The Secret Yarnery Social Media
I'd love to see how yours turned out!
- You can find me on social media, all of those links are in the description box down below.
- If you haven't joined or subscribed to this channel, go ahead and click those buttons under this video right now.
- Let me know if you have any questions in the comments down below, and we'll see you in the next video.
Here are some quick links to my social media!
- YouTube:
- Right Handed Tutorial (https://youtu.be/y1EZ-ZK49GU)
- Left Handed Tutorial (https://youtu.be/iKfFziruvrQ)
- Left Handed Tutorials (https://bit.ly/3UWNmoJ)
- Behind the Scenes (https://bit.ly/3V104kL)
- Website:
- Written Patterns (https://secretyarnery.com)
- Newsletter (https://bit.ly/3ssa0tn)
- Other:
- Join (https://bit.ly/44UC1bH)
- Buy me a coffee! (https://ko-fi.com/secretyarnery)
I post everything crochet related on my social media, so make sure you follow to stay up to date!
Written Pattern
For those who prefer written instructions, a detailed written pattern is available. The written pattern includes:
- Step-by-step instructions
- Stitch diagrams
- Helpful tips and tricks
- Photos
Using a written pattern alongside the video tutorial can be a great way to reinforce your understanding and ensure accuracy.
Frequently Asked Questions
Here are some common questions about crocheting the Guzzling Granny Blanket:
- Can I use a different weight of yarn? Yes, but you may need to adjust your hook size and stitch count.
- How much yarn do I need for a different size blanket? This will depend on the size you want to make. Use a yarn calculator online to figure out how much you will need.
- Can I change the colors? Yes, feel free to get creative with colors!
- My blanket is curling. What am I doing wrong? Make sure you are keeping your tension consistent.
- How do I block my finished blanket? Wet blocking involves soaking your finished project in water, gently squeezing out the excess, and then laying it flat to dry.
If you have a question that's not on this list, feel free to ask in the comments!
Crochet Planner
To stay organized and keep track of your crochet projects, consider using a crochet planner. I offer two options:
- A4 Crochet Planner (https://bit.ly/3NVRsaE)
- Letter Size Crochet Planner (https://bit.ly/35Q8aXF)
A crochet planner can help you track your projects, keep you organized, and provide space for notes and sketches.
Crochet Tips and Tricks
Here are some essential tips and tricks to enhance your crochet skills:
- Maintaining even tension: Consistent tension is key to a neat and professional-looking finished project. Practice keeping your yarn flowing smoothly and avoid pulling too tight or too loose.
- Counting stitches: Accurate stitch counts are crucial for maintaining the correct size and shape of your project. Use stitch markers to mark the beginning and end of each row, and count your stitches regularly.
- Reading crochet patterns: Familiarize yourself with common crochet abbreviations and symbols. Practice following written instructions carefully, and don't hesitate to ask for help if you're unsure about something.
- Choosing the right hook: Selecting the appropriate hook size for your yarn is essential for achieving the desired gauge and texture. Refer to the yarn label for recommended hook sizes, and adjust as needed based on your tension.
Must-Have Crochet Items
To make your crochet experience even more enjoyable and efficient, here are some must-have items:
- Bags - Yarn Ball Storage (https://amzn.to/36cbr3A)
- Bags - Large UFO Zipper Pouches (https://amzn.to/3uqgQ0n)
- Bags - Regular UFO Zipper Pouches (https://amzn.to/3DYxvLB)
- Ball Winder (https://amzn.to/3Jzd4Y0)
- Baskets - WIPS (https://amzn.to/3tQK9te)
- Color Wheel (https://amzn.to/3hJN3IG)
- Crochet Hooks (https://amzn.to/2p5etkC)
- Foot Warmer (https://amzn.to/3RaMtn0)
- Measuring Tape (https://amzn.to/3JviyD8)
- Neck Light (https://amzn.to/2UYNrW4)
- Needle Threaders (https://amzn.to/3zdCK7S)
- Needles - Blunt Tip (https://amzn.to/2MRffKP)
- Needles - Sharp Tip (https://amzn.to/3qEGZWk)
- Scissors (https://amzn.to/3EC1CHy)
- Stitch Markers (https://amzn.to/3GdGCYg)
- Tea - Kericho Gold (https://amzn.to/3zrTcB8)
- Tins - Accessories (https://amzn.to/3EN6nxT)
- Yarn (http://bit.ly/39EZwZX)
The End
I hope you enjoyed this tutorial as much as I did! Remember, the most important thing is to have fun and let your creativity shine. Happy crocheting! I encourage you to check out my Guzzling Granny Crochet Baby Blanket pattern on my website.
![]()
Christa Patel is a passionate crochet enthusiast, designer, and the creative mind behind The Secret Yarnery. Born with a love for crafting, Christa shares her expertise, patterns, and tutorials, empowering others to create beautiful handmade projects through her platform. She believes that crochet is not just a hobby but a way to spread warmth and joy.
Through her engaging YouTube channel and detailed written patterns, Christa makes even the most complicated designs accessible for beginners and experienced crafters alike. Her innovative 3D designs, like the Guzzling Granny pattern, reflect her dedication to blending vintage charm with modern style.
When Christa isn’t crocheting, she enjoys spending time with her family, experimenting with new yarns, and connecting with her growing global community of crafters. You can follow her journey, tips, and inspiration on YouTube, The Secret Yarnery Blog, and other social media platforms.
Let Christa guide you to unleash your creativity one stitch at a time!
About the Author
With a passion for crafting easy, beginner-friendly tutorials and patterns, Christa inspires crafters of all skill levels to unleash their creativity worldwide. She encourages yarn lovers to connect, create, and crochet a world filled with beautiful handmade treasures!
Crochet a 3D Shell Blanket – Guzzling Granny Pattern for Beginners!