Candy Cradle Square Crochet | Secret Stitches Easy Stitch Sampler Blanket Pattern Part 3
Back with another fun addition to the Secret Stitches Easy Stitch Sampler Blanket Pattern! I’m sharing how to make the Candy Cradle Square—a cheerful, cozy crochet block that makes blanket-making a real joy. If you love seeing your yarn stash turn into something beautiful, you’re in the right place.
In this post, I break down every step needed to crochet the Candy Cradle Square, from materials and setup right through to the finishing touches. There’s plenty of detail, clear tips, and a few tricks for smooth sailing, whether you’re new to crochet or already hooked (see what I did there?). Grab your yarn and let’s dive in.
Secret Stitches Easy Stitch Sampler Blanket Pattern Overview
This isn’t just any project—it’s the Secret Stitches Easy Stitch Sampler Blanket Pattern! The idea is simple, and the results are stunning. We join all 12 unique blocks to create a one-of-a-kind crochet blanket bursting with color and texture!
- If you want inspiration from previous parts or see what the finished blanket looks like with the border, check out the complete blanket tutorial, or take a look at the playlist for crochet-along fun.

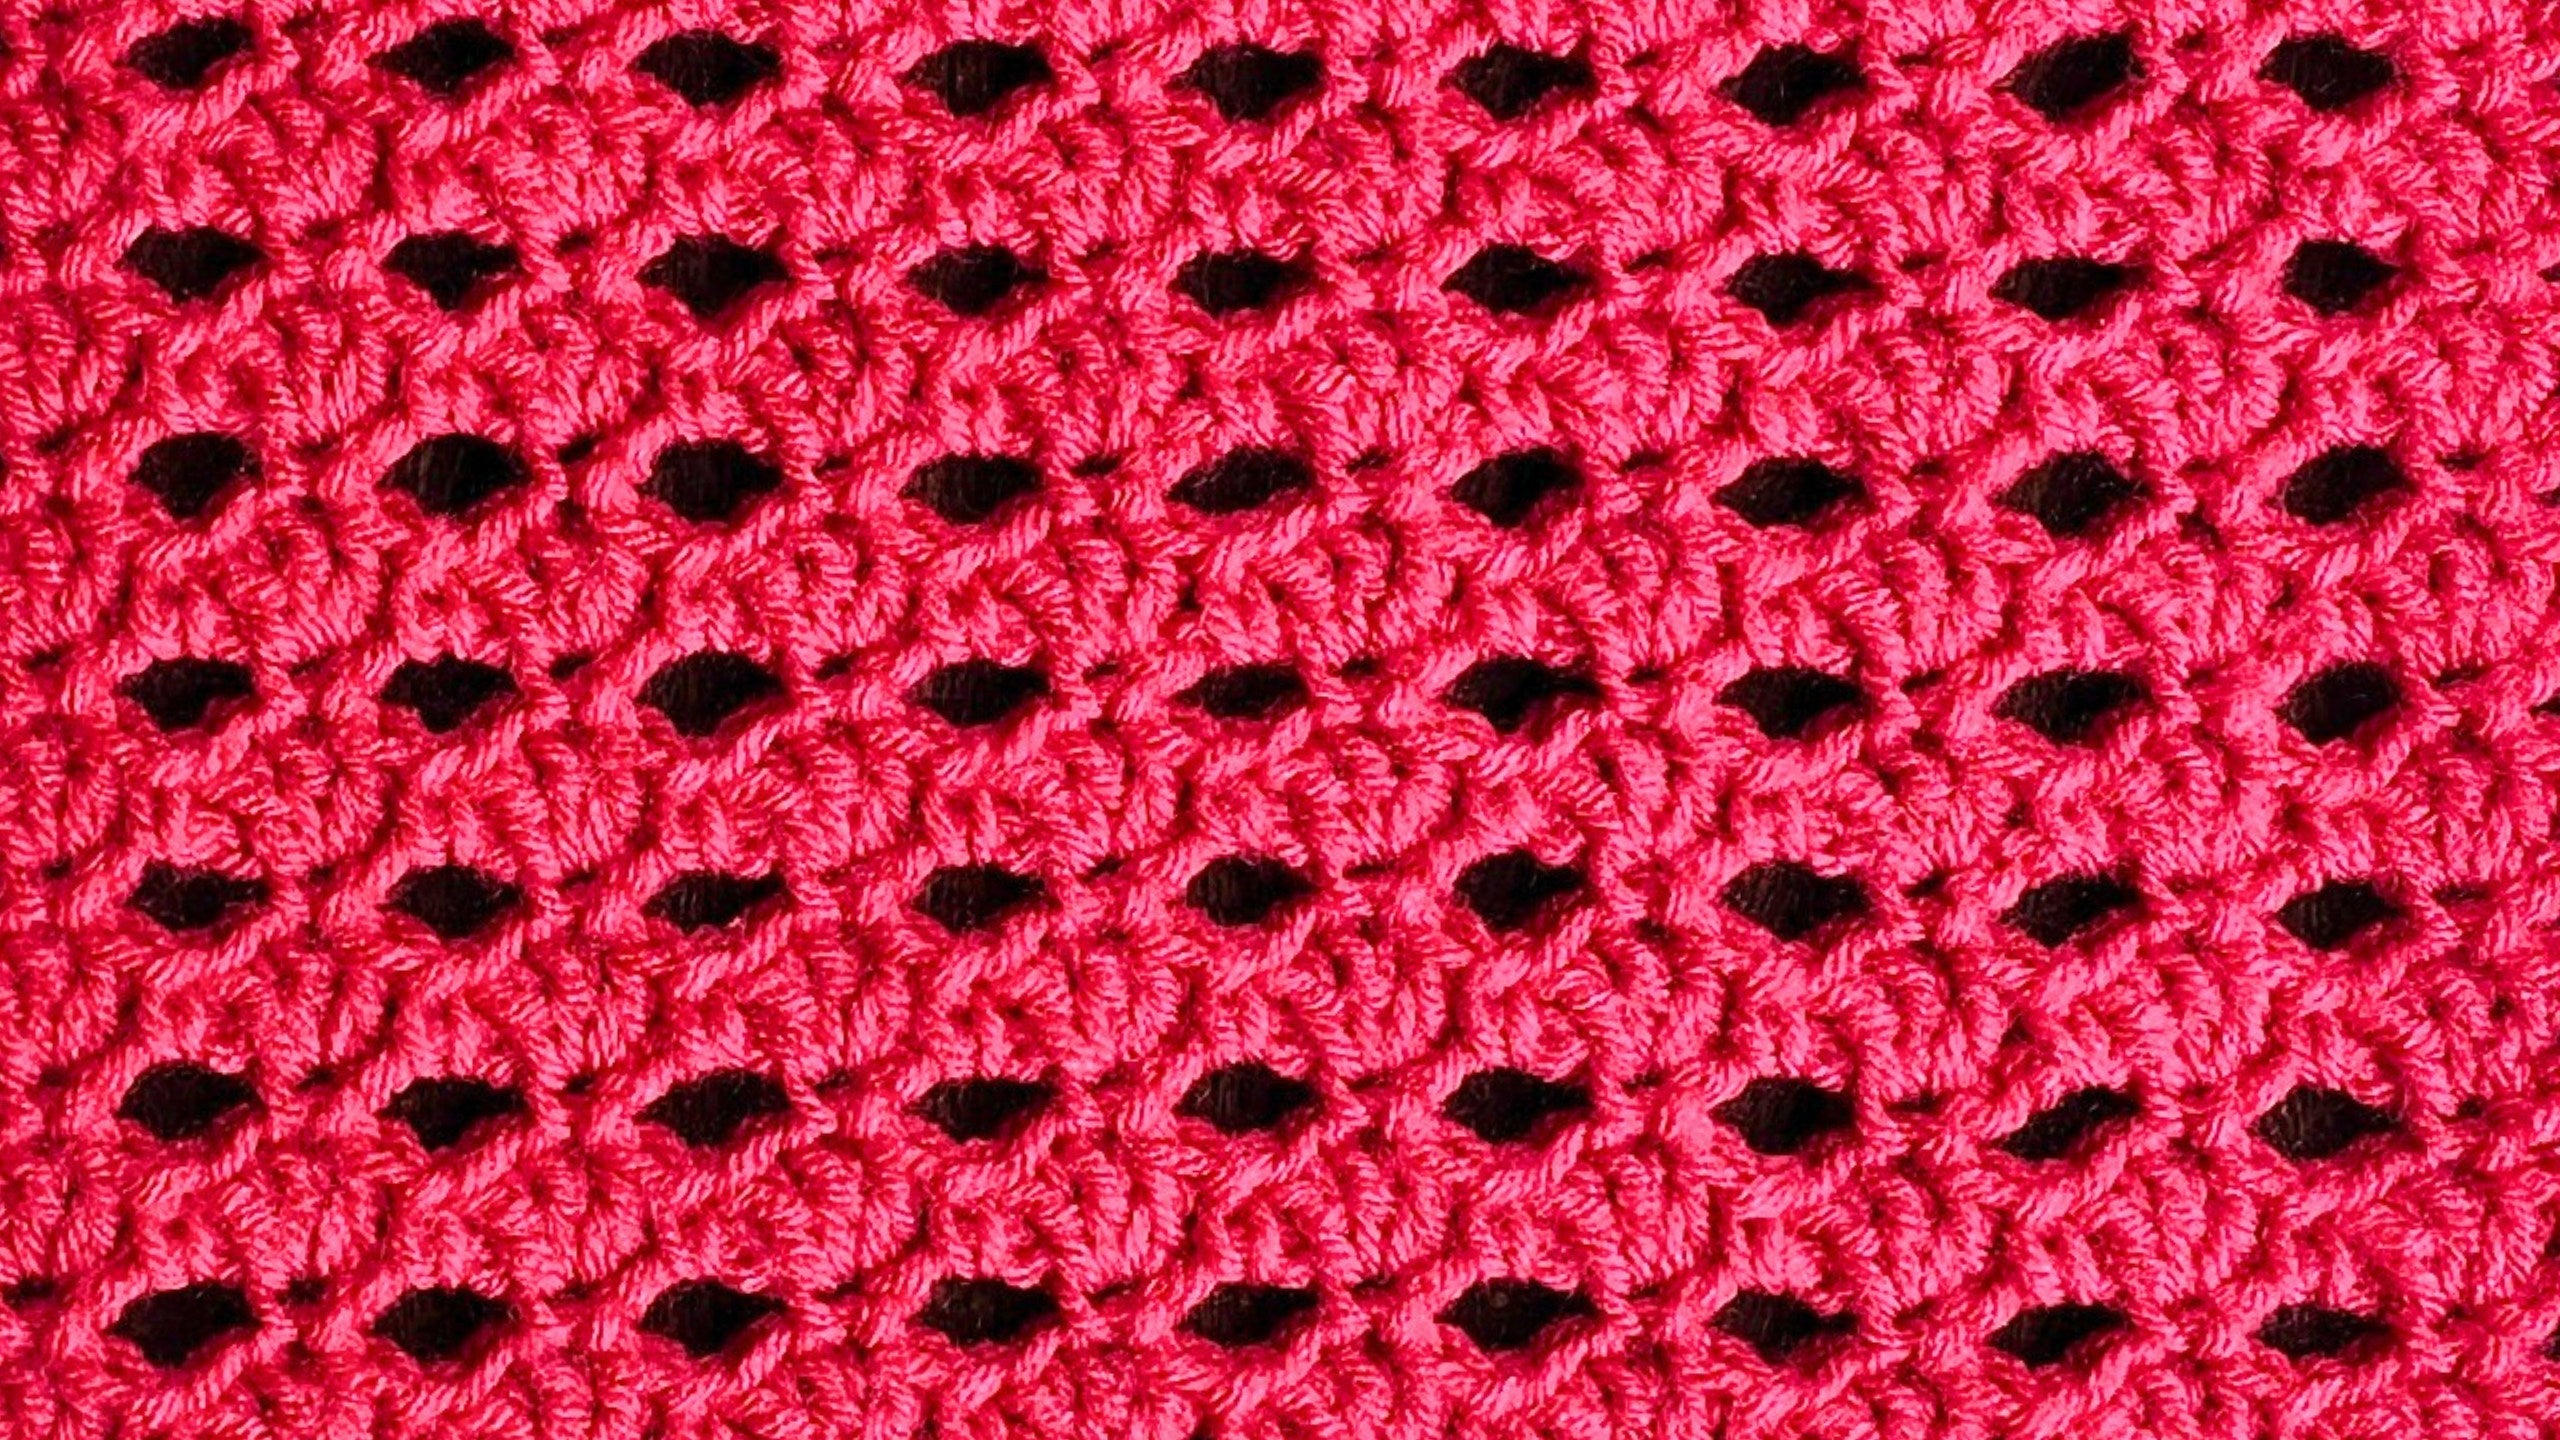
Meet the Candy Cradle Square
The Candy Cradle Square is part three of the Secret Stitches Blanket and might be my favorite so far. This block features a playful, raised stitch pattern that looks like rows of tiny candies cradled together. It’s ideal for adding texture and a touch of whimsy to your blanket. Whether you’re a beginner or more experienced, it brings something fresh to your skills.
The technique is easy to learn and satisfying to repeat—great if you enjoy seeing quick progress. Each block you create becomes a little celebration. Plus, learning new stitch patterns week by week keeps things fun and helps expand your crochet skills!
If you want to see exactly how the finished Candy Cradle Square looks, check out the video embedded above for a full walkthrough and a peek at the final product.
![]()
Materials Checklist: What You’ll Need
Making your Candy Cradle Square doesn’t require a huge shopping trip. Most likely, you already have everything in your stash.
Materials list:
- Worsted weight (4 weight) yarn (stash busting is encouraged!)
- 6 mm crochet hook (this helps keep all your blocks even in size)
- Scissors
- Darning needle for weaving in ends
Yarn tip: While colors can vary between blocks, keeping yarn weight and fiber the same across your project makes for a smoother blanket when you stitch everything together. Even if you want to mix bold or subtle hues, focus on consistency in yarn thickness and fiber.
For essentials like hooks, darning needles, and scissors, I always recommend having quality tools. If yours need an update, find my recommendations for crochet hooks, scissors, and more.
Here’s your quick checklist:
- Yarn (same thickness/fiber for all blocks)
- 6 mm crochet hook
- Scissors
- Darning needle

Starting Your Base: Slip Knot and Chain
Let’s get started on the foundation. First, make a slip knot using your favorite method. Tighten it to fit snugly, but not too tight, on your hook.
Chain 36 to begin. This stitch count works out as a multiple of three, perfect for the Candy Cradle Square’s pattern repeat. Once you have 36 chains, add two more for turning (total: 38).
When chaining, I pinch the flat side of the chain with my fingers and thumb, rolling the chain slightly so I can see the “back bumps.” These little bumps give the first row a neater, more finished edge.
Take your time here—count your stitches so you don’t sneak in extras or miss any.
A close-up view of a chain’s back bumps, rolling it with your fingers, really helps if you’re new to this step. Try using a good lamp or sunlight for best visibility.
![]()
What are Back Loops and Back Bumps—and Why Do They Matter Here?
If you’ve ever wondered why some edges look neater than others, you’re not alone. It all comes down to which loops you work into when starting a base row.
- Front loops sit closest to you as you crochet.
- Back loops are further away, on top of the chain.
- Back bumps are the little ridges along the flat side of the chain, underneath.
For the Candy Cradle Square, working into the back bumps makes the starting edge smooth and even—a small detail that makes a big impact.
To spot those bumps, gently roll your chain so the flat side faces you. The first bump sits right under your working yarn, then follow along for the next ones. Insert your hook under that first visible bump to start your row.
Careful counting is key—making mistakes here can throw off every row that follows. I like to mentally check off each back bump as I go.
Focusing on back bumps can feel awkward at first, but you’ll get the hang of it by the end of your first row. Consistent practice pays off!
For more guidance on mastering the basics, see my Beginner's Guide to Crochet.
![]()
Row 1: Creating the Foundation with Single Crochet and Chain Spaces
Here’s where your square really begins to take shape.
Step-by-step:
- Insert your hook into the first back bump—make 1 single crochet.
- Chain 3.
- Skip the next two back bumps.
- Insert the hook into the third bump and make another single crochet.
- Repeat: chain 3, skip two bumps, single crochet into the next bump all the way down the row.
By the end of this row, you’ll have a line of single crochets, each separated by chain 3 spaces (these make the cradles for your candies next).
For a consistent look, maintain even tension throughout. If in doubt, pause, count your stitches, and adjust as needed to keep things tidy.
Pro tip: After every few repeats, double-check the number of chain spaces and single crochets—especially when you’re starting out. It’s easier to fix mistakes now than later!

Row 2: The Candy Row – Bringing in Texture and Pop
Now it’s time to crochet the “candy” rows that give this square its personality.
Follow these steps for the second row:
- Chain 3 and turn your work (this acts as your first double crochet).
- Work 1 double crochet into the first stitch.
- In the next space, make 1 single crochet.
- Into the next stitch: make 3 double crochets.
- In the following space: make 1 single crochet.
Continue alternating:
- 3 double crochets into each stitch
- Single crochet into each space
Repeat this all along the row. When you reach the end, there’ll be a little “hill” or slanted stitch—insert your hook under both loops and make 2 double crochets to finish the row.
This row is all about rhythm: three lively double crochets (candy), single crochet (cradle), next stitch, repeat.
This row starts to reveal that cute candy-like effect. Watch as each shell pops out, setting up the look for your next layer.
Repeat pattern shortcut:
- 3 double crochets in each stitch
- 1 single crochet in each space
By now, you’ll really see the base of your Candy Cradle Square coming alive!
Row 3: Adding the Cradles
Row three shifts things. This is where those shell “candies” get cradled, creating texture and depth.
How to work this row:
- Chain 1 and turn.
- Make 1 single crochet into the first stitch.
- Chain 3.
- Find the second (center) double crochet in each group of 3 from the previous row (that’s your “candy shell center”).
- Make 1 single crochet into this candy center.
- Chain 3, continue into the next candy center, repeat.
Finish the row by working your last single crochet into the top of the starting chain 3. Catch both loops to make sure your ending is secure and neat.
Tip: Don’t worry if your block looks a little twisted after this row. It’ll settle out as you add more rows and the weight increases.
Spotting the true candy center is key. The pattern relies on these stitches for structure, so aim to always work into the exact middle of each candy shell.
Quick summary of this row’s repeat:
- Chain 3
- Single crochet into the center of each candy
- Continue all along
As your row grows, candy cradles start forming—a satisfying sight!

Building the Pattern: Alternating Rows
Here’s the repeat that defines the Candy Cradle Square:
- Candy row
- Cradle row
- Repeat, back and forth
You’ll need 15 candy rows total for each block. Not sure how many you’ve got? Just count the shell rows going up: each shell means a candy row.
It helps to create a small tracking chart, jotting down each time you complete a candy row. Staying organized guarantees all your CAL blocks will fit together like a puzzle.
A checklist or table on the side of your pattern notes can be a lifesaver if you’re working on squares in between life’s other busy moments.
Final Touches: Ending Your Candy Cradle Square
Once you’ve hit your 15 candy rows, it’s time for the final cradle row—this gives the block a finished, stable edge.
- Chain 1 and turn.
- Work single crochet and chain 3 repeats into the candy centers, as before.
- At the very end, make a single crochet into the top of the turning chain 3, catching both loops for neatness.
- Finish: Chain 1, cut your yarn, then pull through and snug down.
Weave in your yarn tails using a darning needle for a clean, durable finish. Take an extra moment with these tails; a little care here keeps your work looking professional and flat.
A photo of a crisp, finished Candy Cradle Square edge helps serve as a visual guide—snap one of your own to reference next time you return to the project.

Common Issues and Simple Fixes for the Candy Cradle Square
Not every project goes off without a snag! Here’s how to solve the most frequent hiccups:
- Twisted or curling work: This often happens with the first rows. As you add more rows, the weight stretches everything out. If it really bugs you, block your square lightly or give it a gentle steam.
- Losing track of bumps or stitches: Slow down for the first row. Be deliberate with counting and use stitch markers if necessary.
- Uneven tension: Make sure you’re not pulling the yarn too tightly, especially when chaining three and working into candy centers.
- Missing the candy center: Always aim for the second double crochet of the shell for each cradle row.
- Ending the row neatly: Insert your hook under two loops at the last chain, not into a gap, to keep the edge solid.
If any part of the process is confusing, don’t hesitate to pause. Review the instructions, count carefully, and take your time. For visuals or real-time troubleshooting, replay the video above and use the pause and replay options. If you’ve got a tough question, leave a comment or check community forums and groups.
FAQ tip: Keep a small sticky note or notebook with tallies, tips, or reminders from your own experience. Personalized cheat sheets make each new project smoother!
Using Stash Yarn and Combining Colors
One of the joys of the Secret Stitches Easy Stitch Sampler Blanket Pattern is using up leftover yarn in creative ways. Go wild with color combinations—the only rule is to keep yarn weight and fiber consistent so your blanket blocks play nicely together.
If you're mixing fiber types, be sure to check the washing and drying instructions for each yarn you use. Different fibers may shrink or react differently when washed.
Matching thickness is key, though. If your squares vary in thickness or stretch, they may be tricky to join later on. When in doubt, lay your squares flat and stack them mid-project to compare size and drape.
I love projects that eat up partial skeins and scraps. If you need more stash-busting ideas, check out my cozy blankets collection.
![]()
Tools to Make Your Crochet Smoother
Great tools make crochet more enjoyable. Other than yarn and hook, there are a few things I swear by:
- Scissors: Precise and sharp for neat ends.
- Darning needle: Strong and easy to thread for weaving in ends.
- Stitch markers: Perfect for tracking rows or marking the start.
- Measuring tape: Helpful when you want every square even.
- Good lighting: I use a handy lamp or a neck light for late-night sessions.
- Ergonomic hooks: If you crochet a lot, comfy handles save your hands over time.
If you're building your tool kit, browse some of my favorite crochet must-haves.
Better tools mean happier hands and smoother stitches—never underestimate the impact!
For more guidance on learning stitches, see Crochet Stitches Every Beginner Should Know.
Joining Your Crochet Squares into a Blanket
Once you’ve completed all 12 squares from the CAL, the real magic happens—joining them into a finished blanket! There are lots of connecting methods like whip stitch, slip stitch, single crochet joins, or a decorative border.
If you’re ready to learn how to piece everything together, check out my full blanket tutorial for a step-by-step demonstration and finishing tips.
Stick around for more Stitch Sampler Blanket Pattern releases or revisit the best selling crochet patterns for inspiration on future projects!
Tips for Beginners (and a Little Encouragement)
Everyone starts their crochet journey somewhere—don’t worry if your first rows or squares feel slow. Focus on the simple repeat: candy row, cradle row, and a good stitch count. If you’re unsure, keep the video handy and watch segment by segment.
I recommend working at your own pace; there’s no rush. Each repeat gets easier, and before you know it, you’ll have a stack of beautiful squares ready to join.
It always helps to connect with fellow crafters. Drop your questions in the YouTube comments, join in the Secret Yarnery community, or share photos on social media. Your progress, questions, and ideas motivate others!
Every mistake is a chance to learn—crochet is about having fun, not perfection. Take breaks, relax your hands, and celebrate each finished square.
![]()
More Resources and Patterns from Secret Yarnery
My goal is to make crochet clear, creative, and fun for everyone. Explore more patterns, tutorials, and resources like:
- Step-by-Step Crochet Tutorial for beginners
- Tutorials just for left-handed crocheters—find them all in this left-handed tutorials playlist
- Get your free crochet cheat sheet for quick answers and stitch reminders
- Subscribe to my channel so you never miss a new stitch!
If you love crocheting along with friends and sharing what you make, the Secret Yarnery is a place to visit again and again.
Final Thoughts
The Candy Cradle Square brings texture, color, and joy to every blanket. Whether you’re working through the whole Stitch Sampler Blanket Pattern or just trying a new block, I hope these steps and hints make your crochet time enjoyable. Grab a hook, pick your colors, and let the rows of candy and cradle stitches bring you smiles and warmth all year.
Ready for your next block? Watch, pause, comment, and stay connected. Your creativity inspires me and fellow stitchers every day.
Stay hooked!
FAQs
1. What size will my Candy Cradle Square be?
With worsted weight yarn and a 6 mm hook, your square should measure about 10 inches (25 cm) on each side after 15 candy rows. Variations in yarn, hook, or tension can change the size, so check your block as you go.
2. Can I use a different yarn weight or hook size?
Yes, but keep all blocks in your blanket the same thickness for the best result. If you go smaller or larger with yarn/hook, adjust your starting chain and row count to keep your squares even.
3. My square is curling at the edges—how do I fix it?
Light curling is common, especially at the beginning. As you add more rows, it often straightens out. If needed, gently block your finished square by dampening it and laying it flat to dry.
4. I’m having trouble finding the candy center stitch—any tips?
Always look for the middle stitch in each group of three double crochets. Using a stitch marker on the first candy center can help until you get used to spotting them.
5. Can I change colors in the middle of a square?
Absolutely! For a striped or multicolor look, switch colors at the start of any candy or cradle row. Always weave in your ends securely for a clean finish.
6. My squares are slightly different sizes. What should I do?
Lay your squares flat and compare. If the size differences are small, you can adjust during joining or gently block them. For big differences, check your yarn, hook size, and tension, or remake the smallest square.
7. Do I need to use a border on each square?
A border isn’t required, but it can make joining easier and your final blanket neater. If you add one, choose a simple single crochet or slip stitch around each block in a matching yarn.
![]()
Christa Patel is the creator behind Secret Yarnery. With over 25 years of crochet experience, she’s known for designing beginner-friendly patterns, practical tutorials, and stash-busting projects that make stitching fun and relaxing.
Based in Nairobi, Kenya, Christa shares her passion through clear video instructions, easy-to-follow blog posts, and an encouraging online community. She believes crochet should be joyful and stress-free—no matter your skill level. From cozy blankets to quick gifts, her patterns help crafters build skills and confidence, one project at a time.
Connect with Christa on YouTube, Instagram, or at the Secret Yarnery website for new patterns, crochet-alongs, and creative inspiration. Whether you’re just starting or looking for fresh ideas, Christa’s friendly style and helpful resources make crochet accessible for everyone.
About the Author
With a passion for crafting easy, beginner-friendly tutorials and patterns, Christa inspires crafters of all skill levels to unleash their creativity worldwide. She encourages yarn lovers to connect, create, and crochet a world filled with beautiful handmade treasures!
Part 3 - Secret Stitches Easy Stitch Sampler Blanket Pattern