Andy Warhol Inspired Mickey Mouse Crochet Blanket: A Pop Art DIY for Your Home
What happens when classic Disney magic meets the bold, colorful world of Andy Warhol? You get a unique crochet project that pops with personality and style! This Andy Warhol inspired Mickey Mouse crochet blanket is a creative tribute to pop art that’s perfect for draping over your couch, brightening up a bed, or even adding fun to your garden décor. With step-by-step instructions and the innovative continuous join as you go (CJAYGO) technique, making this blanket is as enjoyable as showing it off. Whether you’re a beginner or a seasoned crocheter, you’ll enjoy the seamless join and eye-catching wavy border that polishes the entire piece. I’ll share details on materials, tips on color choices, and every step of the process—including how to scale your blanket to any size. Let’s bring some pop art fun to our crochet hooks!
Materials and Tools Needed
To create a vibrant pop art Mickey Mouse blanket, here’s exactly what I used:
-
Yarn: Size 4 worsted weight acrylic yarn
- Five different bright colors (your choice)
- White yarn for the join and border
- 100g each of the five colors
- 300g of white
- Crochet Hook: 6 mm (J-10 US)
-
Extras:
- Needle for sewing in ends
- Scissors
For easy shopping, you can find recommended supplies in my Amazon favorites and yarn picks, as well as suggested hooks and sharp tip needles from the video description. This project works great with yarn you likely have in your stash.
Quick Checklist:
| Supply | Notes |
|---|---|
| Yarn | 5 colors + white |
| Hook | 6 mm |
| Needles | Sharp tip |
| Scissors | For finishing |

Understanding the Blanket Dimensions and Color Choices
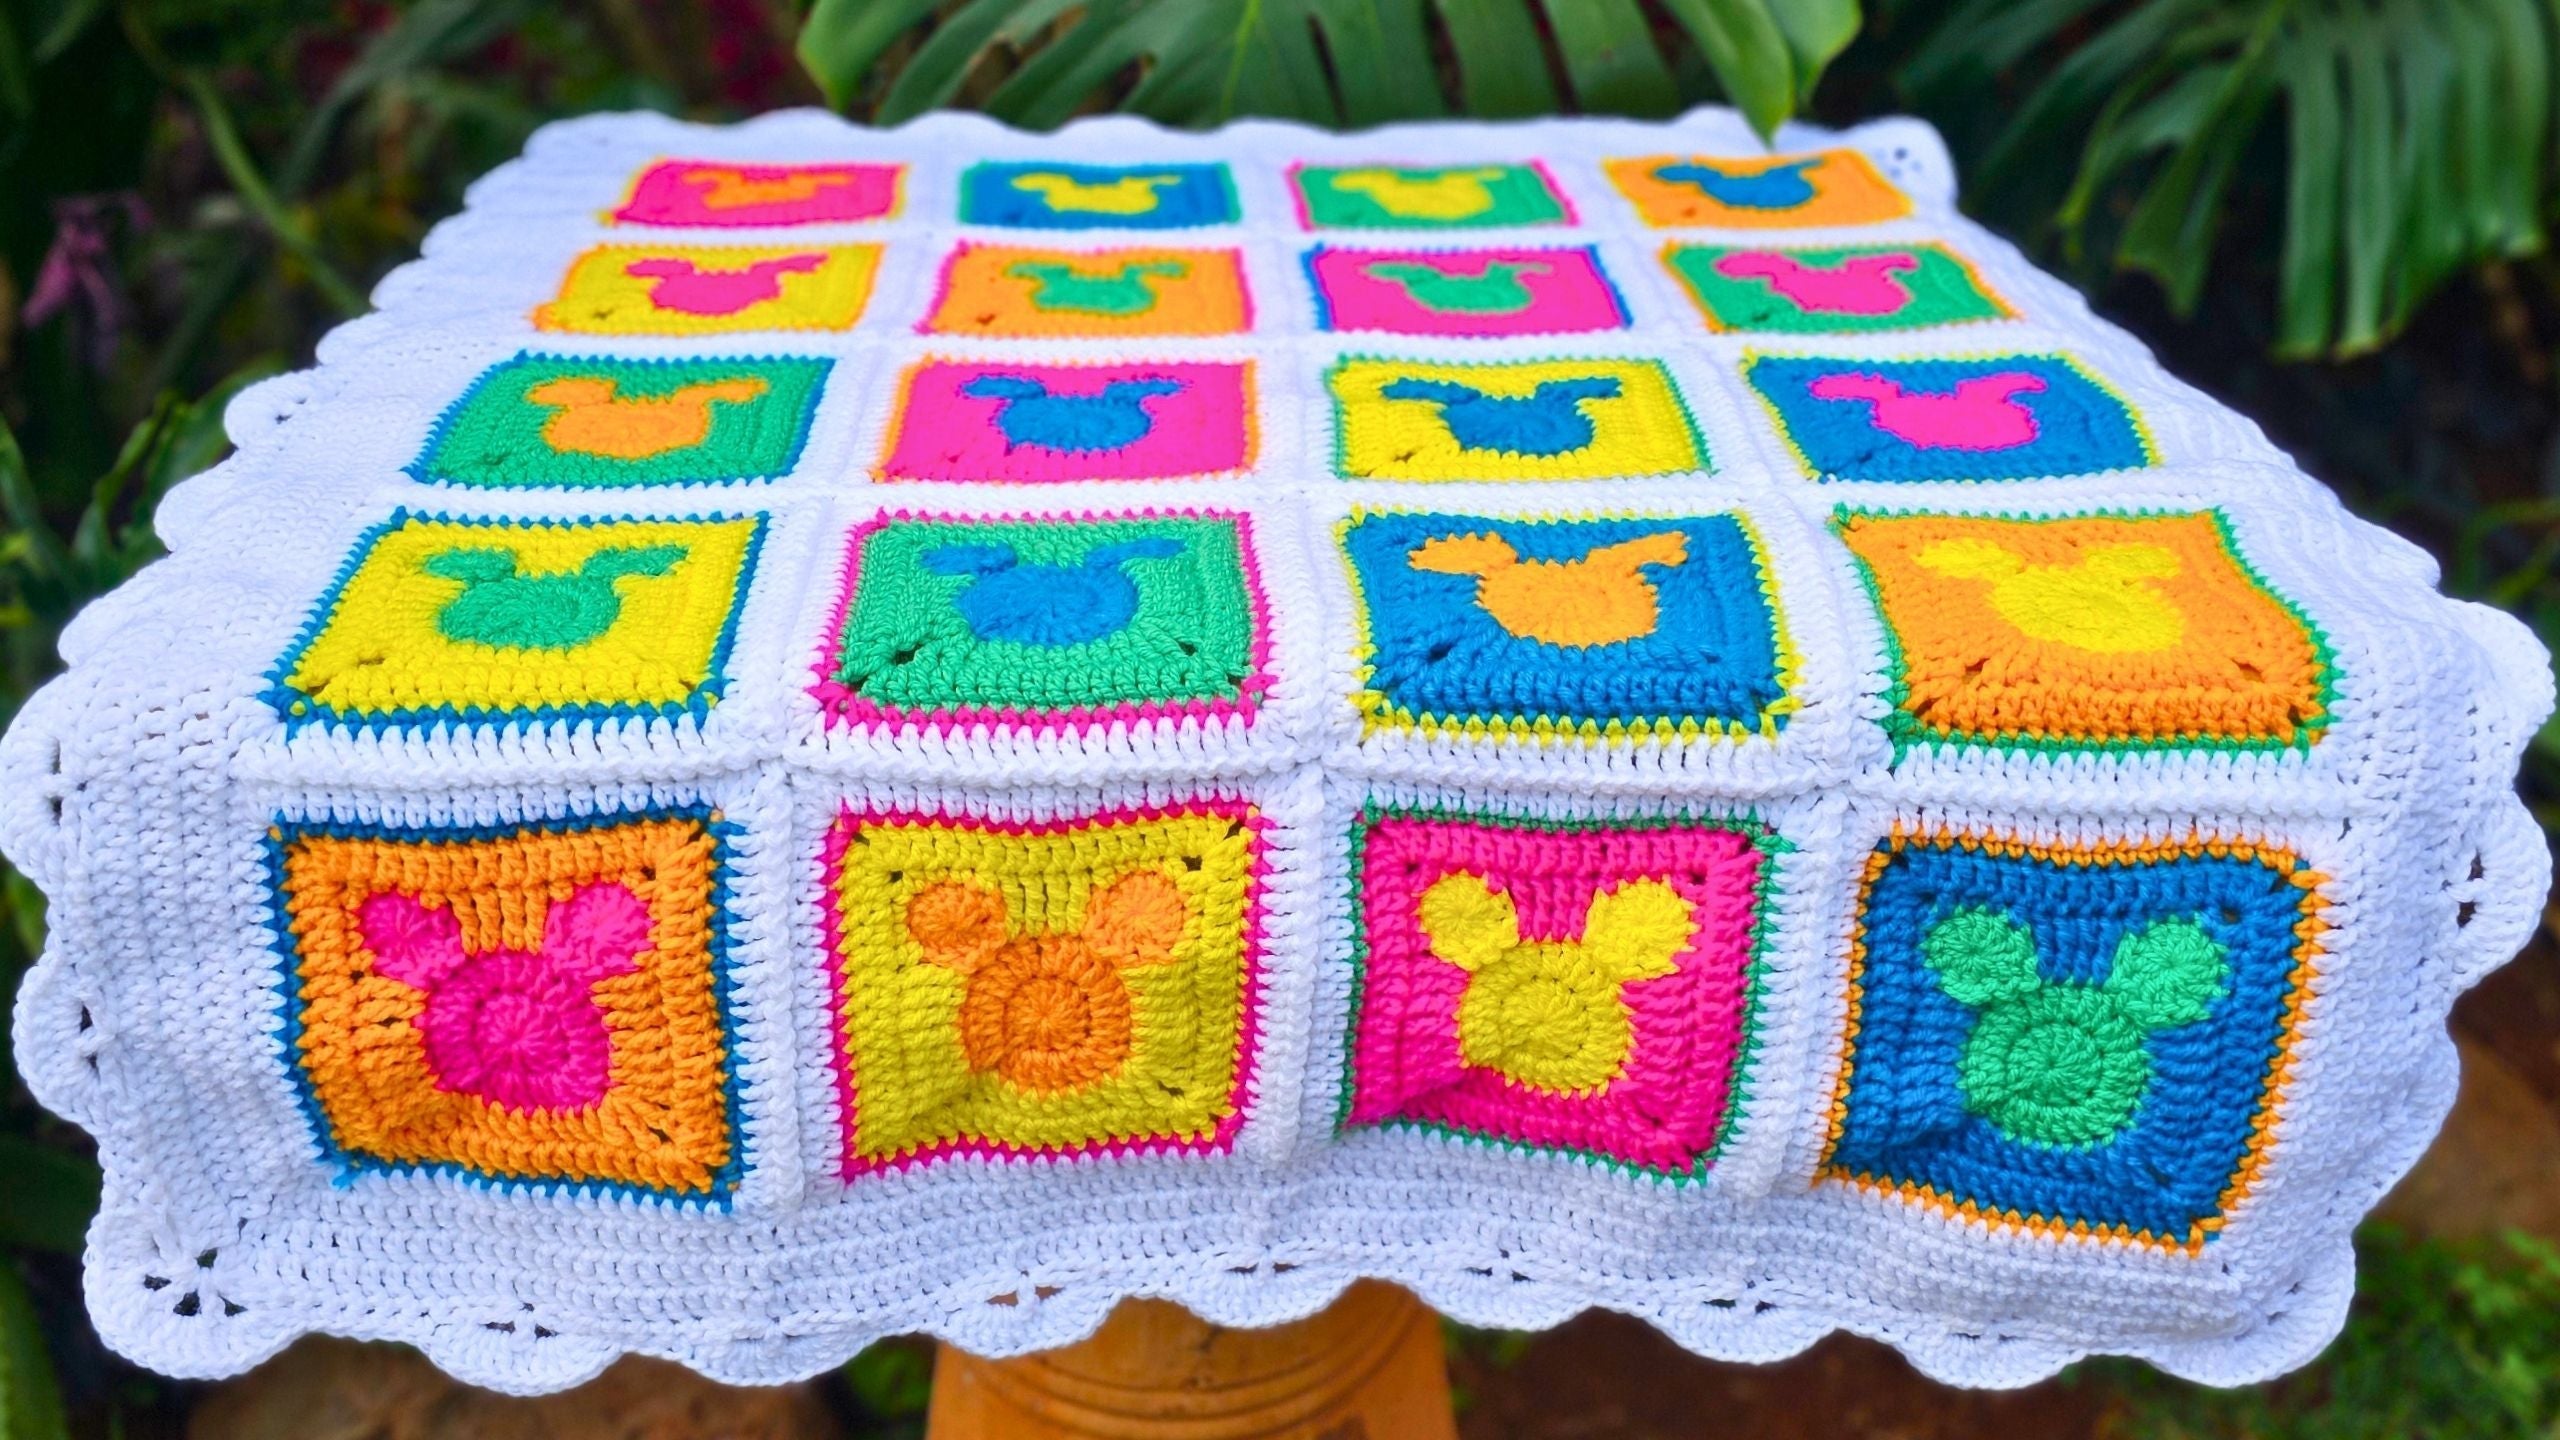
My finished blanket measures 34 inches by 40 inches and consists of 20 granny squares—each measuring about 7 inches before joining. You’re not locked to this size: the beauty of granny squares is their flexibility. Need a bigger throw? Simply add more rows or more squares.
The color scheme is inspired by classic pop art. I went bold with five bright shades, echoing Andy Warhol’s famous repetitions and vivid contrasts, paired with white to unify and highlight every square.
Here’s a quick comparison:
| Style | Colors |
|---|---|
| This Project | 5 bright colors + white |
| Traditional Mickey | Black, red, yellow, white |
For even more ideas and variations, see my easiest Mickey Mouse granny square pattern and think about mixing backgrounds or customizing for your own pop art palette.
![]()
Making the Mickey Mouse Granny Square: Step-by-Step Guide
Now let’s break down the process. Each Mickey Mouse granny square forms the building block of the blanket. I’ll walk you through every part, from the magic ring to attaching the ears and adding bold color edges.
Step 1: Starting the Magic Ring and Base Round
1. Create Your Magic Ring:
- Lay the tail over your non-dominant hand, hold it with your thumb.
- Wrap the yarn around your top two fingers, making an X on top.
- Bring the yarn underneath those fingers, still holding the short tail.
- Turn your hand over to find two strands: short tail and working yarn.
2. Insert Hook:
- With your hook facing down, slide under the short strand, over the long.
- Pull the long strand through to create a loop, then chain two up.
3. Make First Round:
- Chain 2 (counts as one double crochet).
- Crochet 12 double crochets into the ring (over both strands). You’ll have 13 in total after including the chain.
- Pull the tail to tighten the center.
- Slip stitch into the top of the starting chain to close the round.
Tips:
Work over the tail as you go for a secure center. If the tail shortens as you go, pull gently to draw through more yarn.
![]()
Step 2: Building the Mickey Face
4. Start the Next Round:
- Chain 3 for height (keep these chains snug by working on the hook tip).
- Double crochet into the same space for a total of two stitches.
- In every stitch around, make 2 double crochets (pairs).
- Add an extra double crochet at the join for a rounded look.
5. Finish the Face:
- Slip stitch to the top of the starting chain.
- Chain 1 and cut yarn, leaving a long tail.
- Secure the end by pulling and snugging the yarn.
Step 3: Creating and Attaching the Ears
6. Make the First Ear:
- Start a magic ring just as before.
- Chain 2 for your first double crochet, then add 9 more double crochets (10 total including chain).
- Gently tighten the loop, leaving room for further stitches.
7. Join Ear to Face:
- Position the face so the join is at the bottom.
- Count back five stitches from the join point, insert your hook in the sixth stitch.
- Use the remaining ear loop to slip stitch and anchor the ear.
8. Secure the Ear:
- Double crochet into the ear center, work over the tail.
- Flip the face to the front when attaching further stitches.
- Repeat slip stitch and double crochet two more times for solid anchoring.
9. Repeat for Second Ear:
- Create another ear using a magic ring and repeat the process.
- Skip two stitches from the first ear’s join, attach in the third.
10. Sew in Magic Ring Tails:
- Use a needle to weave in, making sure the seam is not felt from the ear’s face.
Pro Tip:
If you need visuals for ear placement and stitch notification, my beginner-friendly Mickey Mouse granny square tutorial has clear photos.
![]()
Step 4: Adding the Second Color Round
11. Join the Second Color:
- On the side opposite where you joined the ears, join your contrasting color (traditionally white, though orange is used in the tutorial for visibility).
- Attach yarn in the stitch after skipping five from the join—secure with a slip stitch.
12. Shape the Face and Corners:
- Along the face, crochet treble crochets (yarn over twice) for a straight edge.
- As you reach the ears, alternate between single crochet, half double crochet, and treble to wrap the ear’s curve.
- In the corners, use half double crochet, chain one, half double crochet into the same stitch for smooth turning.
Basic Stitch Reference:
- Single Crochet (sc): Insert, yarn over, pull through, yarn over, pull through two.
- Half Double Crochet (hdc): Yarn over, insert, yarn over, pull through, yarn over, pull through three.
- Double Crochet (dc): Yarn over, insert, yarn over, pull through, yarn over, pull through two, yarn over, pull through two.
- Treble Crochet (tr): Yarn over twice, insert, yarn over, pull through, then take off two loops at a time for three rounds.
13. Edge Along the Bottom:
- Finish with double crochets to keep sides neat and square.
14. Secure and Cut Yarn:
- After another slip stitch to join, cut yarn with enough tail to sew in later.
![]()
Step 5: Applying the Final Edge to Each Granny Square
15. Edging Round:
- Pick your next accent color.
- Attach in any corner space with a slip stitch, then chain one for your first single crochet.
- Work a single crochet into each stitch along the sides.
- At each corner: single crochet, chain two, single crochet in the same space.
16. Work Into Chain Spaces:
- Be sure to insert through both the front and back loop for a sturdy edge.
17. Finish and Cut Yarn:
- After a slip stitch to join the round, cut yarn, leave a tail for sewing.
Don’t forget:
After finishing, set aside the outside tails (from ears and edges) to sew in once all your squares are edged.
![]()
Organizing and Laying Out Granny Squares
Once you’ve finished all your Mickey Mouse granny squares, it’s time to bring your vision to life:
- Sew in tails on all squares except perhaps the last row if you’re new to joining, to avoid caught stitches.
- Plan your order: Lay out all finished squares on a flat surface so the colors and ear directions create a pleasing arrangement.
- Stack squares row by row: Keep ears facing the same way for consistency.
- Pro tip: Take a photo of your layout. It’s much easier to remember where each square goes when assembling!

Joining Granny Squares Using Continuous Join As You Go (CJAYGO)
This method lets you join squares as you finish them—no sewing required for seams.
Joining the First Row of Squares
1. Start With the Bottom Row:
- Turn the first square upside down. You’ll work from the bottom left if you’re right-handed.
- Attach your join yarn in the corner space with either color (usually white).
2. Work the First Edge:
- Chain 2 (counts as first double crochet).
- Into the corner space, make another double crochet, then one double crochet into each stitch across the edge.
3. Add the Next Square:
- Without turning, grab the next square and immediately start with two double crochets into its corner space, then crochet along.
- Continue this process for all squares in the row, with two double crochets in each corner to join them snugly—no gaps or extra chains between squares.
Working Around the First Row
4. Complete Last Square’s Edges:
- After finishing the first row, work around the remaining three sides of the last square.
- Corners are two double crochets, chain two, two double crochets into the same space.
5. Connect Sides:
- Continue with one double crochet into each stitch along the side and across the top.
- At each new corner, repeat the corner stitch combination.
Joining Subsequent Rows
6. Attach the Next Row:
- Lay out your second row above the first, squares upside down.
- Starting at one side, join to the already finished row below by alternating double crochet into the square you’re working on, then slip stitch into the existing square above.
7. Maintain Corners:
- Begin each join with two double crochets into the new square’s corner, slip stitch into the square above, then work along with double crochet and slip stitch alternations.
- Repeat across each square’s edge, then work around the remaining edges of the new row as with the first row.
Quick Tip for CJAYGO: Think of this join as making a vertical letter “I” into the new square and dotting it with a slip stitch into the row above. It’s rhythmic once you get into the groove!
![]()
Completing Blanket Joins and Final Edge Rounds
8. Work Down Side Edges:
- Once all rows are joined, work down the remaining open side, repeating two double crochets in joining corners.
9. Deal With Joins:
- Where any gaps occur (at the corners or seams), make sure to fill each space with the proper number of double crochets so your blanket stays square.
10. Edge the Blanket:
- Work one full round of double crochet along the entire blanket, placing two double crochets plus chain two in each corner.
- Where blanket rows meet, place five double crochets or work as needed to close gaps and smooth out joins.
![]()
Final Border: The Wavy Ear Border Edging
The finishing touch for this blanket, the wavy ear border, frames your Mickey Mouse squares in a playful, modern way.
Planning the Border Design
I love this border because it polishes off the look without stealing focus from those bright pop art Mickey squares. The white border keeps things crisp, but you can use any color that fits your palette. Three rounds work well, but you can go wider for extra drama if you have the yarn to spare.
Starting the Border Round
- Chain three and turn your work to face the “pretty” side.
- Skip three stitches, then work five single crochets into the next series.
- Create a “dome” by working a double crochet, chain two, double crochet, chain two, double crochet, all in the same stitch.
- Repeat across: skip three stitches, five single crochets, skip three, dome.
The pattern naturally creates a wave—like Mickey’s ears echoing around the edge!
Working Corner Details
At each corner, you’ll make a “big dome” for a smooth, rounded look:
- Into the corner space, work five double crochets, separated by chain two each.
- Mirror the number of single crochets before and after the corner to keep it symmetrical (if you do six before, do six after).
Final Border Rounds and Stitch Placement
- On successive border rounds, work five double crochets into every dome’s open space, one double crochet into the dome’s top stitch, then five more into the next space.
- For single crochets in between domes, skip the first and last stitches of the previous single crochet group for a tidy fit.
Repeat the border pattern around the entire blanket, adjusting stitch counts as necessary—your join and corner counts may vary slightly depending on blanket size and yarn.
Finishing Off the Border
- For the final round, slip stitch into the start chain to join smoothly.
- Cut your yarn, leaving a tail for sewing in.
- Weave in all remaining tails with a sharp needle.
- If you prefer, you can do an invisible join here instead of slip stitching.
Beginner tip: Keep your stitch tension even throughout the border for the neatest result. If you notice the border curling or flaring, check your stitch spacing and adjust as needed.
![]()
Tips for Beginners & Troubleshooting
If you’re new to joining squares as you go, CJAYGO might feel tricky at first, but give it time. I love this method because it skips hours of sewing seams. Stick with it!
- Loose tails: Sew these in as you go, or leave the last two from each square until the end.
- Avoiding twists: Always check your work direction so rows and ears face the same way.
- Stitch counting: Double-check corners and side stitches—most problems come down to missed stitches at the end of a row.
- If the video goes too fast, remember you can pause, rewind, or change playback speed.
If you like printed patterns in plain English, my shop offers an easy-to-follow PDF.
![]()
Additional Resources and Links
Want more projects or extra support? Check these out:
- For detailed step-by-step photos, see the easiest Mickey Mouse granny square pattern
- If you want the written pattern as a PDF, browse the Mickey Mouse granny square crochet pattern product
- Check out C2C Mickey Mouse pop art blanket patterns for even more pop art fun on Etsy
- For left handed tutorials, see my YouTube Channel for Lefties
- Keep up with new projects by subscribing on YouTube
Bookmark this blog and share your creations in the Secret Yarnery community—I love seeing what you come up with.
Summary of Key Techniques Learned
This blanket brings together several modern crochet skills:
- Creating a magic ring for a seamless start and perfect circle
- Attaching Mickey’s ears with slip stitches for a neat, integrated look
- Adding a second color with tidy sides and crisp corners
- Using the continuous join as you go method (CJAYGO) to skip hand sewing
- Creating a bold wavy border that looks like Mickey ears lined in pop art style
If you’ve followed along, you now have a statement crochet blanket worthy of display—and the skills to make another in any color you fancy.
Left Handed?
FAQ: Andy Warhol Inspired Mickey Mouse Crochet Blanket
What skill level is this project?
Beginner-friendly. If you can make basic stitches and a magic ring, you’re set. The CJAYGO join gets easy with a little practice.
What yarn did you use and how much?
Worsted weight (size 4) acrylic. About 100 g each of five bright colors, plus 300 g of white for joins and border.
What hook size works best?
6 mm (J-10 US).
How big is the finished blanket?
About 34 x 40 inches with 20 squares (each ~7 inches before joining). Add more squares or rows to make it larger.
Can I use different colors?
Yes. Choose five bold pop art shades for the faces and white (or any neutral) for the join and border. Keep contrast high so Mickey pops.
Do I have to use acrylic yarn?
No. Cotton or wool blends work too. Check your gauge; natural fibers can change drape and weight.
How do I make each granny square?
Start with a magic ring, crochet the face circle, make two ear discs, attach them, add a shaping round, then edge with a single crochet round in your accent color.
What is CJAYGO?
Continuous join as you go. You join squares with your hook instead of sewing seams. It’s faster and gives a neat, uniform look.
My squares don’t look perfectly square. What should I do?
Block them lightly with steam or a damp towel. Check stitch counts at corners. If sides pull in, add a few extra stitches evenly on the shaping round.
How do I stop the border from ruffling or curling?
If it ruffles, you have too many stitches; skip an extra stitch between domes. If it curls, add a stitch between domes or loosen tension slightly.
Can I resize the squares?
Yes. Add or remove rounds before the final edging to change square size. Keep all squares the same size for easy joining.
Is there a left-handed version?
Yes. See the left-handed YouTube playlist in the links.
Do you have a printable pattern?
Yes. Grab the PDF pattern from Secret Yarnery. You’ll also find step-by-step photos on the blog.
Where can I find the supplies you used?
See my Amazon favorites and the video description for yarn, hooks, and sharp tip needles.
How do I wash the finished blanket?
If using acrylic, machine wash cold, gentle cycle; tumble dry low or lay flat. For natural fibers, follow the yarn label and consider hand washing.
Can I sell items made from this pattern?
Yes, in small handmade quantities. Please credit Secret Yarnery as the pattern source and use your own photos.
What if my ear placement looks uneven?
Count stitches from the join as shown, and pin before attaching. You can unpick and reattach; the slip stitch anchors make it easy to adjust.
How many squares do I need for a throw or bed size?
Baby: 20–30 squares
Throw: 35–56 squares
Twin: 63–80 squares
Adjust based on your square size and desired dimensions.
Where can I get help if I get stuck?
Comment on the YouTube video, browse the blog tutorial, or join the Secret Yarnery community for quick tips and support.
![]()
Christa Patel is the maker and voice behind Secret Yarnery, known for clear, beginner-friendly crochet tutorials and bold, colorful designs. She specializes in granny squares, join-as-you-go methods, and statement borders that look polished without the fuss. Her step-by-step videos and printable patterns have helped thousands of crocheters finish projects with confidence.
Christa shares practical tips, yarn guidance, and simple fixes for common mistakes, all tested on real projects. When she is not filming tutorials, she is sketching new motifs, swatching color combos, and answering community questions.
Find more of Christa’s patterns, tutorials, and tools at secretyarnery.com, and subscribe on YouTube for weekly crochet inspiration.
About the Author
With a passion for crafting easy, beginner-friendly tutorials and patterns, Christa inspires crafters of all skill levels to unleash their creativity worldwide. She encourages yarn lovers to connect, create, and crochet a world filled with beautiful handmade treasures!
Andy Warhol Inspired Mickey Mouse Crochet Pop Art Blanket