How to Crochet a Stacking A-Frame Log Cabin Granny Square: A Complete Step-by-Step Guide
If you love the look of traditional granny squares but are ready to add something a little different to your crochet projects, the A-frame log cabin granny square is the perfect next step. This cheerful, scrap-friendly square uses simple stitches in a clever way to form a unique "roof" or arrowhead pattern, and it looks stunning combined with other five-round granny squares. Gather your leftover yarn, grab a hook, and follow along for an easy, detailed tutorial you can finish in a cozy afternoon.
Materials Needed for a Stacking A-Frame Log Cabin Granny Square
Before I get started, I make sure I've gathered all my crochet essentials:
- Yarn: Size 4 worsted weight acrylic yarn (scraps work beautifully; mix and match colors as you like)
- Crochet Hook: 6 mm (J) size
- Scissors
- Yarn Needle: For sewing in ends
Why these choices?
Worsted weight acrylic yarn is versatile, budget-friendly, and easy to find. Using scraps means I can play with color combinations without worrying about wasting new skeins. The 6 mm hook gives a flexible, not-too-tight texture that's great for blankets or pillows. Scissors and a needle are must-haves for finishing, snipping yarn tails, and weaving loose ends in for lasting durability.
If you need a refresher on tools and basics, you'll find excellent beginner resources in the crochet beginner resources 2025.

Preparing to Start Your Granny Square
Starting a granny square is all about forming a strong, tidy center:
-
Slip Knot
Tie a slip knot and place it on your hook. This gives you a secure starting point. -
Chain Three
Chain 3 to create a circle for your center. Some crocheters prefer a magic ring or magic loop for a tighter center. -
Form the Ring
Slip stitch into the very first chain to join. I've found that if I pinch the ring open with my fingers, it's easier to work into the middle. -
Hold the Tail
Keep the yarn tail aligned with the edge and hold it across your circle so you can crochet over it. This saves time when sewing in ends later.
Tip: If you like visual analogies, imagine the slip knot and first chains as the frame of a tiny tent—a snug, handy base for all the color that comes next.
Round 1: The Foundation of the Granny Square
Here’s how I create the base round for the A-frame look:
-
Chain 3
This counts as your first double crochet. -
Double Crochet 2 into the Ring
Make two more double crochets into the center of your ring. -
Chain 2
This forms the first corner. -
(3 Double Crochets, Chain 2)
Repeat this (3 double crochets, chain 2) two more times, always working into the center of the ring and crocheting over your yarn tail. -
Final Corner:
You'll finish the round with a fourth (3 double crochets, chain 2).
At this point, you should see a neat little square with open corners and full, fluffy sides.
Bonus: Crocheting over the tail means you can cut it off later instead of laboriously sewing it in.
If you ever feel overwhelmed counting stitches or need to slow down, adjust the video speed for a pace that works best for you.

Adjusting the Ring for More Space
If your center feels crowded, here’s a simple fix:
- Slide the Stitches Apart: Gently pinch the starting chain and your last double crochet. Slide the stitches outwards a bit—they’ll spread and give your square a much flatter, roomier center.
- Why bother? If the middle gets too bulky, later rounds might not lay flat. Taking a second to spread your stitches now keeps everything tidy and flat, and makes your piece easier to join with others.
Tip: Don’t struggle or cram stitches into a tight space. Let them breathe—your project will look and feel better.
Finishing Round 1
- Chain 2 to form your last corner.
- Slip Stitch into the top of your original chain 3 to join the round.
- Chain 1 to secure your yarn, then cut the yarn, leaving a 6-inch tail for sewing in.
- If you crocheted over your starting tail, simply snip it flush with your stitches—no sewing needed!
Key Stitches in Round 1:
- Double crochet
- Chain
- Slip stitch
Getting a precise, neat finish here sets you up for success in later rounds.

Starting Round 2 with Color Two: Working into the Back of Your Work
Time to bring in your second color:
-
Turn Your Work
- Flip the square so you're working across the back. You'll notice the stitches look a bit like macaroni on the back, and rows of tidy “V” shapes on the front—think of macaroni vs. penne pasta shapes.
-
Join New Color in Corner Space
- Insert your hook into any corner space, pull a loop of the new color through, and slip stitch to secure.
-
Chain 2
- This acts as your first double crochet.
-
Two More Double Crochets in Same Corner
- Complete the corner cluster.
-
Work Over Tail
- Hold the new color’s tail along the top edge and crochet over it as you work across the sides.
-
In Next Corner:
- Three double crochets, chain two, three double crochets all into same corner.
-
For Side Spaces:
- Three double crochets into each one.
Visual Analogy: I always remember “front is penne, back is macaroni” to quickly identify which side I should be working with.
Corner Stitch Pattern:
- 3 double crochets
- Chain 2
- 3 double crochets
Side Stitch Pattern:
- 3 double crochets per open space
Once you reach the starting corner, finish with a double crochet in the top of your chain and secure with a chain 1 before cutting your yarn.

Round 3: Building on Your Granny Square with Color Three
Adding a third color makes your square really pop. Here’s my process:
- Turn your square so the back faces up again.
- In the first corner space, join your third color with a slip stitch.
- Chain 2 and add 2 double crochets into that corner.
- Into each side space, work 3 double crochets.
- Into corners, remember:
- 3 double crochets,
- chain 2,
- 3 double crochets
- For all side spaces: 3 double crochets.
- As you come to the end, don’t forget to bring your yarn tail forward so you can continue working over it, hiding it inside your stitches.
- Finish with a double crochet in the top of your chain, then chain 1 to secure.
Tips:
- If your stitches start crowding, gently slide previous stitches back to create room.
- Each color round grows your square outward, one “log” at a time.
Step-by-Step for Round 3:
- Chain 2 (first double crochet)
- 2 double crochets in corner
- 3 double crochets in side spaces
- Corner stitch as above
- Repeat all the way around, turn after each full round for a consistent look
Consistency makes for a much neater finish, and helps all your squares match. For more guidance on basics, check out this step-by-step granny square for beginners.

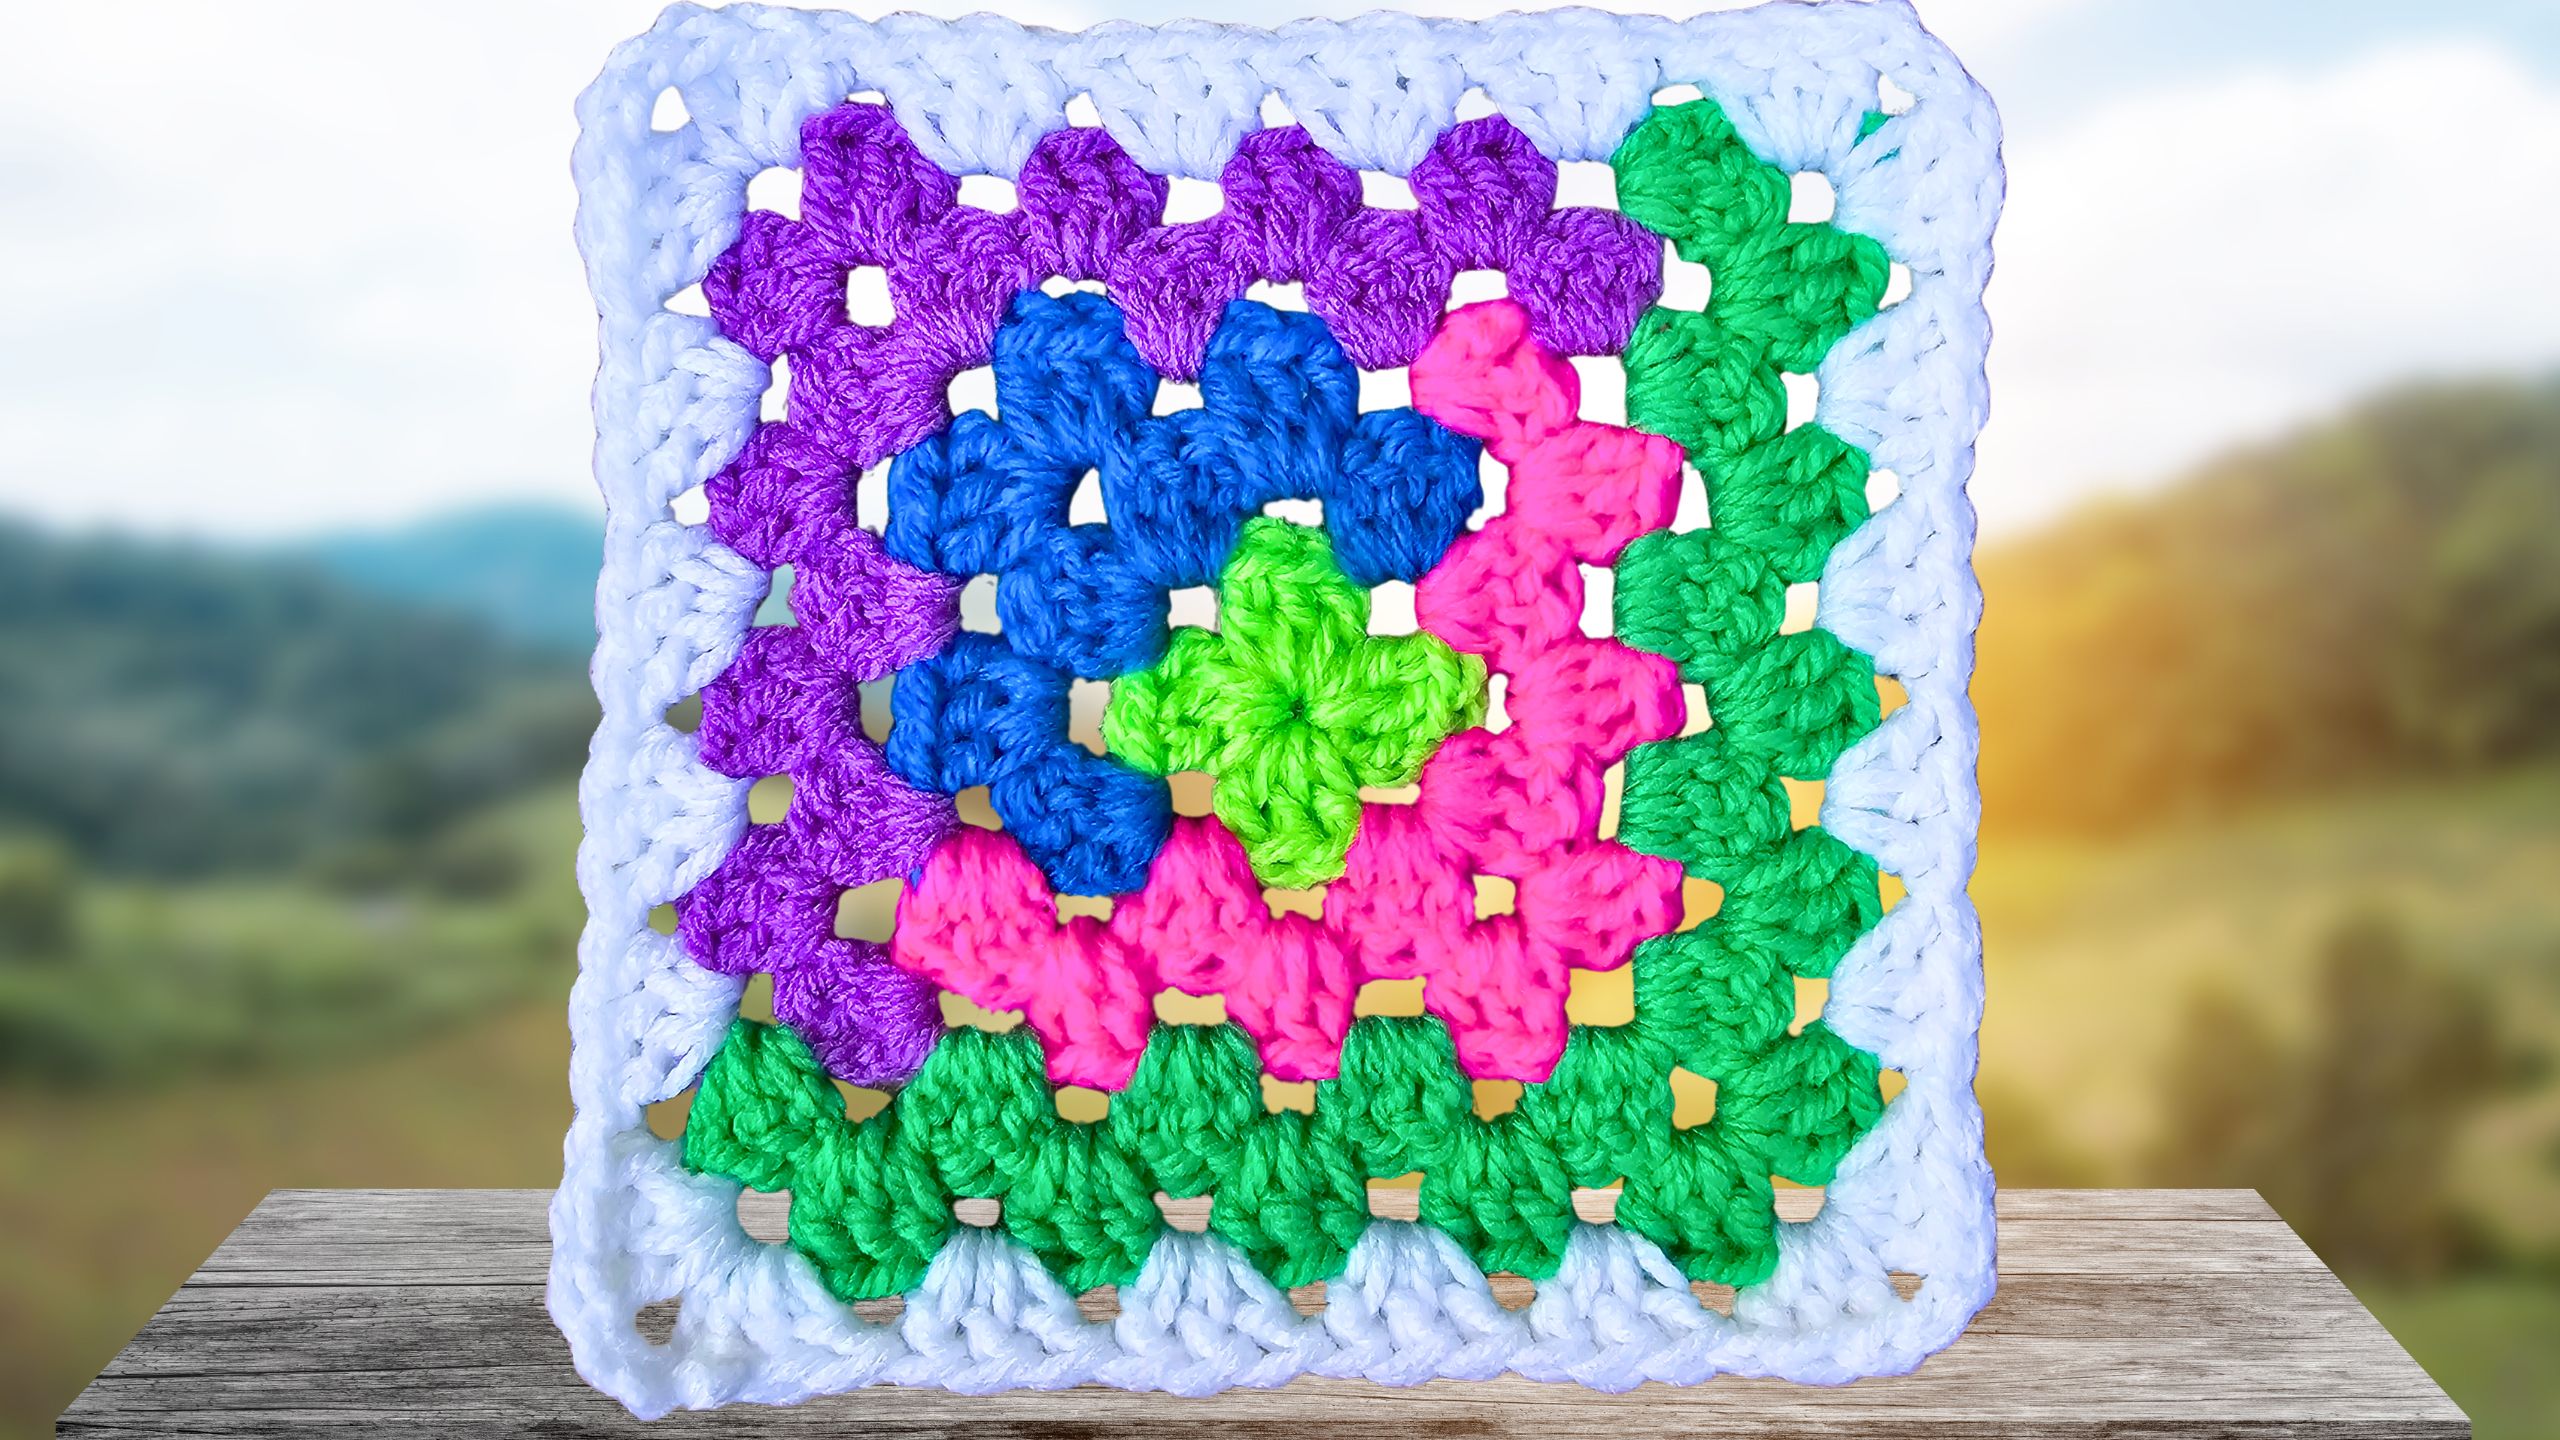
Deciding Your Granny Square Pattern Orientation: Stacked vs Alternating A-Frames
One of the best features of the A-frame log cabin design is how you can orient the “roof” shapes. Here’s how the layout options compare:
| Pattern Option | Description | Visual Effect |
|---|---|---|
| Stacked A-Frames | Start each color in aligned corners | Roofs “stack” neatly in a row like arrowheads |
| Alternating A-Frames | Start each color in offset corners | Roofs alternate, forming a zigzag motion |
How does this work?
- Starting your color in the same corner each time stacks the peaks or "roofs."
- Switching corners for new colors creates a more varied, swirling look.
Think about where you want the A-frame peaks to appear before attaching each new color. It’s a simple choice that makes a huge difference in your finished project’s vibe.
Round 4: Creating the Stacked A-Frame Look
For a crisp, stacked-roof appearance:
-
Start in the Largest Corner
- Identify the largest corner from your previous round (usually opposite where your last color finished).
-
Join Color Four
- Use a slip stitch to join and secure with a chain 2.
-
2 Double Crochets in Corner
- Continue the corner cluster.
-
3 Double Crochets in Each Side Space
- Work across each open space.
-
Corner Pattern (as before)
- In the next corner: 3 double crochets, chain 2, 3 double crochets.
-
Work Over Tails
- Keep your yarn tail along the edge so you’re always building a tidy, seamless look.
-
At the End of Row
- In your last space, bring the yarn tail forward and crochet over it.
- Chain 2, turn your work, and continue with three double crochets in each side space on your return row.
Tips:
- Take your time. Pausing as you complete each round helps check your alignment and pattern.
- Always look at the center to double-check your orientation.
Don’t rush—enjoy seeing each A-frame “log” build up with each color.

Round 5: Final Color Round and Finishing Your Granny Square
The final round really brings your square together. Here’s how I manage it:
- Find the corner where there are only two colors stacked on one side, and one color on the other sides—this is where to start.
- Join your last color, chain 2, and create your first cluster of double crochets.
- Work three double crochets into each side space across.
- In each corner: three double crochets, chain two, three double crochets (as you’ve done in prior rounds).
- In the last side space, bring your tail forward and work over it.
- Once you finish the round, chain 2 and turn your work for the return row. Three double crochets into each space, corners as usual.
- End with a final double crochet in the top of your beginning chain stitch. Chain one and cut your yarn, leaving a long enough tail to sew in at the end.
Key steps to remember:
- Every color round has two rows (down one side, then back up).
- Always check your corners to keep your A-frame in line!
Managing Yarn Tails and Identifying Front vs Back of Work
Keeping your project tidy speeds up finishing later:
-
Poke Yarn Tails to the Back:
After finishing all your rounds, use your crochet hook or a yarn needle to nudge every yarn tail through to the same side (the back). -
Use the Center Square:
The very center of your work tells you which side is facing out—a neat little “V” is typically the front. -
Purpose:
Keeping all tails poked to the back makes it easier and faster to sew them in cleanly later.
Quick Tips:
- Don’t sew tails in until the very end.
- Use the “front” and “back” indicator for neat project assembly.

Adding a Border to Your Granny Square
A smart border pulls all your hard work together and helps your squares line up perfectly when joining into a blanket or pillow.
How to add a border:
-
Choose Your Border Color
- Any color works; a neutral or a pop of contrast can give a pro finish.
-
Start in Corner Space
- Insert your hook into a corner nearest the last tail.
- Join new yarn with a slip stitch, chain 2 to start.
- 2 Double Crochets in Same Corner
-
3 Double Crochets in Each Side Space
- Work around all edges, making three double crochets into each open space along the sides.
-
Corners:
- In every corner space, work three double crochets, chain two, three double crochets.
-
Work Over Any Tails
- As always, crochet over new yarn tails where you can.
-
Complete the Border
- When you get back to where you began, complete the final cluster and slip stitch into your chain to join. Chain one, then cut and finish as usual.
If you want to create extra-large squares, keep repeating the two-row-per-color idea before bordering. If you need ideas for creative edge finishes, the neat crochet edges for stunning spring projects guide will come in handy.
Tips for Joining Multiple Granny Squares
When working up a bunch of A-frame log cabin granny squares for a bigger blanket or bold pillow:
- Make sure each square has the same number of rounds and a similar border for a uniform result.
- Decide if you'll join as you go (connecting squares with joining stitches as each is finished) or stitch all together at the end—that’s up to your preference.
- Consistent sizing makes joining so much easier, especially when mixing with other five-round granny squares.
- Keep in mind: carefully blocked squares fit together more smoothly.
Want more fun square ideas? Check out this top 20 free granny square projects 2025 roundup for inspiration.

Additional Helpful Tips and Troubleshooting
Crocheting shouldn’t be stressful. Here’s how to avoid common pitfalls:
-
Adjust Your Stitch Pace:
- Use YouTube’s speed controls to slow down (for beginners) or speed up (for pros).
-
Slide Stitches Back:
- If side spaces fill up, gently push old stitches back to create room for new ones.
-
Repeated Patterns:
- Double-check each round: corners always have 3 double crochets, chain 2, 3 double crochets; side spaces have 3 double crochets.
-
Keep Yarn Tails Visible:
- Pin yarn tails along the edge so they’re easy to crochet over.
-
Finishing Touches:
- Sew in all tails neatly at the end.
- Block your finished square for sharp corners and a truly professional look.
-
Stitch Count Consistency:
- Make sure you’re always putting the right number of double crochets into each space.
Final reminder: A little care in the details today means your blanket or pillow will look beautiful for years!
Suggestions for Variation and Personalization
The A-frame log cabin granny square is a canvas for your creativity:
-
Switch Up Colors:
- Use a planned palette, bold stripes, or a total scrap yarn mix for drama.
-
Try Different Yarn Weights:
- Make mini ornaments with fine yarn or bold afghan blocks with chunky yarn.
-
Customize Size:
- Add more two-row “logs” for a bigger square or stop early for a smaller one.
-
Mix and Match:
- Blend A-frame squares with classic grannies, daisy granny square blankets, or granny square flower patterns for a one-of-a-kind effect.
-
Alter Corner Placement:
- Experiment with where you start each new color for unique stacked or alternating patterns.
Don’t be afraid to let your personal style shine!

Conclusion
Crocheting a Stacking A-frame log cabin granny square is a joyful, stash-busting project that adds variety and visual interest to any crocheted blanket or pillow. With step-by-step rounds, clever ways to hide your yarn ends, and options for arranging the blocks, you can make each square truly unique. Whether you’re new to crochet or an experienced maker, give this design a try—your scrap box and your creative spirit will thank you!
If you loved this tutorial, you might also enjoy learning [how to crochet a seamless granny square (https://secretyarnery.com/blogs/blog/easy-crochet-granny-square?srsltid=AfmBOops5yQ-ZJzXGKHuhOB7FiQC1yZsFlIHrDhQ13eAc8CWN9zNTP_v
Left Handed?
FAQs
What is a Stacking A-frame Log Cabin Granny Square?
- It’s a variation of a classic granny square that builds “logs” in two-row color sections to create a roof or arrowhead effect. It pairs well with other five-round squares.
What yarn and hook work best?
- Use size 4 worsted weight acrylic and a 6 mm (J) hook. Acrylic is durable and affordable, and the 6 mm hook keeps the fabric soft and drapey for blankets.
How do I start the center: magic ring or chain?
- Both work. Chain-3 and join is simple for beginners. A magic ring gives a tighter center. Choose the one you’re comfortable with.
How many rounds should I make?
- Five color sections (10 rows total) create a balanced square that matches most five-round granny squares. Add more two-row “logs” for larger squares.
How do I get the stacked vs alternating A-frame look?
- Start each new color in the same corner for stacked peaks. Start in a different corner each time for alternating, zigzag peaks.
Why are my corners curving or ruffling?
- You may be missing a chain-2 in corners or adding extra stitches in side spaces. Each corner is 3 dc, ch 2, 3 dc. Each side space is 3 dc. Block the square to flatten.
How do I keep my square flat?
- Slide stitches back in crowded spaces, keep tension even, and block when finished. If it cups, try a larger hook; if it ruffles, size down.
Should I turn my work between rounds?
- Yes for this look. Turning each color section keeps the texture even and supports the “log cabin” effect.
How do I hide yarn tails without sewing forever?
- Hold tails along the edge and crochet over them. At the end, poke remaining tails to the back and weave them in once.
What’s the best border for joining squares?
- A simple granny border (3 dc in each space, corners as 3 dc, ch 2, 3 dc) keeps edges even. Then use slip-stitch join, whipstitch, or join-as-you-go.
![]()
Christa Patel is the maker behind Secret Yarnery, where she shares beginner-friendly crochet tutorials, stash-busting patterns, and calm, step-by-step videos. She loves turning scrap yarn into colorful, useful projects, from modern granny squares to cozy blankets and pillows.
With thousands of crafters following along on YouTube, Christa’s mission is simple: make crochet feel easy, fun, and stress-free. When she’s not filming or testing new stitch combos, you’ll find her sorting yarn by color, sipping strong coffee, and planning the next crochet-along.
Find more tutorials, free patterns, and resources at secretyarnery.com, and subscribe on YouTube for weekly crochet inspiration.
About the Author
With a passion for crafting easy, beginner-friendly tutorials and patterns, Christa inspires crafters of all skill levels to unleash their creativity worldwide. She encourages yarn lovers to connect, create, and crochet a world filled with beautiful handmade treasures!
How to Crochet a Stacking A-Frame Log Cabin Granny Square