How to Crochet a Pumpkin for Beginners: 3 Easy Ideas
Pumpkins belong in every cozy corner once the leaves start to turn. If you want Crochet Pumpkin Fall ideas that go beyond basic, here are three gorgeous projects you can make with simple stitches.
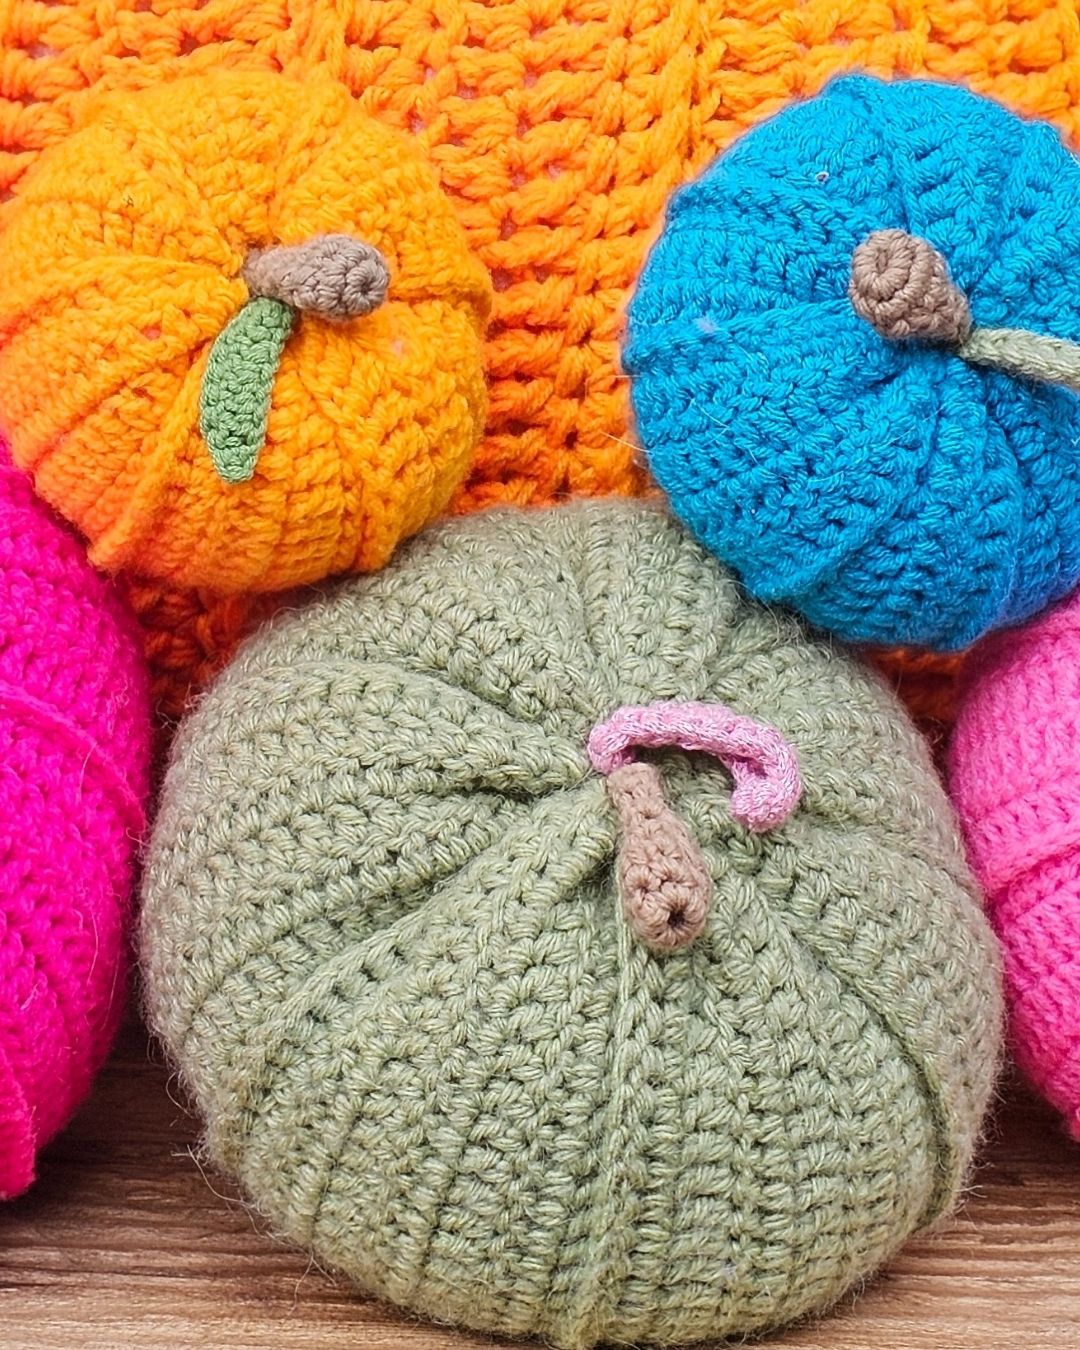
Try a quick small pumpkin that’s perfect for shelves and desks, a textured pumpkin granny square for blankets and pillows, or a giant floor pouf that doubles as a seat or footrest.

- Small pumpkin: a fast, stuffed pumpkin you can size with your starting chain.
- Pumpkin granny square: a raised but flattenable motif that joins into blankets or pillows.
- Giant floor pouf: a bold, textured statement pumpkin made with three strands held together.
Materials You’ll Use Across Projects
General Supplies
You can use any worsted weight acrylic yarn for all three. The small pumpkin and granny square use single strands. The pouf uses three strands held together for speed and bulk.
- Yarn
- Hooks:
- Small pumpkin: 5 mm for tight stitches.
- Granny square: 6 mm.
- Giant pouf: 9 mm for the body, 8 mm for the stem. If you start with a foundation chain instead of a chainless foundation, use a 10 mm hook for the chain.
- Other tools:
- Darning needle
- Scissors
- Stitch markers for beginners
- Fiberfill or pillow stuffing for the small pumpkin and the pouf
Project Quick Specs
| Project | Yarn & Amount | Hook(s) | Notes |
|---|---|---|---|
| Small plush pumpkin | Worsted weight; scraps for stem and leaf | 5 mm | Size by chain length: 20 small, 30 medium, 40 large |
| Pumpkin granny square | 3 colors in worsted weight | 6 mm | Works flat or lightly raised |
| Giant pumpkin floor pouf | About 10 skeins total, three strands held together | 9 mm body, 8 mm stem | Start with 45 chainless foundation stitches |
Customization Tips
- Colors: Pick anything that fits your space. Hot pink, oatmeal, forest green, or classic orange all work. Mix fibers if you like a heathered look.
- Sizes:
- Small plush pumpkin: Start with 20 chains for small, 30 for medium, 40 for large.
- Giant pouf: Build to a rectangle that’s twice as wide as it is tall. A quick check is to fold it in half so it looks square.
Step-by-Step: The Small Crochet Pumpkin

This pumpkin is quick, firm, and great for gifts. Tight stitches keep the stuffing inside and the ridges give it that pumpkin squish.
Foundation and First Rows
- Leave a 10 inch tail for sewing. Make a slip knot and chain 20 for a small pumpkin. Keep your chain loose. If your chain is tight, go up a hook size for the chain.
- Chain 1 more as a turning chain. Double crochet into the second chain from the hook, working into the bottom loop of each chain so you get a neat edge. You’ll have 20 double crochet.
- Chain 1 and turn. Double crochet in the very first stitch and in each stitch across. Always get two strands on your hook for each top V. Mark the first stitch if you’re new.
- At the end of each row, remember the “hill” stitch on the edge. Tip the row up to see it and work into it to keep your sides straight.
- Work rows 2 through 4 as regular double crochet rows.
Tip: Count sometimes, not constantly. Matching your stitch count across rows is enough.
Add Pumpkin Ridges With Front Post Double Crochet
- Row 5: Chain 3 and turn. Skip the first stitch. Front post double crochet around the next stitch by going in before the post and out after the post, then complete your double crochet. Work a FPDC around each post across the row. On the last one, separate the chain from the post with your thumb so you can wrap the hook around the final post cleanly.
- Return to regular double crochet: Chain 1 and turn. Work one regular double crochet in each stitch for three rows. On the first row after a FPDC row, don’t forget to work into the top of the chain from the previous row.
- Repeat: Three rows of regular double crochets, one FPDC row. For a small pumpkin, make seven ridges, ending with three regular rows after the last FPDC.
Want a taller pumpkin or wider spacing between ridges? Add more regular rows between FPDC rows.
Join and Shape
- Fold the rectangle in half with the ridges facing out. Chain 1, then single crochet the two sides together, stitch by stitch, from top to bottom. Catch the “hill” stitches at the end.
- Cut the yarn with a 10 inch tail. Thread your needle with the seam tail. Weave around the edge, picking up a loop every half inch or so. Pull to cinch closed.
- Stuff with fiberfill. Thread the starting tail and weave around the top edge. Add more stuffing if needed, then cinch closed.
- To secure the closure, crisscross a few stitches from side to side across the opening. Tie the two tails with a tight double pass knot, then one more knot on top. Trim and hide the ends by threading both tails and pulling them into the pumpkin.
Troubleshooting:
- If stuffing shows through, cinch the edge tighter.
- If sides bow out, massage the shape and shift stuffing.
Make the Stem
- With a small scrap of brown or green, make a slip knot and chain 3. Slip stitch into the first chain to form a ring. Chain 1.
- Work 6 single crochet into the ring over the tail.
- Round 2: Two single crochet into each stitch around for 12.
- Round 3: Decrease around by working single crochet two together, repeating to reduce the opening.
- Work even: One single crochet in each stitch until the stem height looks right for your pumpkin. Slip stitch into the next stitch, chain 1, and fasten off with a long tail.
- Sew the stem to the top center. Stitch around the base several times until secure, then knot and hide the tail inside.
You can make the stem thicker by doing fewer decrease rounds, or skinnier by doing more.
Add a Leaf
- Chain 11. In the second chain from the hook: single crochet. Next chain: single crochet. Next 2 chains: half double crochet in each. Next chain: double crochet. Next chain: 2 double crochets in the same chain for a little curl. Next chain: double crochet. Next chain: half double crochet. Next chain: single crochet. Last chain: slip stitch. Chain 1 and fasten off with a tail.
- Sew the leaf to the base of the stem with two neat passes. Knot, hide tails, and trim. Every leaf will look a bit different. That’s part of the charm.
The Pumpkin Granny Square

This square looks plump but can be pressed flat. It’s perfect for blankets, runners, and pillow fronts.
Build the Pumpkin Center
- Make a magic ring. Chain 1. Work 11 double crochet into the ring, then pull the tail to close. Slip stitch to the first real double crochet to join and chain 1.
- Into the same stitch: single crochet, chain 1.
- Cluster sections:
- In the next stitch, start three double crochets, leave the last loop of each on the hook. Yarn over and pull through all loops for a DC3tog. Chain 1.
- In the next stitch, start three treble crochets, leave the last two loops of each on the hook. Yarn over and pull through all loops for a TR3tog. Chain 1.
- Repeat TR3tog for the next two stitches, chaining 1 after each.
- In the next stitch, work a DC3tog and chain 1.
- Single crochet in the next stitch, chain 1.
- Mirror the sequence across the remaining stitches: DC3tog, then three TR3tog groups, then a final DC3tog in the last stitch. Chain 1 after each cluster.
- Slip stitch to the single crochet near the base to join and chain 1.
Tip: If you want a flatter pumpkin, use chain 2 between clusters in this round.
Smooth the Shape
- Round 2: Work single crochet around the edge, using stitch sizes to even out the shape.
- Big stitch on top of each cluster gets 2 single crochets.
- Small stitch between clusters gets 1 single crochet.
- Slip stitch to the first single crochet to join.
Add the Stem
- Turn the pumpkin so the top is centered. Join stem color with a slip stitch through the top stitch. Chain 1.
- Single crochet, chain 1, turn, and single crochet back into that same area. Fasten off and use the tail to square the stem as you sew in the end. A tiny scrap is all you need.
Turn It Into a Granny Square
- Find the space between treble crochet clusters. Join your square color with a slip stitch in the stitch sitting right above that space. Chain 3 to count as your first treble crochet.
- Work 2 more treble crochet in that same spot.
- In the stitch above the next space, work 3 half double crochet.
- In the stitch above the next space, work 3 half double crochet again.
- Make the corner in the stitch above the next space: 3 treble crochet, chain 2, 3 treble crochet.
- Along the bottom edge near the single crochet section, place 3 double crochet before that single crochet and 3 double crochet after it to square off the base. Keep the stem pushed to the front as you go.
- Continue around with the same logic:
- Corners: 3 treble crochet, chain 2, 3 treble crochet.
- Between corners: groups of 3 half double crochet or double crochet as described above to keep a balanced square.
- To join and continue into a classic granny, you can join with a single crochet in the corner, chain 3, then work standard granny clusters in each space. Or slip stitch to finish and weave in tails.
The Giant Pumpkin Floor Pouf

Big, squishy, and fast, this showpiece uses three strands together and a 9 mm hook. It makes a great footrest or low stool.
Start With a Chainless Foundation
- Hold three strands of worsted weight yarn together. Leave longer tails, about 18 to 24 inches, for sewing later.
- Make a slip knot. Chain 4.
- Foundation double crochet method:
- Yarn over, insert your hook into the first chain, pull up a loop. Adjust the loop on your hook so it matches the other loops. Chain 1 through that first loop to build the base. Keep that chain held open with your finger.
- Complete a double crochet into that same spot you’re holding open.
- For each new stitch, go into the base chain you held open, chain 1 to form the base of the next stitch, hold it open, then complete the double crochet.
- Continue until you have 45 foundation stitches. You’ll see cute V’s along both edges.
Tip: Pinch open the chain part of each foundation stitch as you work. It keeps the base neat and even.
Build Texture With Simple Repeats
- Row 2: Chain 1, turn, and double crochet in the first stitch and across. Work into the top of the foundation V’s.
- Row 3: Chain 1, turn, double crochet in each stitch. Mark your first stitch if needed.
- FPDC row: Chain 2, turn. This chain counts as the first stitch. Front post double crochet around each stitch across.
- Repeat sets of even rows of double crochet between FPDC rows so your ridges all face one side. You can do four, six, or eight double crochet rows between FPDC rows. Keep it consistent enough so the texture looks intentional.
Size check:
- Your rectangle is ready when it’s twice as wide as it is tall. Another quick check is to fold it in half. If it looks like a square, you’re good. A wider rectangle makes a shorter, squatter pumpkin. A narrower one makes a taller pumpkin.
Join, Close, and Stuff
- Fold the rectangle in half, right sides out. With the 9 mm hook, single crochet the two long sides together, matching stitches as you go. If they don’t align perfectly, skip one on the longer side.
- Cut one tail short. Leave at least one very long tail for cinching the ends.
- Thread a blunt needle with the long tail. Weave around one open end, picking up a few strands every inch. Pull to cinch closed.
- Lock it in place by tying to a nearby tail. For a secure center, stitch from one side to the other side in a kitty corner pattern until the center is fully closed.
- On the other side, weave the tail around the opening but don’t cinch yet. Stuff the pouf firmly. Press stuffing into the sides to smooth the shape. Cinch closed.
Make and Attach the Stem
- With stem color and an 8 mm hook, make a magic ring. Chain 1.
- Work 12 double crochet into the ring. Pull the tail to close. Slip stitch to join, chain 1, and turn.
- Round 2: Work one front post double crochet around each stitch. Slip stitch to join, chain 1, and turn.
- Round 3: Alternate front post and back post double crochet around. This gives a wood-like texture.
- Fasten off with two long tails. Knot the magic ring tails for safety.
- Center the stem on the pouf opening and stitch around the base into the pumpkin top. Make several passes until it feels solid. Tie to a nearby tail and hide ends under the stem.
Stuff the pouf a bit firmer than you think. It will soften slightly with use and you want it to hold shape.
Styling and Color Ideas

- Mix shades of orange for depth. Add a touch of green in the pouf to mimic real pumpkins.
- Match the small pumpkin and granny square colors to tie a room together.
- Use fuzzy yarns for cozy texture on small pumpkins. Use smooth acrylic for structure on the pouf.
- Make a set: small plushies in varying chain counts, a throw of pumpkin granny squares, and one bold pouf in the corner.
Conclusion
Pumpkin yarn projects make fall feel warm and playful. These Crochet Pumpkin Fall ideas cover it all, from quick gifts to a statement pouf that steals the show. You learned how to build clean edges, add textured ridges, shape neat stems, and close forms that hold their stuffing. Ready to pick your first pumpkin from your hook? Share your color combinations, try a size tweak, and make a patch that’s perfectly you.
FAQs
What are some quick crochet pumpkin ideas for fall?
Crochet small plush pumpkins, pumpkin granny squares, or a giant pouf to add cozy autumn vibes to your home.
Can beginners crochet pumpkins for fall?
Yes! Simple projects like small plush pumpkins and granny squares are perfect beginners.
What yarn is best for crochet pumpkins?
Use worsted weight acrylic yarn in shades of orange, green, and brown for a classic pumpkin look.
How do I stuff my crochet pumpkins?
Use fiberfill or pillow stuffing to fill your pumpkins, adjusting the firmness to get the desired shape.
What are the benefits of crochet pumpkin granny squares?
These versatile squares can be used for blankets, pillows, or even as decorative items to celebrate fall.
![]()
Christa Patel is a passionate crochet designer and educator. With years of experience teaching beginners, she is known for her simple, friendly approach to crochet. Christa specializes in creating easy-to-follow patterns, empowering crafters of all skill levels to make beautiful and practical projects. As the creator behind Secret Yarnery, Christa shares free patterns, video tutorials, and tips with a growing global community. Her work inspires thousands to pick up a hook and start their crochet journey with confidence!
Find me here:
- YouTube: https://youtu.be/HWxd69-nNq0
- Blog and patterns: secretyarnery.com
- Instagram: @secretyarnery
About the Author
With a passion for crafting easy, beginner-friendly tutorials and patterns, Christa inspires crafters of all skill levels to unleash their creativity worldwide. She encourages yarn lovers to connect, create, and crochet a world filled with beautiful handmade treasures!
How to Crochet a Pumpkin for Beginners: 3 Easy Ideas