Amazing Flat Braid Join Crochet Border for Any Size Blanket!
Looking for a border that looks polished, lays flat, and works on any blanket size without tricky stitch math? I’ve got you. Flat Braid Join Crochet Border — a polished, lay-flat finishing border that works on almost any blanket size without tricky stitch math. This simple, flexible, and pretty border is easy to add to row- made pieces or joined squares; read on to learn the three quick parts — base edging, the chain-skip braid, and the loopy finish — and get a short tutorial to follow along.
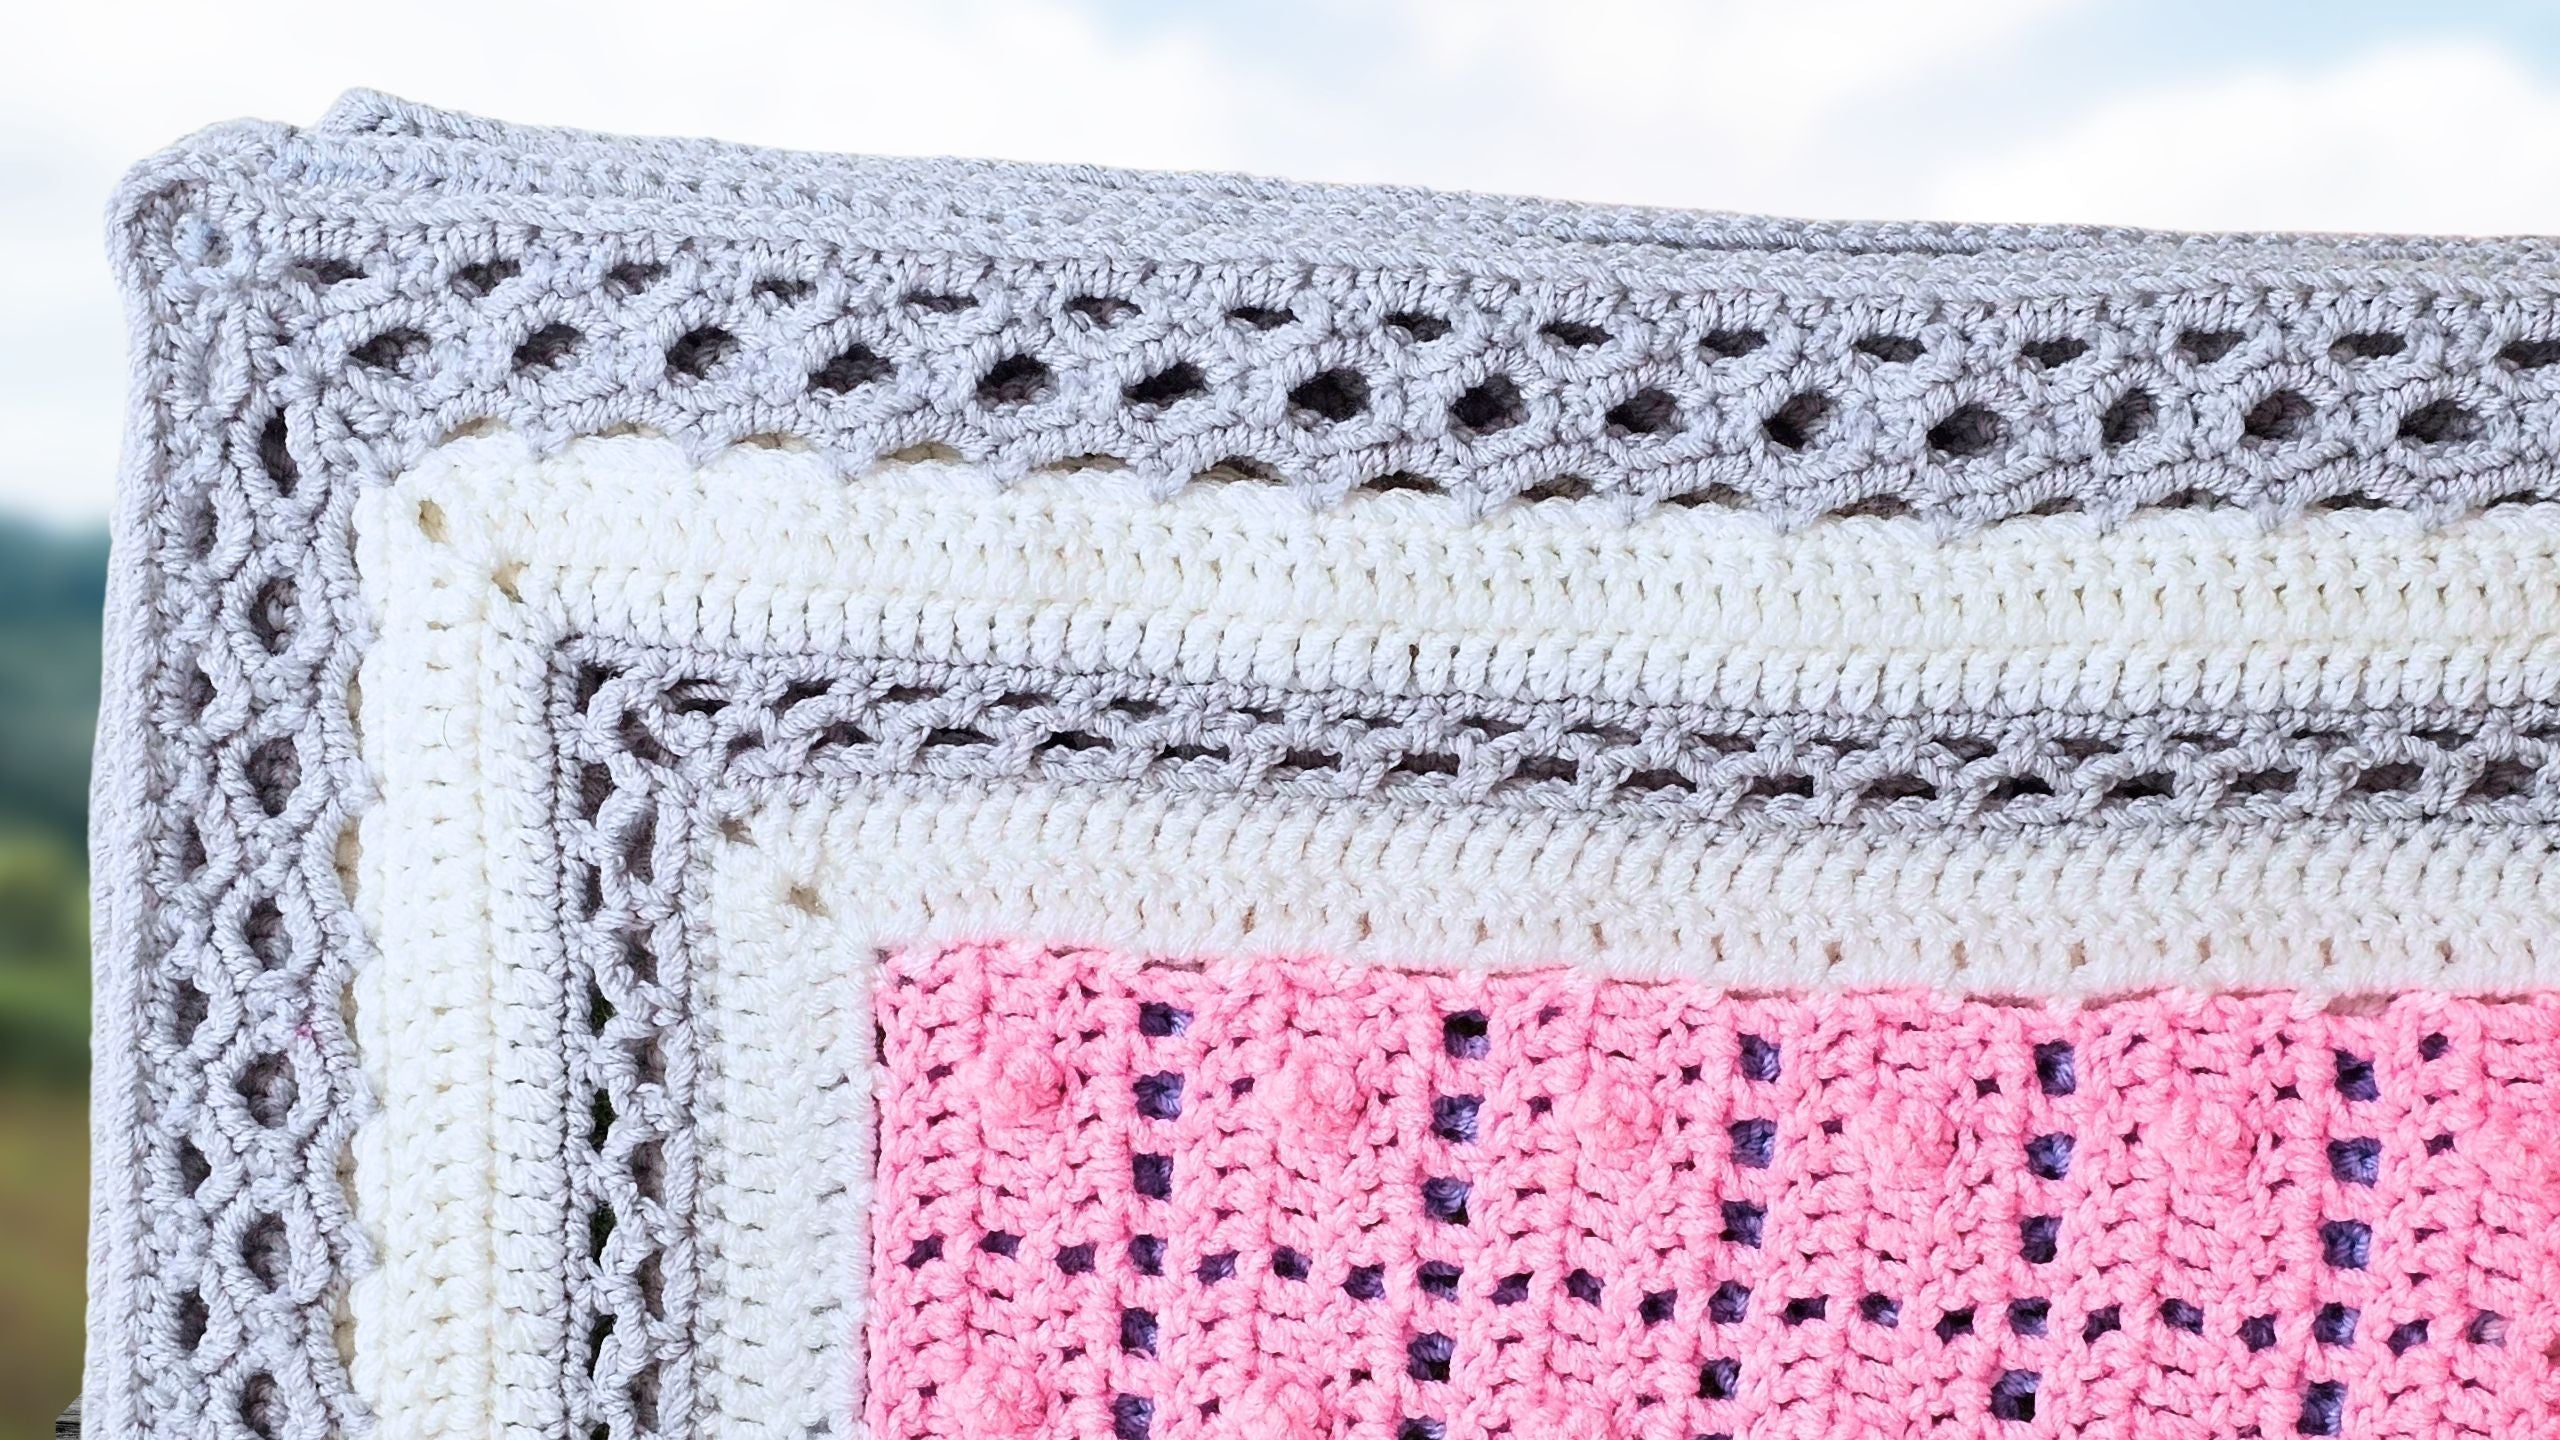
I used this Flat Braid Join Crochet Border on my Secret Stitches blanket, and it also pairs beautifully with any project made in rows or with joined granny squares. Below is what you’ll learn in this tutorial and the materials and basics to get you started — quick sections you can jump to if you prefer: base edging, the chain-skip braid join, and the loopy finish that smooths everything out.
What you'll learn (quick overview) - Base edging (prepare the edge): a neat foundation worked along the side or the edge of row-built blankets or around joined squares so the braid sits evenly. You’ll see how a row of single crochet (or equivalent base stitches) stabilizes the edge and creates consistent stitch spacing.
Materials Needed
- Yarn: size 4 worsted weight acrylic. For my queen size sample, I used about 200 g for the white edging and 300 g for the gray border. Use the same yarn weight that matches your blanket so the border blends nicely.
- If you want to try a similar yarn, I’ve linked what I used here: worsted weight acrylic yarn.
- Hook: use the hook that matches your blanket. I used a 6 mm hook. If you need one, here’s my go-to: ergonomic crochet hook.
- Other supplies: a pair of scissors and a yarn needle for weaving in tails. For sharper tips that glide through stitches, I like these sharp tip needles.
This border works with a multiple of four, but I’ll show you how to adjust in the corners so you don’t need to hit exact counts. It is customizable, repeatable, and great for blankets with squares or straight rows.

Why Choose This Flat Braid Join Border?
It’s quick to memorize and adds a clean, braided look that suits both modern and classic styles.
- Key benefits:
- Works with a multiple of four, yet corners are flexible so the fit is easy on any blanket size.
- Cute corners that look neat, not bulky.
- A loopy edge that lays flat and prevents curling.
- It is perfect for blankets made of squares or long rows. The single crochet round inside the process helps maintain shape over time.
If you want more background on flat braid joins, this helpful walkthrough on a continuous approach is a useful companion read: Continuous Flat Braid Join tutorial.
Preparation Before Starting
Start in any corner space. I like to use the same color as the edging on my squares for a cohesive look. Hold your yarn tail along the edge for the first few stitches so it gets woven in as you go. Have a stitch marker handy. I use it to mark the join and corners in the first few rounds, which keeps everything tidy.
Lay your blanket flat so it is not twisted, and make sure you can rotate it easily while working. Turning your work in certain rounds helps the border lay flat, so give yourself space to turn the blanket as you go.

Starting the Base Edging Round
Joining the Yarn
Pop your hook into any corner space. Place a loop of your border color on the hook, pull it through, and slip stitch to join with both strands. Drop the tail, hold it along the edge for a few stitches, and you are set.
First Chain and Double Crochets
Chain two. This counts as your first double crochet. If you joined differently, chain three instead. Work one double crochet into each stitch along the side of the blanket.
Handling the First Corner
At the corner space, make one double crochet, chain two, and one double crochet into the same space. This is the corner treatment every time. Continue with one double crochet in each stitch along the side.
Completing the First Full Round of Edging
Working Along All Sides
Repeat the pattern around the blanket: one double crochet into each stitch. At each corner, work one double crochet, chain two, one double crochet into the same space. This creates a neat angle and keeps the border even.
Joining Back to the Start
When you reach the starting corner space, make one double crochet into that same space. Join with a single crochet into the top of your starting chain. Chain two, or chain three if your chains are tight, then place a stitch marker in that space so you can spot the corner quickly.
Turning and Second DC Round
Turn your work. Make one double crochet into the next stitch, then one double crochet into each stitch across the side. Repeat the corner treatment at each corner. This second round adds a bit of substance and sets up the next round that stabilizes the edge.

Adding the Stabilizing Single Crochet Round
Preparing for Single Crochets
After finishing the second double crochet round, join back at the start with a single crochet into the top of the chain. Chain one. Pop a stitch marker into the corner space just ahead of your stitch. Turn your work.
Working Single Crochets Around
Work one single crochet into the corner space, then one single crochet into each stitch across the side. The purpose of this round is important: single crochets are less stretchy, so this helps the blanket keep its shape and pulls in the border slightly.
Corner Treatment in the SC Round
At each corner, work one single crochet, chain two, and one single crochet into the same corner space. If it helps, rotate your work a bit to keep your stitches even as you turn the corner.
Finishing the SC Round
When you return to the start, make one single crochet in the corner space, chain two, slip stitch into the first real stitch to join, then chain one to secure. Cut your yarn and pull through, leaving a tail long enough to weave in later.
Transitioning to the Flat Braid Border
Turn your blanket so you are working into the back of the single crochet round. You will know you are on the back because the V’s from that round are not visible on this side. Pick a different corner than the one you just finished with. Insert your hook into the corner space, loop your border color on the hook, pull through, and slip stitch with both strands to join. Drop the tail and hold it along the back as you start the next step.

Creating the Chain-Skip Foundation for the Braid
Basic Pattern Along Sides
Chain three, skip three stitches, and single crochet into the fourth stitch. Repeat this all the way along the sides: chain three, skip three, single crochet into the fourth stitch.
Adjusting for Corners in the Foundation
At a corner, the goal is to land in the corner space for your single crochet, then chain three and single crochet into the same corner space again. If your stitches do not line up neatly, do a chain four and skip four just before the corner to make it fit. Always mirror whatever you do after the corner. For my blanket, two corners needed a chain four and skip four to line up.
Completing and Joining the Foundation
Back at the starting corner, single crochet into the corner, chain three, then slip stitch between the legs of the first stitch to join. Turn your work. Turning here helps the border lay flat and reduces curl.
If you enjoy seeing variations of flat braid style joins in other contexts, this step-by-step photo guide is clear and helpful: Happily Ever Afghan flat braid join walkthrough.

Building the First Hill Round
Corner Space Work
Into the corner space, make five single crochets, then one single crochet into the next stitch. That sets your rhythm.
Along the Sides
Repeat all along the side: five single crochets into each chain-three space, and one single crochet into the single crochet stitch between spaces. At each corner, do the same, with one single crochet into the stitch and five single crochets into the corner space.
Joining the Hill Round
When you return to the start, slip stitch into the legs of the first stitch to join. Then slip stitch loosely up the next three stitches so you end at the top of the hill. Chain three and turn your work.

Forming the Braid with Center Stitches
Identifying Center Stitches
Each hill has five single crochets across the space, plus singles in between. You will skip two stitches on the left and two on the right. The two center stitches are where you will work.
Basic Braid Pattern
Make one single crochet into each of the two center stitches on top of the hill. Chain three, then jump to the next hill’s two center stitches and make two single crochets again. Repeat around the blanket.
Corner Adjustment in the Braid
At a corner hill, chain three, single crochet into the center stitch of that hill, chain three, and single crochet into the same center stitch. Then chain three and continue with two single crochets into the center two stitches of the next hill down the side.
Joining the Braid Round
When you reach the start, make one single crochet into that same top stitch, chain three, and slip stitch into your first chain. Chain one and turn your work.

Repeating the Single Crochet Hill Round
Matching the Previous Round
Into the corner loop, work five single crochets into the space and one into the next stitch, just like before. Where you see the paired single crochets from the prior round, make one single crochet into the first stitch, skip the second, and go straight into the next space with five single crochets.
Working Around Sides
Keep the rhythm: five single crochets into each space, one single crochet into the first stitch of each pair, then skip the second and move into the next space.
Finishing the Repeat
At the start, slip stitch into the first stitch to join, then slip stitch into the next two stitches so you are back up at the corner. Chain two and turn your work.

Straightening the Edge with Chain Two
Updated Pattern for Straightness
To straighten the edge and reduce wave, switch to chain two between sections. Jump to the center of the next hill and place two single crochets into the two center stitches. Chain two, then repeat at the next hill.
Along the Sides
Continue this chain two and two single crochet pattern all the way around the blanket. These slightly shorter chains pull in the edge for a crisp finish.
Corner with Larger Loop
At the corner, chain two, single crochet into the center stitch at the top of the corner hill, chain five, and single crochet into the same stitch. This larger loop sets up a smooth, final corner.
Completing the Straightening Round
When you get back to the start, chain two, single crochet into the same stitch, chain five, and single crochet into that same stitch again.

Final Loopy Edge with Half Double Crochets
Starting the HDC Round
Chain one and turn your work. Into the first corner loop, place seven half double crochets. This fills the corner and gives it a rounded, balanced look.
Pattern for Spaces and Stitches
Follow this pattern around:
- Stitch: 1 HDC into the first stitch of the hill.
- Space: 3 HDC into the next space.
- Corner: 7 HDC into each corner space.
This combination creates a soft, loopy edge with gentle arches that sit flat.
Working the Full Round
Keep working one half double crochet into the first stitch, three half double crochets into the next space, and seven half double crochets in every corner loop.
Joining and Finishing
When you return to the start, you can slip stitch to the first stitch, chain one to secure, cut the yarn, and weave in the tail. For a seamless look, I like the invisible join:
- After your last half double crochet, cut the yarn and pull it through the stitch.
- Thread your needle and insert it under both top strands of the first stitch where you would normally slip stitch.
- Bring the needle back down through the center of the last stitch you made.
- Snug it until the join matches the surrounding stitches, then weave in the tail.

Tips for Customizing Your Border
Yarn Color Choices
Use any colors you love. I edged my blanket in white, then worked the braid in gray for a soft contrast. Match your blanket for a seamless look or pick a contrast for a bold frame.
Adjusting for Blanket Size
The chain-three foundation creates evenly spaced loops, and the corners give you room to adjust. If your stitch counts do not line up near a corner, switch a section to chain four and skip four so the corner lands in the right place. Mirror the adjustment after the corner.
Preventing Curling and Shaping
Turning your work after each round helps keep the border flat. The single crochet round stabilizes the edge so your blanket does not stretch out. If your chain spaces feel tight at first, that is normal. They relax with use and help the border keep its shape.
If you want another technique that also focuses on flat edges, I wrote up a detailed guide that pairs well with this border: lay-flat crochet border trick.

Free Resources and Patterns
Want the step-by-step instructions in an easy format?
- Grab the free pattern: download the free Flat Braid Join border pattern.
- Prefer to print and take notes? Get the printable PDF version.
- Left-handed? I have a full left-handed tutorial.
- Get my handy crochet cheat sheet for quick references you will use all the time.
Common Adjustments for Different Projects
For Smaller Blankets
You will use less yarn. The pattern remains the same. If your sides are short, you may find that chain three, skip three lands neatly every time with little or no corner adjustment.
For Square vs. Rectangular
The same corner math applies. Keep your pre-corner and post-corner adjustments mirrored on opposite sides for a symmetrical result.
Troubleshooting Fit Issues
If the border looks tight or pulls inward, keep your slip stitches loose when moving up the hill. If you changed to chain two on a round and it is still a bit snug, ease your tension slightly or switch back to chain three for a section. Always mirror adjustments after each corner so your sides match.
Supplies for a Professional Finish
I like using needles that glide through stitches when I weave in ends. These are my favorites: sharp tip needles. You can see all my recommended tools and supplies in one place here: my Amazon store favorites.
If you enjoy clean borders on C2C projects too, you might like my post on a simple crochet border for C2C projects. And if you are working on shawls, this guide breaks down a graceful edging: beautiful border for C2C shawl.
What Makes This Border Beginner-Friendly
I teach each round in a logical order, and I build in natural pause points. That helps you keep momentum without feeling rushed.
- Key features:
- Flexible corner math, so you are never stuck on stitch counts.
- A loopy edge that looks fancy but is easy to repeat.
- An invisible join option for a seamless, pro finish.
Yarn Usage Breakdown
For a queen size blanket, I used about 200 g of white for the base edging and 300 g of gray for the border rounds. Your yardage will vary based on your tension and blanket size. If you are unsure, test on a small section or a swatch to scale your estimate.
Visual Timestamps for Reference
Use the video to check your progress as you go. The base edging comes first, followed by the chain-skip setup, then the hill rounds, the straightening chain-two round, and the final half double crochet edging. If you are a visual learner, keep the video open while you work so you can match your stitches to each step.

Applying This Border to the Secret Stitches Blanket
I edged my Secret Stitches blanket in white, then added the Flat Braid Join in gray for a crisp pop. The braid looks great with joined squares, and it frames the motifs without distracting from them. Share your color pairings in the comments. I love seeing how you make it your own.
Final Touches and Care
Sew in all tails securely on the back, and weave in at least two directions. Acrylic yarn is easy to care for. Wash on gentle and lay flat to dry if you want to keep the border crisp. If needed, a light steam block can help the edge relax without losing shape.
Conclusion
A Flat Braid Join Crochet Border adds style without stress. The stitch pattern is simple, the corners are flexible, and the result is smooth and flat. Try it on any blanket, from rows to joined squares. If you want written instructions, grab the free pattern or the printable PDF, and watch the video as you go. I cannot wait to see your blankets with this border. Share your colors and progress, and stay hooked!
Left Handed?
FAQs
What yarn and hook should I use?
Use the same yarn weight and hook size as your blanket. For worsted weight, a 6 mm hook works well.
Will this work if my stitch counts don’t match?
Yes. Keep sides consistent and fix the math in the corners using extra chains or skips. Always mirror the adjustment after the corner.
How do I prevent curling or ruffling?
Turn your work each round. Include the single crochet round to pull the edge in. Keep chains relaxed but even.
How do I handle corners?
Most rounds use single crochet, chain, single crochet in the corner space. In setup rounds, end the side with sc, ch 3, sc in the corner. If counts don’t line up, use ch 4 and skip 4 to land cleanly.
Can I make the loops bigger or smaller?
Yes. Adjust chain counts between hills. Chain 3 gives looser loops, chain 2 tightens and reduces waviness.
Do I have to use two colors?
No. Two colors highlight the braid; one color gives a subtle look. Choose high contrast for pop or tonal for calm.
How many rounds are in this border?
Seven rounds total: base dc round, sc control round, setup chain round on the back, fill the hills, link with ch 3, tighten with ch 2, then finish with hdc for the loopy edge.
Can I use this on non-square projects?
Yes. Works on blankets made from squares or rows, and looks pretty on shawl or scarf edges if you like a loopy finish.
What if my edges are uneven?
Round 1 (double crochet) evens small inconsistencies. Keep tension steady and don’t rush corners.
What’s the invisible join and why use it?
It’s a needle-finish that replaces the slip stitch join in the last round. It blends the final stitch so the round looks continuous with a clean, pro finish.
![]()
I’m Christa, the maker behind Secret Yarnery. I design simple, joyful crochet projects that look polished without the stress. My patterns focus on clear steps, flexible stitch counts, and finishes that lay flat and last. When I’m not filming tutorials on YouTube, I’m testing borders, sipping coffee, and picking color combos that pop on camera and in real life. If you love easy wins, tidy joins, and playful textures, you’re in the right place.
Find me here:
- YouTube: https://youtu.be/HWxd69-nNq0
- Blog and patterns: secretyarnery.com
- Instagram: @secretyarnery
About the Author
With a passion for crafting easy, beginner-friendly tutorials and patterns, Christa inspires crafters of all skill levels to unleash their creativity worldwide. She encourages yarn lovers to connect, create, and crochet a world filled with beautiful handmade treasures!
Flat Braid Join Crochet Border: Step-by-Step for Any Size Blanket!