African Crochet Flower Step-by-Step: Make Vibrant Hexagons!
|
Time to read 13 min
Product added to cart
|
Time to read 13 min
Have you ever wanted to create something beautiful and unique with your own two hands? The African flower crochet design is a fantastic choice. It's a versatile motif that can be used in so many different projects. Whether you're aiming for a colorful blanket, a whimsical stuffed animal, or a stylish handbag, the African flower is a perfect starting point.
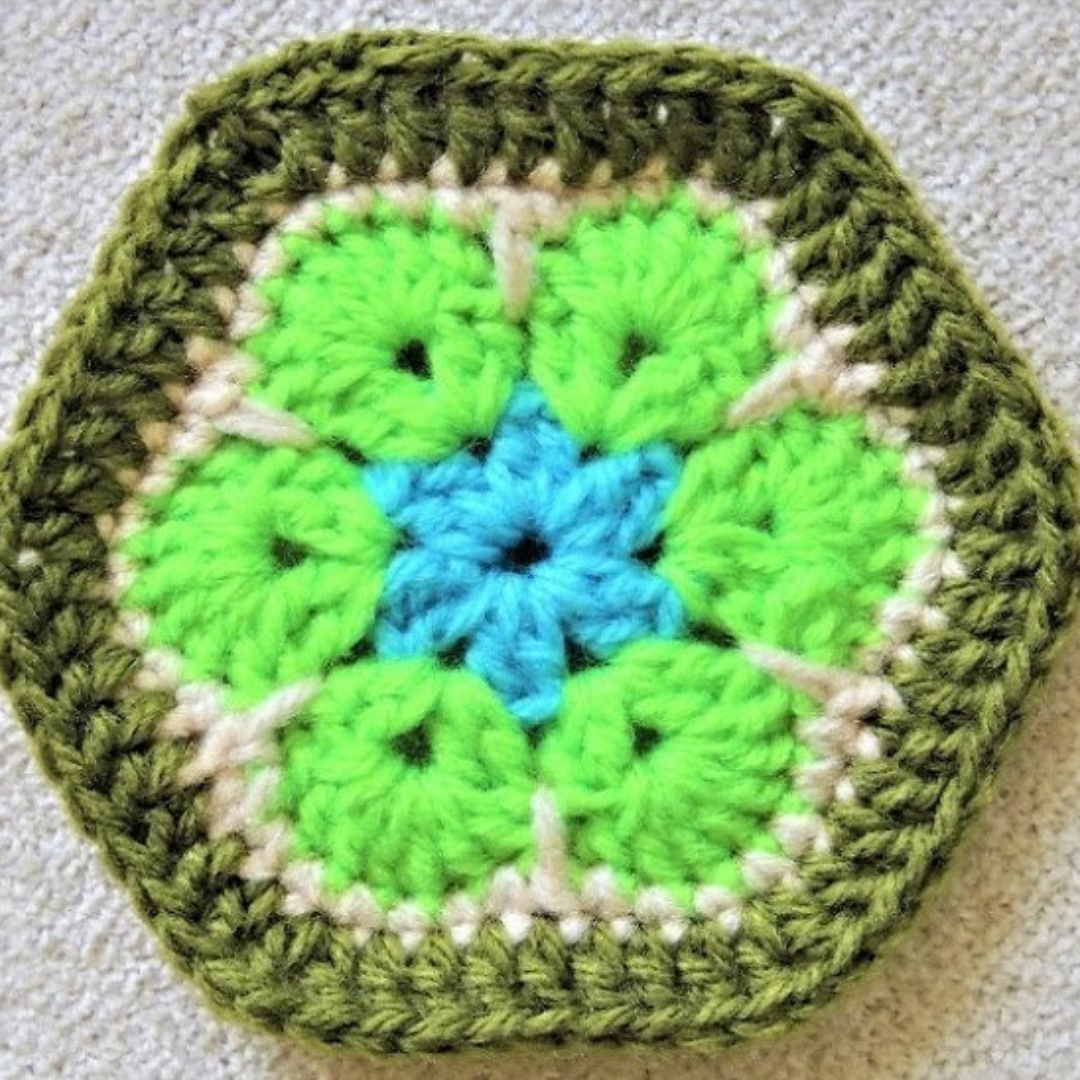
In this tutorial, I'll guide you through the process of crocheting your own African flower, specifically the hexagon shape. And if you prefer to watch along, I've included a video tutorial too! Plus, I'll touch on the different shapes you can create, including pentagons, heptagons, and octagons. You may have even seen these motifs in adorable Heidi Bears stuffed animals!
Table of contents
By following this tutorial, you'll gain a bunch of new crochet skills. You'll learn how to create a basic African flower hexagon. Then you'll discover how to tweak the pattern to make different shapes. Don't worry, it's easier than it sounds!
I'll also show you how to work with multiple colors to make your African flower really pop. I'll even share my favorite technique for weaving in ends as you go, which gives you a cleaner finish. This means no more yarn needles! Lastly, I'll prep you for the "join-as-you-go" (JAYG) technique, which is a super neat way to connect your flowers. Keep an eye out for my upcoming "join-as-you-go" video tutorial, where I'll walk you through the entire process.
Okay, let's gather our supplies! Here's what you'll need to crochet your own African flower:
One of the coolest things about the African flower crochet design is that you can create different shapes simply by changing the number of petal pairs in the center ring. It's like a mathematical flower!
Here's a quick rundown:
No matter which shape you choose, the basic technique remains the same. Only the initial number of pairs changes. So once you've mastered the hexagon, you can easily adapt the pattern to create other shapes.
Before you jump into the pattern, let's talk about a few things to consider. The type of project you're making will influence your yarn and hook choices.
For stuffed animals, you'll want a tighter weave to prevent the stuffing from escaping. A smaller hook size and a lighter weight yarn will help you achieve this. On the other hand, if you're making a blanket, you might prefer a larger hook and a thicker yarn for a softer, more drapey feel.
Also, keep in mind that the back side of the African flower tends to look a bit messier than the front. If you're making a blanket where both sides might be visible, this is definitely something to consider.
Alright, let's get started! We'll begin by making the center ring of our African flower.
As you work, it's important to keep your stitches tight and push them together to create enough space in the center ring.
Now, let's move on to the second round, where we'll create the bases for our petals.
Changing Color:
First, we need to change colors. To do this seamlessly, slip stitch to join the new color. Then, chain 2, which counts as the first double crochet.
Remember, there are no chains between the petal bases. We're essentially forming a "double V stitch" in each chain-one space. This round sets the stage for the beautiful petals that will come next. These skills are taught in Crochet Tutorial Guides.
Time for the final color and the petals!
It's super important to count each set of double crochets to ensure consistency. You should have seven in each shell. This is crucial for later when we start joining the flowers together.
Okay, this is one of my favorite tips: "work in your ends as you go." It saves so much time and gives you a cleaner finish.
In Round 1, when you start with your first color, work around the tail as you crochet. This secures the end and prevents it from coming loose later. Once you've crocheted over it for a bit, you can simply cut off the excess yarn.
When you change colors, weave in the tail by working the yarn through the back loops of the stitches. Then, bring the tail back through a few stitches to secure it even further. This prevents the tail from coming loose later on.
The best part? You don't even need a yarn needle for this technique!
Even experienced crocheters run into snags sometimes. Here are a few common issues and how to solve them:
Ready to get creative with colors? Here are a few ideas to spark your imagination:
Don't be afraid to experiment and find your own unique color combinations!
Remember, the hexagon is just the beginning. Once you've mastered the basic technique, you can easily adapt the pattern to create pentagons, heptagons, and octagons.
Just change the number of petal pairs in the center ring, and you're good to go!
Now, let's talk about joining your African flowers. One of the most popular methods is the "join-as-you-go" (JAYG) technique. This allows you to connect your flowers as you crochet, saving you time and effort.
The final round of double crochet is key to JAYG. It provides a solid base for joining the flowers together. I'll be releasing a video tutorial soon that's dedicated to JAYG techniques, so stay tuned!
Whether you're planning to use the JAYG method or not, adding a final round of double crochet gives your African flower a clean, finished edge.
When you get to the slip stitch knot from the previous round, do a double crochet just underneath it to kind of pinch it up and hide it. Forcing the hook in to hide the knot.
Make sure you have nine double crochets on each side of the hexagon.
To join the final round, slip stitch to the top of the initial chain two. Then, chain one to secure. Weave in the end, and you're done!
This creates a clean, finished edge for your African flower. However, if you're using the "join-as-you-go" method, this step is optional.
Congratulations! You've successfully crocheted your own African flower. Now what?
The possibilities are endless! You can use your African flowers to create:
And so much more! Let your imagination run wild and see what you can create with this versatile motif.
I hope you enjoyed this tutorial! If you did, please subscribe to my channel for more crochet tutorials. And don't forget to like the video and leave a comment!
Also, be sure to check out my upcoming "join-as-you-go" video tutorial. It's going to be awesome!
I'd love to see what you create with this tutorial. Share photos of your finished African flowers on social media using the hashtag #SecretYarneryAfricanFlower.
Here's a breakdown of the stitches used in this tutorial:
New to crochet? Here are a few tips to help you succeed:
Ready to take your African flower to the next level?
Choosing the right yarn can make a big difference in your project.
The right hook size is essential for achieving the correct gauge. Use a gauge swatch to determine the correct hook size for your yarn.
Blocking is a process that helps to even out your stitches and give your finished project a professional look. Wet blocking is a simple method that involves soaking your African flowers in water and then pinning them to a flat surface to dry.
Proper care will help your crochet projects last for years to come. Always read the yarn label for care instructions.
While JAYG is a popular method, there are other ways to join African flowers.
Here's a handy chart to help you remember the number of petal pairs for each shape:
Shape
Petal Pairs
| Pentagon | 5 |
| Hexagon | 6 |
| Heptagon | 7 |
| Octagon | 8 |
It’s a crochet design made with rounds of petals, usually shaped as a hexagon. It’s often used to make blankets, amigurumi, and decorative items.
Yes, but acrylic yarn is recommended for beginners. You can also use cotton or wool. Choose yarn weight based on your project (thicker for blankets, thinner for toys).
A 4mm hook works well for most yarns, but adjust as needed for your yarn type and project.
No, basic stitches like slip knot, chain, slip stitch, single crochet, and double crochet are used.
Maintain a consistent tension, count your stitches after each round, and use stitch markers if needed.
Yes, the “join-as-you-go” (JAYGO) technique lets you connect motifs during the last round, saving time on sewing.
Here are a few common crochet terms:
Measuring tape, yarn bowls, and yarn bags can make crocheting easier and more enjoyable.
If you're left-handed, be sure to check out the left-handed version of this tutorial! Left Handed Tutorials
You can find even more creative crochet patterns on my website.
Printable PDF patterns are also available on my website.
Join the Secret Yarnery community for even more benefits! Join the Community
Subscribe for more crochet content! Subscribe Now!
With a little practice, you'll be crocheting beautiful African flowers in no time!
Christa Patel is the creative mind behind the Secret Yarnery, a trusted resource for crochet enthusiasts worldwide. With years of experience, Christa specializes in designing beginner-friendly yet stunning crochet patterns that inspire creativity and confidence in crafters of all skill levels.
As a passionate crocheter, Christa is known for her clear and approachable teaching style, breaking down complex patterns into simple, easy-to-follow steps. Through her engaging video tutorials, written patterns, and helpful tips, she has cultivated a community where crocheters can connect, learn, and share their work.
Christa’s dedication to making crochet fun and accessible shines in every project she creates, from colorful blankets to intricate borders. Whether you’re a seasoned expert or just picking up a hook for the first time, Christa's guidance will help you craft something beautiful.
For more crochet patterns, tips, and inspiration, visit her website at The Secret Yarnery, or check out her YouTube channel filled with step-by-step tutorials.
Easy crochet tutorial
Both right and left handed video tutorials
Perfect for beginners!


