Easy Crochet Hot Pad Pattern: Step-by-Step Tutorial for Stylish Home Decor
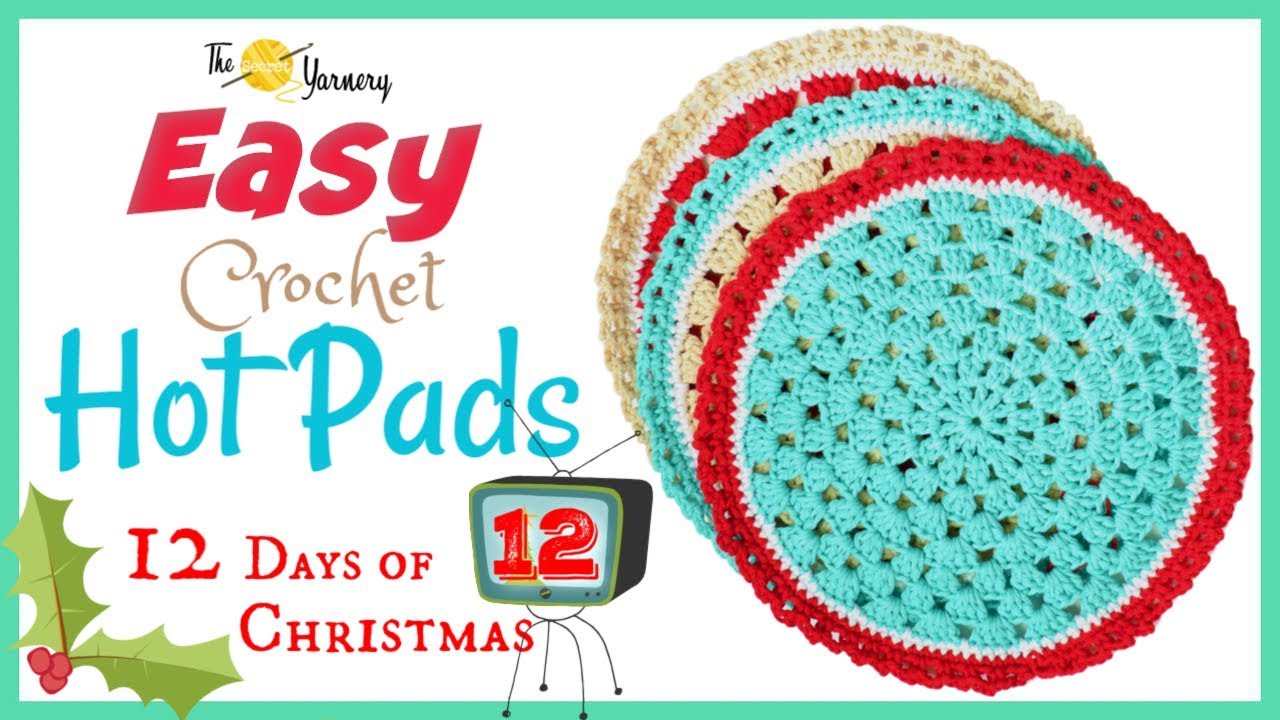
Looking for a quick and satisfying crochet project that you’ll use every day? I’ve got just the thing: an Easy Crochet Hot Pad pattern that combines simplicity, style, and practicality. Whether you need a sturdy hot pad for the kitchen, a cheerful placemat for the dining table, or a fast gift for friends, this pattern fits the bill. These hot pads whip up fast, offer thick protection, and are the “big sibling” to my ever-popular superfast crochet coasters. I designed this project to be beginner-friendly while still offering seasoned crocheters a bit of sparkle with customizable color combos and border flair.
Crocheting these hot pads fills your home with the cozy touch only handmade items bring. I’m excited to show you the details—from looping your first slipknot to finishing with a decorative border—so you’ll have a functional piece that’s both beautiful and hard-wearing. Let’s make something you’ll reach for daily and be proud to display.
What Makes These Hot Pads Special
These crochet hot pads stand out for three reasons:
- Quick finish: They work up in a snap, so you can make a set in an afternoon.
- Versatility: Use as a hot pad, trivet, placemat, or decorative accent.
- Customizable look: Choose your favorite colors for a personal touch or match your decor.
Materials Needed for a Crochet Hot Pad
Here’s what I used to create my easy crochet hot pad. You can swap in your own color preferences or yarn brand, just aim for similar thickness and fiber.
You’ll need:
- 3.5 mm crochet hook (comfortable for this thickness of cotton yarn)
- Size 3 natural cotton yarn (brand: Ice Yarns—soft, squishy, and perfect for heat resistance)
- Three colors for the main body, one shade of white for the accent
- Yarn needle for weaving in ends
- Scissors
Feel free to pick any cotton yarn in your favorite shades. Cotton is ideal for handling heat and absorbing moisture, making it the best fiber for kitchen items. If you prefer to use what’s on hand, just check that the thickness matches for a consistent look and sturdy feel.
Preparing to Crochet: Making a Slipknot
Getting started is simple. Here’s how I whip up a slipknot:
- Measure about two inches of yarn tail.
- Wrap the yarn around two fingers to create a loop.
- Tuck the working yarn under the loop and pull through to form the knot.
- Place the slipknot on your hook and tighten gently. You’ll work over the tail, so it’s secure and easy to hide later.
Saving time by working the tail in as you crochet is a small, satisfying way to keep your project tidy and efficient.

Starting the Foundation Chain
We’ll start by chaining four stitches to form the center of the hot pad.
- Chain 4 stitches: Yarn over and pull through the loop on your hook for each chain.
- When counting, do not count the slipknot or the active loop on your hook. Only count the “V” shapes—the actual chain stitches.
- After you have four chains, create a ring by slip stitching into the very first chain you made. This forms a tiny circle where you’ll work the next group of stitches.
Counting the V shapes makes it easy to double-check your starting point, and this small ring is the foundation for the entire project.
Creating the Center Circle
Now it’s time to fill in the circle. Here’s how I do it for a classic, sturdy center:
- Hold the circle open with your finger for easier insertion.
- Chain 4 (this chain counts as your first double crochet and chain 1).
- Work a double crochet into the middle of the ring. To double crochet:
- Yarn over, insert your hook into the ring, yarn over and pull up a loop (three loops on your hook).
- Yarn over, pull through two loops (two loops remain).
- Yarn over again, pull through the last two loops.
- Chain 1, then repeat: double crochet into the ring, chain 1.
- Continue until you have 11 double crochets, with a chain 1 after each (the initial chain 4 also counts as your 12th “double crochet”).
- Give the ring a gentle wiggle if the stitches feel tight—pull apart your starting chain or finished double crochets to make more room.
Tip: If your center ring feels crowded, gently pull your stitches outward. Think of it like loosening a belt to get a comfy fit before moving on to the next round.
Joining the Round with a Slip Stitch
Joining your stitches neatly sets up the rest of your work. Here’s the method:
- After your final chain 1, slip stitch into the third chain at the top of your starting chain-4.
- Insert your hook under two loops of this third chain, yarn over, and pull through all loops on the hook.
- Slip stitch again into the next chain space (between double crochets) to position yourself for the next round.
Work slip stitches loosely—tight slip stitches can make it tough to insert your hook on the next go-round and could bunch up your hot pad’s edges.

Getting Height and Stitch Setup for Round 2
To start round 2, you need your stitches at the right height.
- Chain 3 for height (counts as your first double crochet).
- Work two double crochets into the space you’re already in.
- Chain 1 before moving to the next space.
- In every chain-1 space around, work two double crochets, then a chain 1.
Here’s a mini diagram for what you should see:
- [Space] → [2 double crochets + chain 1] → [Next space]
This round increases the shape evenly, keeping your hot pad flat and smooth.
Rounds 2 to 5: Growing Your Hot Pad
Here’s how I build up the thickness and size for a generous, useful hot pad:
Each round adds one more double crochet to each shell (set):
- Round 2: Two double crochets per space (plus chain 1)
- Round 3: Three double crochets per space (plus chain 1)
- Round 4: Four double crochets per space (plus chain 1)
- Round 5: Five double crochets per space (plus chain 1)
Each round starts with a chain 3 for height, which counts as a double crochet in your first cluster.
There are always 12 spaces around the mat, so you increase by one stitch per cluster per round for even growth. Don’t forget: after the last shell, slip stitch to the top of your starting chain 3 and slip stitch into the next space to start the following round.
Table: Double Crochet Count Per Round
| Round | Double Crochets per Shell | Chain 1 Between Shells | Total Shells (Clusters) |
|---|---|---|---|
| 2 | 2 | Yes | 12 |
| 3 | 3 | Yes | 12 |
| 4 | 4 | Yes | 12 |
| 5 | 5 | Yes | 12 |
Bold rule: Chain-3 at the start always counts as your first double crochet.
Adjusting to Keep a Smooth Circle
As the hot pad grows, you may notice lumps or corners forming. To keep the circle nice and round, the stitch pattern changes:
- Instead of working all clusters in the spaces, start placing some clusters into the center double crochet of each shell.
This spread-out method helps the pad lay flat and look smooth, not wavy or misshapen.
Before and after shape fix: Before this change, the mat may puff out in places and lose its circle. After switching, everything smooths out as stitches are distributed more evenly.

Placing Clusters for Perfect Circles
Here’s how I set up this smooth, even round:
- Begin with a chain 3 for height.
- Into the first open space, work two more double crochets for a total of three (chain 3 + 2 double crochets).
- Chain 1 as always.
- Next, find the middle double crochet of the shell below. Insert your hook directly into this center stitch, and make three double crochets.
- Chain 1, then three double crochets in the next space, chain 1, then three in the next center stitch.
- Repeat all the way around, alternating between spaces and center double crochets.
- Slip stitch to join at the top of the round.
Final tip: Always check that you’ve chained 1 after each cluster for tidy, separated shells.
Alternating Shell Increases for a Larger Hot Pad
If you’d like to make your hot pad even bigger, try alternating between small and big shells:
- Small shell: 3 double crochets, chain 1
- Big shell: 4 double crochets, chain 1
Go around the entire hot pad, alternating between small and big shells in each space. This increases the round by 12 stitches again and helps maintain the circle’s shape as your work grows.
Alternating makes the expansion look balanced and prevents bulges or dips—so your mat always looks pro.
Finishing with a Final Round of Equal-Sized Shells
Once you’ve reached your desired size, finish strong:
- Switch back to making just 4 double crochets in every space around (no more alternating).
- Chain 1 between each shell.
- Begin with a chain 3 for height, just like before.
Finishing note: At the end, your shells will all be the same size, creating a neat, symmetrical edge that’s ready for a gorgeous border.
How to Secure the Yarn and Finish Your Main Hot Pad
Once your last round is complete:
How to secure your yarn:
- Slip stitch to the top of the starting chain 3 to close the round.
- Chain 1 to lock it.
- Cut your yarn, pull the hook up so the yarn slips through the loop, and tug gently to set the knot.
A secure finish will keep your hard work safe from unraveling.
Adding a Strong, Stylish Crochet Edging
Here’s how I make the border pop (and add extra durability):
- Insert your hook into the top of the first double crochet stitch after the space.
- Attach a new color or continue with the same yarn, leaving a 5-inch tail.
- Yarn over and pull through to make a loop, then slip stitch both strands together to join.
- Drop the tail behind your work, crocheting over it as you go (this hides it without a needle).
- Chain 1 (counts as your first single crochet). Next, make one single crochet stitch in each and every double crochet and each chain space around.
- Keep your tension a little loose for a flexible, even border.
- When you reach the start, slip stitch into the beginning chain 1, and chain 1 to finish. Cut the yarn, pull the hook up, and tug to secure.
Pro tip: Working over the tail saves time and effort on weaving tails later!
Second Border Round: Wrapping with Single Crochet
The second round highlights the clean sew-free edge:
- Attach yarn in any stitch with a slip stitch.
- Chain 1 to start.
- Work one single crochet in every stitch around. No chain spaces or special tricks—just steady, even stitches.
- Slip stitch to join, chain 3 to prepare for decorative edging.
- Continue to work over any yarn tails for a smooth edge, finishing by working them in with a needle if needed.
Consistency is key: Stick to one stitch per stitch, and your border will look crisp and professional.

Decorative Chain-3 Loops for a Polished Edge
To finish, I love adding a chain-3 loop edging. Here’s the quick pattern:
- Chain 3, skip the next stitch, and work a single crochet into the stitch after.
- Repeat: chain 3, skip 1, single crochet.
- Continue this loop pattern all the way around the hot pad.
These little loops create a scalloped effect—pretty, cheerful, and slightly vintage.
- Even loop size is important: Try to make each chain 3 tight and even for a tidy look.
Weaving in the Ends Like a Pro
Once you’re done, all that’s left is to hide yarn tails for a seamless finish.
Tips for neat ends:
- Use a yarn needle to weave the tails back through the stitch lines on the reverse side.
- Don’t snip too close—leave a tiny tail tucked under several stitches so the yarn won’t work its way out.
- If you’ve worked over some tails as you crocheted, you’ll have almost no ends left to weave.
Highlight box: Never rush weaving in ends—secure, hidden ends keep your hot pad tidy and wash-friendly.
Make It Bigger or Add Personal Touches
You can easily change up the finished size of your hot pad:
- Work fewer rounds for a petite pot holder or more for a placemat-size circle.
- Always increase by one stitch per shell each round for a smooth expansion.
- Try different borders or color combos for custom flare.
- Use as a plant mat, large trivet, or decorative centerpiece. The possibilities stretch as far as your creativity!
- Try gradient shades, bold stripes, or a holiday mix—what you make is uniquely yours.
Recommended Yarn and Hooks
If you want to match my look and feel exactly:
- I used soft, durable cotton yarn from Ice Yarns.
- My go-to hook is 3.5 mm, perfect for size 3 cotton.
For a nice selection of cotton yarns ideal for hot pads, check out Crochet Hot Pad Patterns. They have a roundup of yarn suggestions and more pattern ideas if you want to experiment or stock up for future projects.
12 Days of Christmas Giveaway: Join the Fun!
To celebrate the season, I’m running a special 12 Days of Christmas giveaway. Here’s what’s up for grabs:
- A ball of Loretto print yarn (50% acrylic, 50% cotton—squishy, rich, and perfect for wearable items)
- A 4 mm Tulip crochet hook (smooth, comfortable, my favorite!)
How to enter:
- Subscribe to my YouTube channel and turn on notifications.
- Leave a comment on the video answering, “What are your go-to stocking stuffers?”
- I want your small-gift ideas—even if you don’t celebrate Christmas, share your favorite little gifts!
- Winners will be announced on December 24th.
I appreciate each and every one of you for joining the Secret Yarnery community—it’s such a joy to share these tutorials and giveaways!
Let’s Connect: Share Your Finished Hot Pads
I absolutely love seeing your work and connecting with you:
- Tag me on Instagram: @secretyarnery
- Join the Secret Yarnery Crochet Community on Facebook.
- Post progress shots or finished hot pads with your favorite color combos.
- Share your tips or variations—your creativity inspires others!
New to the channel? Hit subscribe and join a warm, encouraging crochet family.
More Crochet Tutorials and Support
I release new tutorials every weekday at 6 p.m. Central on my YouTube channel. There’s something for everyone, no matter where you are on your crochet journey.
For left-handed crafters, I make sure you’re included! Find all my tailored left-handed crochet tutorials for a seamless learning experience. Want the written pattern? I also offer a step-by-step written version of this project so you can print and crochet at your own pace.
Make sure you subscribe so you never miss a pattern or live Q&A session—we learn together and cheer each other on!
Crochet Accessories That Make Life Easier
Having the right tools just makes every project smoother. Some of my favorite crochet helpers:
- Yarn ball storage bags and UFO zipper pouches for organizing works-in-progress.
- Yarn ball winder for tangle-free, easy-to-use skeins.
- Stitch markers and blunt-tip needles for finishing and borders.
- Measuring tapes, sharp scissors, and handy tins for all those little accessories.
- Neck lights when you want to crochet while watching TV or at night.
Investing in quality tools saves time and makes every project more enjoyable.
Step-by-Step Pattern Workflow: Quick Reference
Bookmark or print this quick guide for easy reference as you crochet:
- Make a slipknot, chain 4, slip stitch to form a ring.
- Round 1: Work double crochets separated by chains into the ring.
- Slip stitch to join, slip stitch to next space.
- Rounds 2-5: Work increasing sets of double crochets per space, with chain 1 between.
- Switch to alternating clusters in spaces and center stitches when needed.
- As mat grows, alternate small and big shells for more size.
- Finish with a round of 4 double crochets per space, chain 1 after each.
- Fasten off, secure ends.
- Join border color, work single crochet around.
- Add second round of single crochet.
- Finish with chain-3 loop decorative edging.
- Weave in ends, block if desired—enjoy!
Common Crochet Troubleshooting Tips
Struggling with tight rings?
- Wiggle your stitches; don’t be afraid to pull gently to make space.
Losing track of your chains or clusters?
- Count the “V” stitches between shells after every round.
Slip stitches getting tight?
- Loosen your grip and keep slip stitches relaxed for a flexible border.
Edge turning wavy?
- Double check stitch count and avoid tugging chains too tight between shells.
Feeling tense?
- Take breaks, shake out your hands, and enjoy the rhythm—it’s part of the fun.
How Your Hot Pad Should Look as You Go
Here’s a quick look at what to expect visually:
- After Round 1: Small, tight circle with visible chain spaces.
- Rounds 2-5: Mat grows in size evenly, each round’s shells stack neatly.
- Pattern shift round: Circle will smooth out, looking round and flat.
- Final rounds and border: Wide, balanced shape with no lumps or pulls.
- Finishing edge: Scalloped or loopy border gives a finished, decorative look.
FAQs
What yarn is best for hot pads?
Use 100% cotton. It handles heat, absorbs moisture, and washes well. Avoid acrylic; it can melt.
What hook size should I use?
A 3.5 mm hook works well with size 3 cotton. If your stitches feel tight, go up to 3.75 or 4 mm.
How big is the finished hot pad?
With size 3 cotton and a 3.5 mm hook, it’s about 7 to 8 inches across at 5 rounds plus border. Add rounds for placemat size.
Can I use thicker yarn?
Yes. Size 4 cotton works too. Use a 4 or 4.5 mm hook. Your hot pad will be thicker and slightly larger.
How do I keep the circle from getting wavy or lumpy?
Check stitch counts each round, keep chain-1 spaces relaxed, and start placing some clusters into the center stitch of shells when the circle starts to wobble.
Do I need a heat-resistant lining?
Cotton is usually enough for everyday pots. For extra protection, make two hot pads and whipstitch them together, or use thermal stitch for a double-thick pad.
Can I make a matching set?
Yes. Use the same pattern for coasters with fewer rounds, and add more rounds for placemats or trivets.
How do I change colors cleanly?
Join a new color at the start of a round. Crochet over the tails for a tidy back, then weave in the last inch with a needle.
![]()
Christa Patel is the maker and voice behind Secret Yarnery, where she shares simple, stylish crochet patterns and step-by-step video tutorials. She’s known for beginner-friendly projects that are fast to finish and easy to customize, plus clear tips that help crocheters feel confident with every stitch.
When she’s not filming new tutorials or hosting giveaways, Christa is testing yarn, sketching pattern ideas, and chatting with her community on YouTube, Instagram, and Facebook. She loves cotton yarn, crisp borders, and anything that makes handmade pieces both beautiful and practical.
About the Author
With a passion for crafting easy, beginner-friendly tutorials and patterns, Christa inspires crafters of all skill levels to unleash their creativity worldwide. She encourages yarn lovers to connect, create, and crochet a world filled with beautiful handmade treasures!
Easy Crochet Hot Pad Pattern : Stylish Home Decor!