Easy Flat Braid Join: The Simple, Stunning Way to Connect Crochet Squares
Crocheting a blanket full of unique squares feels amazing, but figuring out how to join them so it looks beautiful and professional can be a struggle. The Easy Flat Braid Join changes everything—offering a strong, decorative finish that looks intricate but is truly quick and beginner-friendly. Here, I'll walk you through every step to connect your squares, create a beautiful border, troubleshoot issues, and finish your masterpiece with pride.
If you've joined the Secret Stitches Easy Stitch Sampler Blanket Pattern or any granny square project, this method will give your blanket a standout finish that sits flat and shows off every color. Let's get those hooks moving!
What You’ll Need to Get Started
Before you jump in, make sure you have everything on hand for this easy flat braid join:
- About 250 grams of your chosen joining yarn color (enough to do all joins and a neat outer edge)
- Crochet hook in a size that matches your square gauge
- Sharp scissors for clean cuts
- Blunt yarn needle for weaving in ends
Tips: Pick a joining color that matches or complements your center squares, so the braid looks intentional and flows across the entire blanket. Save yarn tails as you go—they’ll tuck in neatly later for a durable finish.

Introduction to the Flat Braid Join Technique
The flat braid join might look fancy with its woven, lace-like connection, but it’s incredibly approachable. This join works wonders for a variety of square-based projects, especially if you’re working with the Secret Stitches CAL 2021 blocks or traditional granny squares.
Key Benefits:
- Gives a soft, flexible, and decorative join
- Sits flat—no thick ridge between squares
- Allows you to join-as-you-go or add squares later
- Looks like a real braid from above
No need to be intimidated! It’s simple when you break it down, and you get results that look like hours of advanced work.
Preparing Your First Square for Joining
Getting started right sets the pace for the whole blanket. Here’s how I prep that first square:
- Choose any corner—pick one that hasn’t been joined before.
- Attach the joining yarn with a slip stitch in the corner space, leaving a tail.
- Chain one. This stands in as your first single crochet.
- Work the first single crochet stitch over your tail for a few stitches, tucking it in for neatness. Then let it hang, weaving it in fully at the end.
- Continue making single crochet stitches into each stitch along the side of your square.
Don’t stress about perfection—just keep your tension even and count stitches as you go.
Completing the First Round Around the Square
The first round sets up your “braid base.” Here’s my method for a full, flat foundation around each square:
- Single crochet into each stitch up to the corner.
- In each corner space, work one single crochet, chain two, and another single crochet.
- After your corner, make sure to single crochet into the very first stitch following it (sometimes it hides just before the post).
- Continue this system—single crochet in each stitch, and work the corners the same—until you return to your starting corner.
Tip: Pause as needed to double-check you’re hitting every stitch, especially that sneaky one right after each corner space.
Finishing Round One with Slip Stitch and Transition to Round Two
To finish this foundation round seamlessly:
- Slip stitch into the spot where you first joined, between the “legs” of the starting stitch.
- Without turning your work, chain four to start the new round.
- Begin the flat braid: Skip two stitches, then single crochet into the third. Repeat: chain four, skip two, single crochet into the third all the way along.
- At corners, single crochet into the corner space, then chain six to turn—this creates space and keeps the corners flexible.
Now’s a great time to pause, breathe, and continue around the square—watch your pattern emerge!

Counting Loops Along Edges for Consistency
Consistency here saves headaches later. After finishing the loop round:
- Each side edge should have 19 chain-4 loops (not counting corners).
- Each top or bottom edge will have 17 loops.
- If you’re off by one, don’t panic! Small adjustments often blend in. Just ensure all sides of the same length match, so your braid lines up.
Keeping loop counts right lets each flat braid join line up perfectly and prevents puckering or gaping.
Starting to Join Additional Squares — The Basics
Time to join another square! Here’s how I stack and prepare:
- Lay squares side by side, pretty sides up—check your orientation so tops and bottoms are aligned.
- For the new square, work the joining round (with loops) on three sides, leaving one side undone for joining.
- The side you leave bare is the one you’ll attach to the next connected square.
- Take a moment to position your hook carefully at your starting corner—it really helps with neat finishes.
It might feel awkward the first time, but lining up your squares well avoids a wonky join.

Setting Up the Join on One Side Between Two Squares
Now bring those two blocks together!
- Pinch the finished square (with all loops) and the new square (with loops on three sides) so their joining sides touch.
- Hold the finished block above your workspace for easy access.
- Start joining by single crocheting into the corner space of the new, unjoined square.
- Chain three, making a bigger loop, then pull your hook out. Insert your hook down into the opposite loop (across the finished square’s edge), put the working yarn back on your hook, shrink the loop to normal size, and pull through.
- Complete the corner by chaining three, then single crochet into the corner again, and chain two to continue.
Tips for Loops & Tension:
- Pinch your large working loop with your non-hook hand to keep it in place while switching squares.
- Pull the working yarn up gently—avoid pulling it tight, which can pucker the join.
Creating the Chain and Half Loop Pattern for the Side Join
Here’s the rhythm of this neat joining method:
- After finishing the corner, chain two (making your next loop bigger than usual).
- Pull your hook, find the next open loop on the finished edge, and insert your hook into it.
- Replace the new loop on your hook, tighten it, and chain two to complete the next loop.
- Skip two stitches along the joining side, then single crochet into the third.
- Repeat this: chain two, enlarge loop, pull hook, hook into next finished loop, chain two, skip two, single crochet into the third stitch.
Holding your loops with your fingers helps keep the process smooth. This method makes the braid effect that stands out in the easy flat braid join.
If you skip the “remove and re-hook” technique, your join will still be strong—but that signature braided look will be less defined.
![]()
Working Along the Joining Side to the Corner
Continue the chain and joining system all the way to the end of the joining edge:
- Approaching the corner, finish your last loop sequence as usual.
- At the corner, chain three before making your last loop big, hook into the opposite corner loop of the finished square, pull up yarn, then chain three more to finish the corner.
- Single crochet into the joining square’s corner space and chain two.
Corners really anchor the braid and prevent warping—don’t skip the chains or crowd the stitches!
Closing the Join with a Slip Stitch
Your join looks so clean by finishing with a slip stitch:
- Insert the hook into the first chain created at the start of your join.
- Pull yarn through and make a slip stitch.
- Chain one for security, cut your yarn, and pull it snug to be sure the join doesn’t loosen.
Finishing Tips:
- Pull the joining yarn firmly (but not tight) when finishing.
- Use the yarn needle to weave in your tails on the wrong side before moving to the next square.
Managing Squares with Two Sides to Join
When your blanket gets bigger, you’ll need to join on two adjacent sides:
- Work three sides with loops as usual, leaving two adjacent edges bare.
- Place the unjoined square with its sides lined up, matching the other blocks row and column.
- Start the single crochet and loop row along the first side, pause in the corner, and repeat the joining process as before.
With practice, these multi-sided joins keep the flat braid effect consistent and prevent bunching at intersections.
![]()
Joining Two Sides and Kitty Corner Joining Technique
Sometimes, your join will cross at a corner with other squares already attached. That's when I use the kitty corner join:
- Start as usual with a single crochet in the corner space.
- Chain three for the half-loop, then instead of joining straight across, insert your hook into the diagonal or "kitty corner" loop of the target square.
- Pull up your yarn, chain three after the join, then continue your side as before.
Mini FAQ: Why Kitty Corner Joins?
- They prevent holes or lumps at four-square intersections.
- They help the braid continue in a neat X across corners.
After the corner, continue down the side with the familiar chain, loop, and join routine.
Working Through Rows of Joined Squares
Now the repetition really pays off. As you add rows to your blanket:
- Keep the blocks you’ve finished above your working area for easy joining.
- Always check your loop counts on each side—saves time later.
- Mix up your yarn colors if you like, or stick to one for a classic look.
- Take breaks to admire your join lines and correct any uneven spots before moving on.
Adding each row brings you closer to a seamless, finished project, and the more you practice, the more even your joins will become.

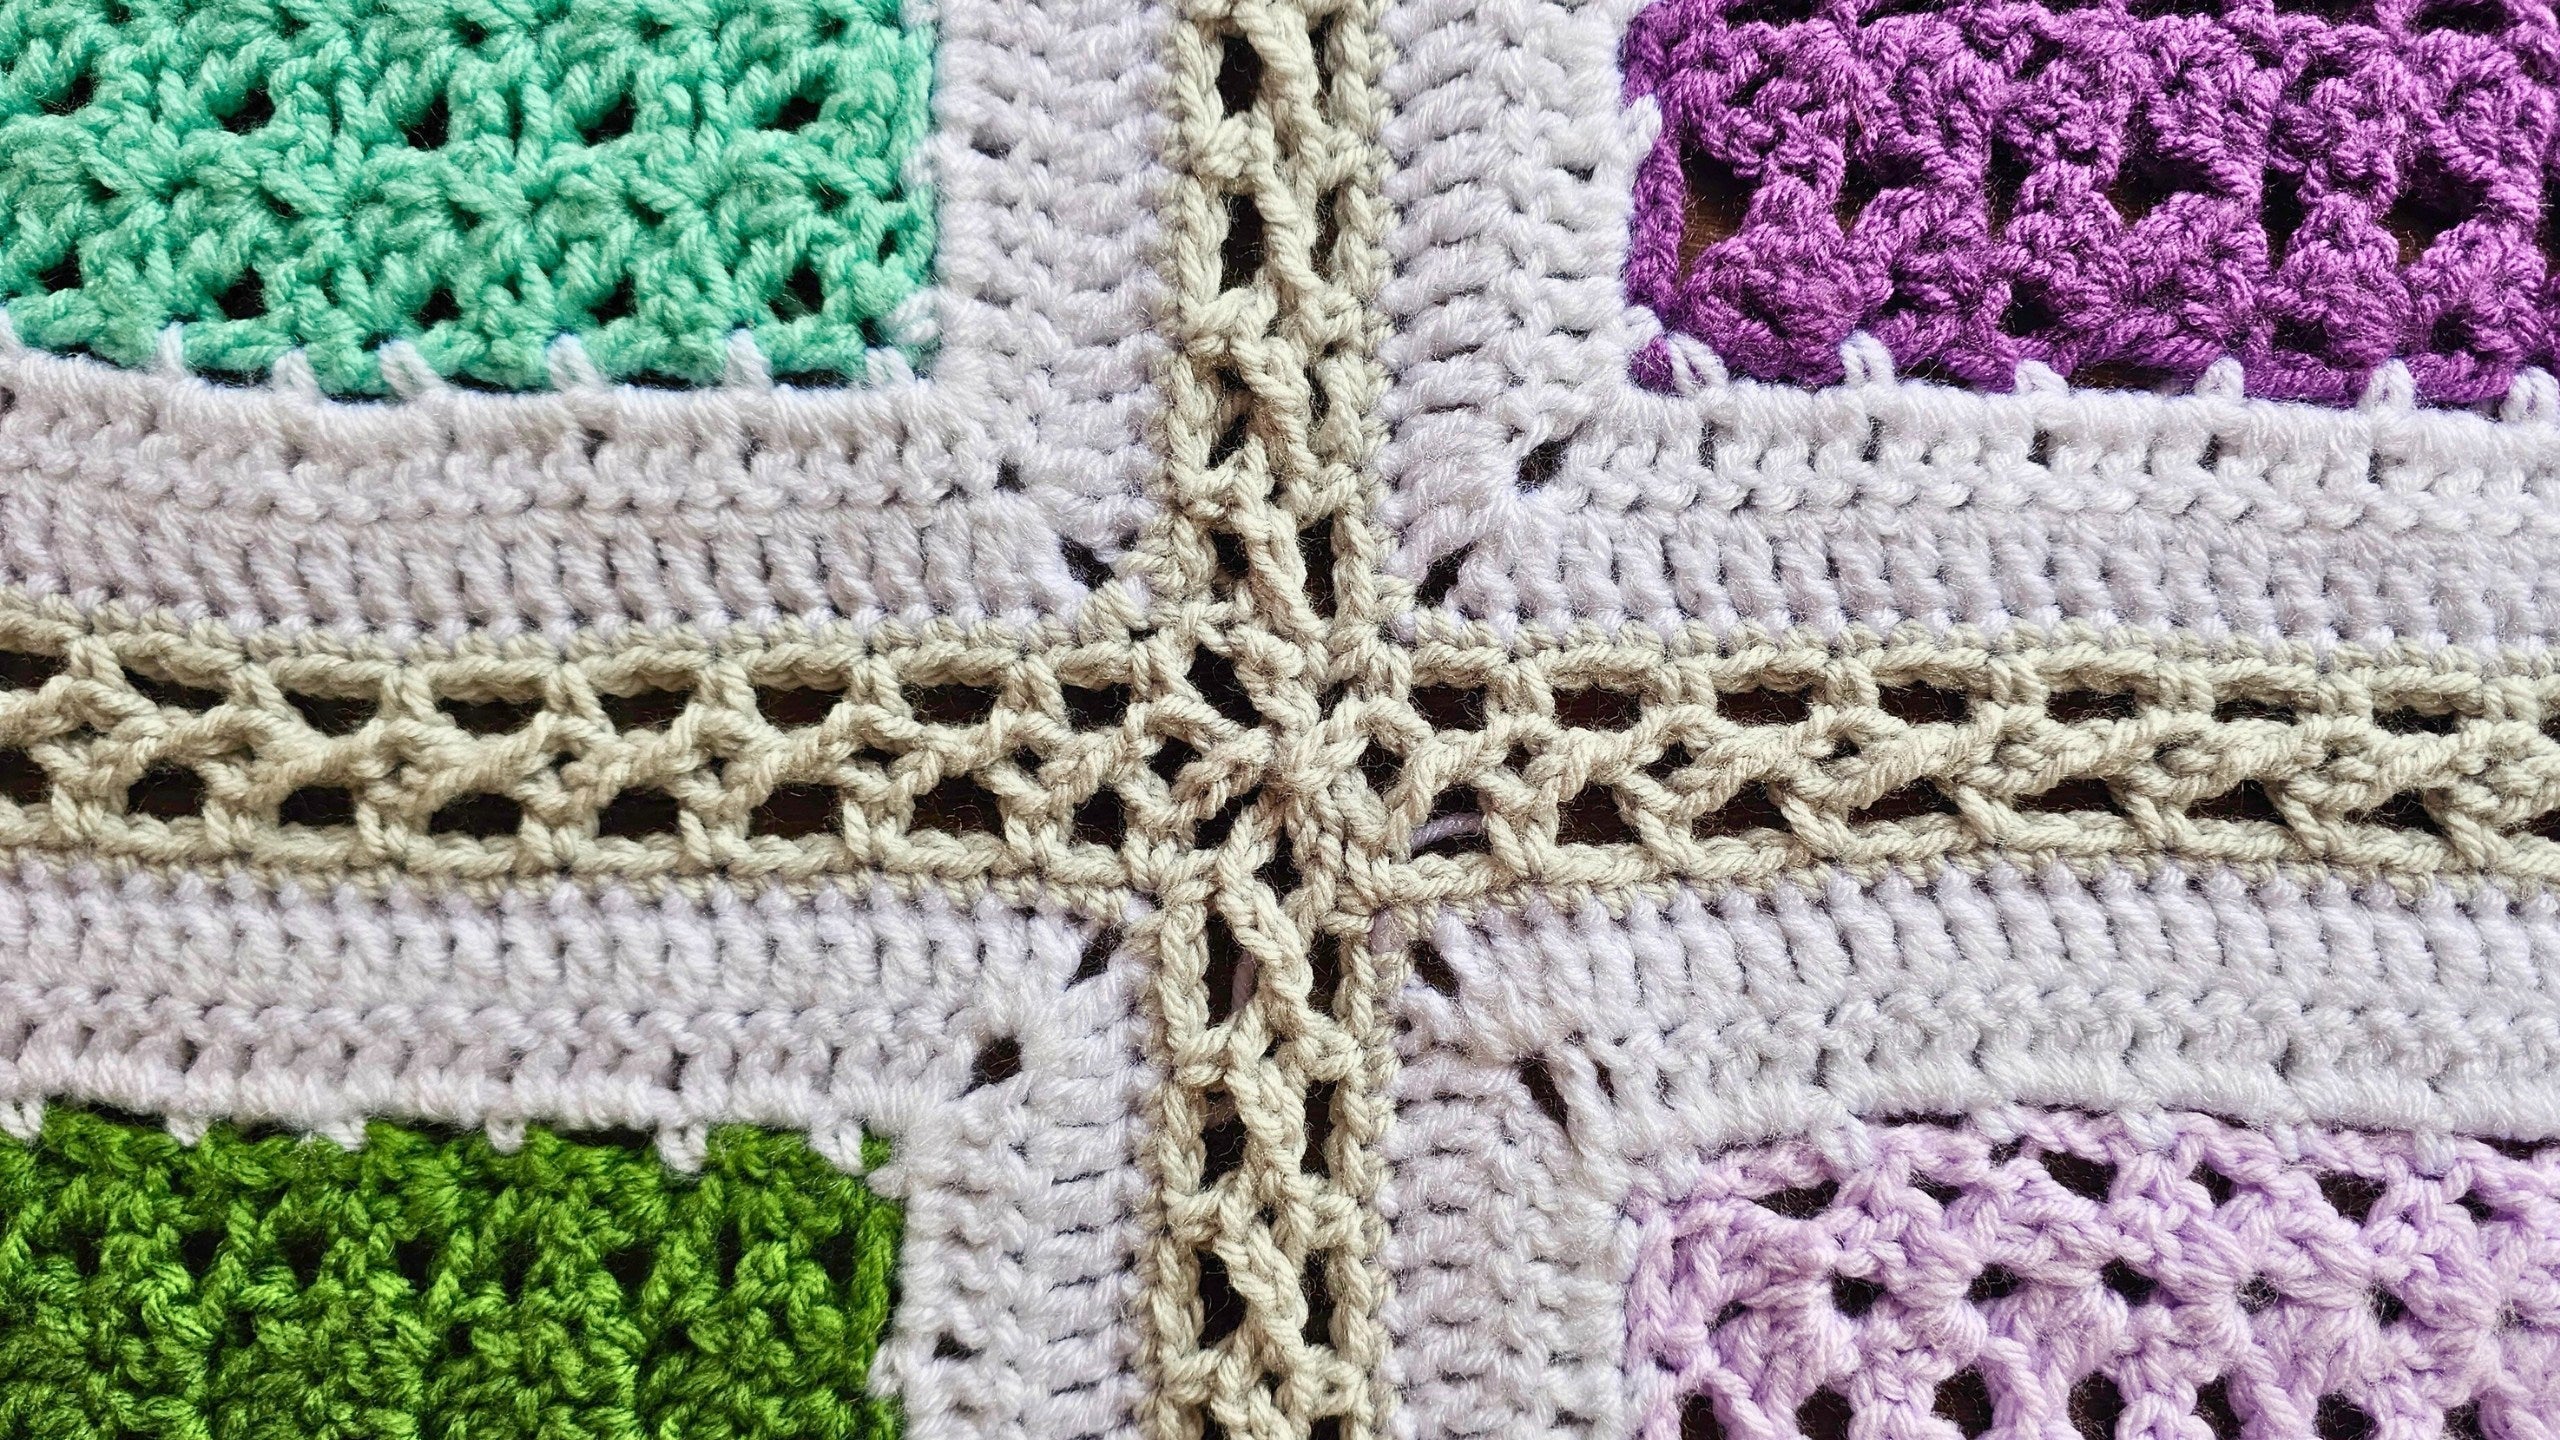
Creating the Braid Effect Using Loop Removal Technique
The real magic of the easy flat braid join comes from removing your hook and looping it through the loops on the previous square. Here’s why that works:
- Taking the hook out and picking up the previous loop with your hook makes each chain nest together like a braid.
- If you skip the hook removal (just work straight through), you’ll still get an attractive join, but with less definition.
Pro tip: Always give yourself an extra moment to pinch the working loop before re-inserting the hook, especially at corners or long runs. It keeps loops uniform and prevents twisting.
Working the Border Round with Half Double Crochet
Once your squares are all joined, start tidying up those edges:
- Pick any corner and slip stitch in your yarn.
- Chain three to begin.
- In each braid loop along the side, work one half double crochet and chain two.
- For corners, after your last loop before the corner, work a half double crochet into the corner, chain four, rotate your work and add another half double crochet in the same corner loop.
Border Repeat Pattern:
- Along sides: Half double crochet, chain two, repeat
- At joins: Two half double crochets (one for each side), no chain between
- At corners: Half double crochet, chain four, half double crochet
Work all the way around for a neat, frame-like look.

Completing the Border Round with Slip Stitch Join
Finishing the border couldn’t be simpler:
- After your final loop, half double crochet into the last corner and chain four.
- Insert your hook into the original starting slip stitch.
- Slip stitch, chain one, cut yarn, and pull the tail through.
- Check for evenness as you tighten the last loop—tightening too much will pull the blanket in at the edge.
A gentle touch here keeps the border as flat as the join.
Adding a Row of Single Crochet after Border
To create a polished edge:
- Start back at a corner and attach your joining yarn as before.
- Single crochet in each stitch, and add two single crochets into each chain space along the side for extra texture.
- When you reach a corner, always work two single crochets into the space, chain two, rotate, then two more single crochets into the same space.
- At joins, use a single crochet decrease (crochet two stitches together) if you need to keep your stitch count correct.
This round lays the perfect foundation for any decorative border you’d like to add afterward.

Finishing Off with a Slip Stitch or Invisible Join
Ready for that final flourish? Here’s how I do it:
- To finish with a slip stitch: go into the first single crochet, pull up a loop, chain one, cut yarn, and pull through.
- For an invisible join: cut the yarn after your final single crochet, pull the tail all the way through the last stitch, and thread your yarn needle.
- Insert the needle into the very first single crochet stitch, pull yarn through, and then re-insert the needle into the last stitch (where your yarn tail is coming from).
- Gently snug it down until it looks just like another crochet stitch—no knot, no bump.
- Weave in the tail for a truly professional look.
Using the invisible join is especially helpful when working with a multicolored border or when you want the finish to blend perfectly.
Securing and Weaving Tails
Don’t let all that work unravel! Here’s how I handle ends:
- After cutting yarn, weave each tail with a blunt needle back and forth through several stitches on the back side.
- Try to split existing stitches with each pass for extra security.
- Don’t cut too close—leave a tiny tail to allow for natural movement.
- Especially at joins, weave tails in different directions for added strength.
Tips for Maintaining Even Tension When Joining
Achieving a professional look comes down to even tension:
- Keep your hands relaxed. If you find your work is puckering, try going up half a hook size.
- Don’t yank the working yarn, especially between loops.
- For a fluffier, more open braid look, keep your loops a touch looser.
Tension tips: Pause every few squares to flatten out your work and see if you like the feel of the braid join. Adjust as you go—crochet likes flexibility!

Troubleshooting Common Joining Problems
Even the best crocheters hit snags. Here are fixes for common joining problems:
- Loops are uneven or counts are off: Double-check your chain and stitch count before joining sides.
- Corners bunch or pucker: Make sure to add the full chain (six for corners in round two; four in the border) and don’t crowd your stitches.
- Not lining up with previous squares: Pause, gently unpick just the last join, and realign.
- Joins too tight: Loosen up loops or try a larger hook until it feels right.
Being willing to undo a few stitches ensures your blanket looks and feels great.
How to Care for Your Finished Blanket
When your gorgeous braid-joined blanket is done:
- Wash gently—handwashing with mild detergent or cold water works best.
- Lay flat to dry, gently shaping and evening out braid joins as needed.
- For extra sharp edges, consider blocking your blanket (pin it to shape and steam or mist lightly). This really helps flatten and showcase your joins.
Treat your work kindly, and it’ll stay soft and lovely for years.

Showcasing Your Crochet Work in the Secret Yarnery Community
Sharing your handiwork is half the fun! Show off your finished blanket, ask questions, or get inspired by others at:
- The Secret Yarnery’s welcoming Facebook group, The Secret Yarnery Crochet Community, where folks love to support and admire all skill levels.
- Post on Instagram with @secretyarnery for a chance to get featured and gather even more creative ideas.
Whether you want advice, applause, or just a sense of belonging, we’re here for you.
Where to Find More Patterns and Tutorials by Christa
Hungry for more fun patterns and step-by-step videos? Dive into the Secret Stitches CAL 2021 playlist or grab the free Crochet Cheat Sheet to expand your skills.
Want an entire collection of square patterns? Check out the Granny Squares Collection for endless options to mix and match.
And don't forget: subscribe to the Secret Yarnery YouTube channel and tap that notification bell, so you never miss a new tutorial or inspiration post.
Final Encouragement and Inspiration
The easy flat braid join isn’t just a joining technique—it’s a way to showcase your creativity and learn a new skill that makes your blankets truly stand out. It might look intricate, but with a bit of practice, it becomes second nature, rewarding you with a finish you’ll be proud to show off.
Joining a welcoming community like the Secret Yarnery helps keep momentum high. Every finished square, every joined corner, and every learning moment adds up. Thanks for joining me on this crochet journey—now go stay hooked, and don’t forget to share your colorful masterpieces with the world!
Left Handed?
FAQs
What is the flat braid join?
The flat braid join is a crochet technique used to connect squares (like granny squares) with a decorative, lacy, braided look. It’s flexible, sits flat, and turns the join into a feature instead of hiding it.
Can I do the flat braid join if I’m a beginner?
Yes! The flat braid join looks fancy, but the steps are really just single crochets, chains, slip stitches, and a simple join-as-you-go method. If you can crochet granny squares, you can definitely master this join.
What kind of yarn is best for flat braid joining?
Use the same weight yarn as your squares. A smooth, not-too-fluffy yarn shows off the braid best. If you want the join to blend in, use a matching color; for a statement braid, go with a contrast!
How do I avoid puckering or bumpy seams?
Keep your loops slightly loose, avoid pulling the joining yarn too tight, and double-check your loop and stitch count on each side. If the join feels tight, try a slightly larger hook just for the joining rounds.
Can I join different sized squares?
It’s best if all your squares are the same size and have the same number of stitches on each side. If they differ, add a round of single crochet with increases or decreases around the smaller squares first to make them match.
How do I join squares in rows and columns?
Work each square’s joining loops on all but one or two sides, then join new squares to the arrangement as you go. Use the “kitty corner” trick (joining diagonally at intersections) to keep the braided effect flowing at corners.
What do I do if my squares don’t line up while joining?
Don’t stress. Pause if you notice things aren’t matching, gently rip back just the last join, adjust your square, and try again. Even experienced crocheters have to fix things sometimes!
Can I use flat braid join for projects other than blankets?
Absolutely! This joining method is great for pillows, bags, shawls, or any project based on crochet squares or motifs.
Do I need to block my blanket after joining?
Blocking isn’t required but highly recommended for a professional look. It helps the edges settle, the braid to open up, and everything to lay flat. Just wet or steam-block, then pin your blanket to shape.
Where can I get more help or see video demos of this technique?
Check out Secret Yarnery on YouTube for video tutorials, or join the Secret Yarnery Crochet Community on Facebook for support, tips, and inspiration from fellow crocheters.
![]()
I’m Christa Patel—founder of Secret Yarnery, passionate crocheter, designer, and your virtual yarn buddy! I create easy-to-follow patterns and videos to help people of all skill levels crochet with confidence and joy. My mission is to make crochet simple, stress-free, and fun for everyone—from your first granny square to your newest blanket masterpiece.
I’m known for my step-by-step tutorials, colorful Stitch Sampler Blanket Patterns, and friendly community support. When I’m not crocheting or filming, you’ll find me chatting with fellow yarn lovers in the Secret Yarnery Facebook group or sharing inspiration on YouTube.
You can find more patterns, tips, and creative crochet ideas at Secret Yarnery, or join the welcoming Secret Yarnery Crochet Community on Facebook. Let’s stay hooked together!
About the Author
With a passion for crafting easy, beginner-friendly tutorials and patterns, Christa inspires crafters of all skill levels to unleash their creativity worldwide. She encourages yarn lovers to connect, create, and crochet a world filled with beautiful handmade treasures!
Part 14 - Secret Stitches Easy Stitch Sampler Blanket Pattern