Diamond Trellis Square | Secret Stitches Easy Stitch Sampler Blanket Pattern Part 4
If you love adding unique squares to your crochet blankets, you’re in for a treat. Today, I’m sharing all the steps, tips, and tricks to create the Diamond Trellis Square, which is the fourth square in the Secret Stitches Easy Stitch Sampler Blanket Pattern. This design blends modern lacy diamonds with classic trellis stitches, working up into a stylish piece for any easy crochet blanket. Whether you want to match all your squares or mix up your yarn colors, this tutorial will help you achieve a gorgeous and forgiving blanket square—even if your tension isn't perfect.
Overview of the Diamond Trellis Square
The Diamond Trellis Square shines as part four of the Secret Stitches Easy Stitch Sampler Blanket Pattern. Each square in this crochet along is designed to work into a grand and beautiful easy crochet blanket, with every section featuring a unique stitch pattern for eye-catching variety.
What I really love about this part is the striking combination of lace-style diamonds and open trellis work. The pattern uses only basic crochet stitches, but the finished look is polished and modern. Plus, the four-row repeat makes the square easy to memorize and relaxing to work—perfect for winding down with your favorite yarn after a long day.
To keep things simple and accessible, you’ll find a written pattern for the Diamond Trellis Square on the Secret Yarnery website.
For anyone on the hunt for more project ideas, don’t forget to explore the cozy blanket stitch designs available.

Yarn and Materials Needed
For this square, I’m using Savor from Ice Yarns—one of my favorites for easy crochet blanket projects. It’s a size 4 worsted weight yarn, made from 100% Dralon acrylic, so it’s both soft and strong. Each skein is 200 grams and 330 meters, making it generous enough for several squares.
You can choose to use the same color for all your squares, dip into your leftover yarn, or work in a different color for each square. I went with changing colors for each square for that fun, patchwork effect.
You’ll also need:
- A 6 mm crochet hook (I always keep my Clover hook handy)
- Scissors
- Darning needle for finishing your ends
- Four stitch markers for keeping count
Check out the Savor yarn if you’re looking for something new, or grab the 6 mm crochet hook I use to make sure you have the right tools for this square.
Preparing to Crochet the Diamond Trellis Square
Let’s get your square off to a smooth start. I always begin with a slip knot and leave a long tail for easy sewing later. For best results, chain loosely—tight chains will make your edges curl, while loose chains keep everything flexible and pretty.
Here’s how I keep things in order at the foundation stage:
- Chaining loosely helps prevent puckering—if you tend to crochet tightly, try using a hook one size larger for the foundation chain, then switch back.
- Multiples of 8 plus 2: The base chain for this square needs to be a multiple of 8, then add 2 more chains. Use your stitch markers every eighth stitch—that way, you’re always on track.
- Stitch markers are your best friend for counting and helping with even stitch placement.
If you’re worried about your squares lining up, don’t stress. The join method you’ll use to assemble your blanket is quite forgiving, making minor size differences a non-issue.
![]()
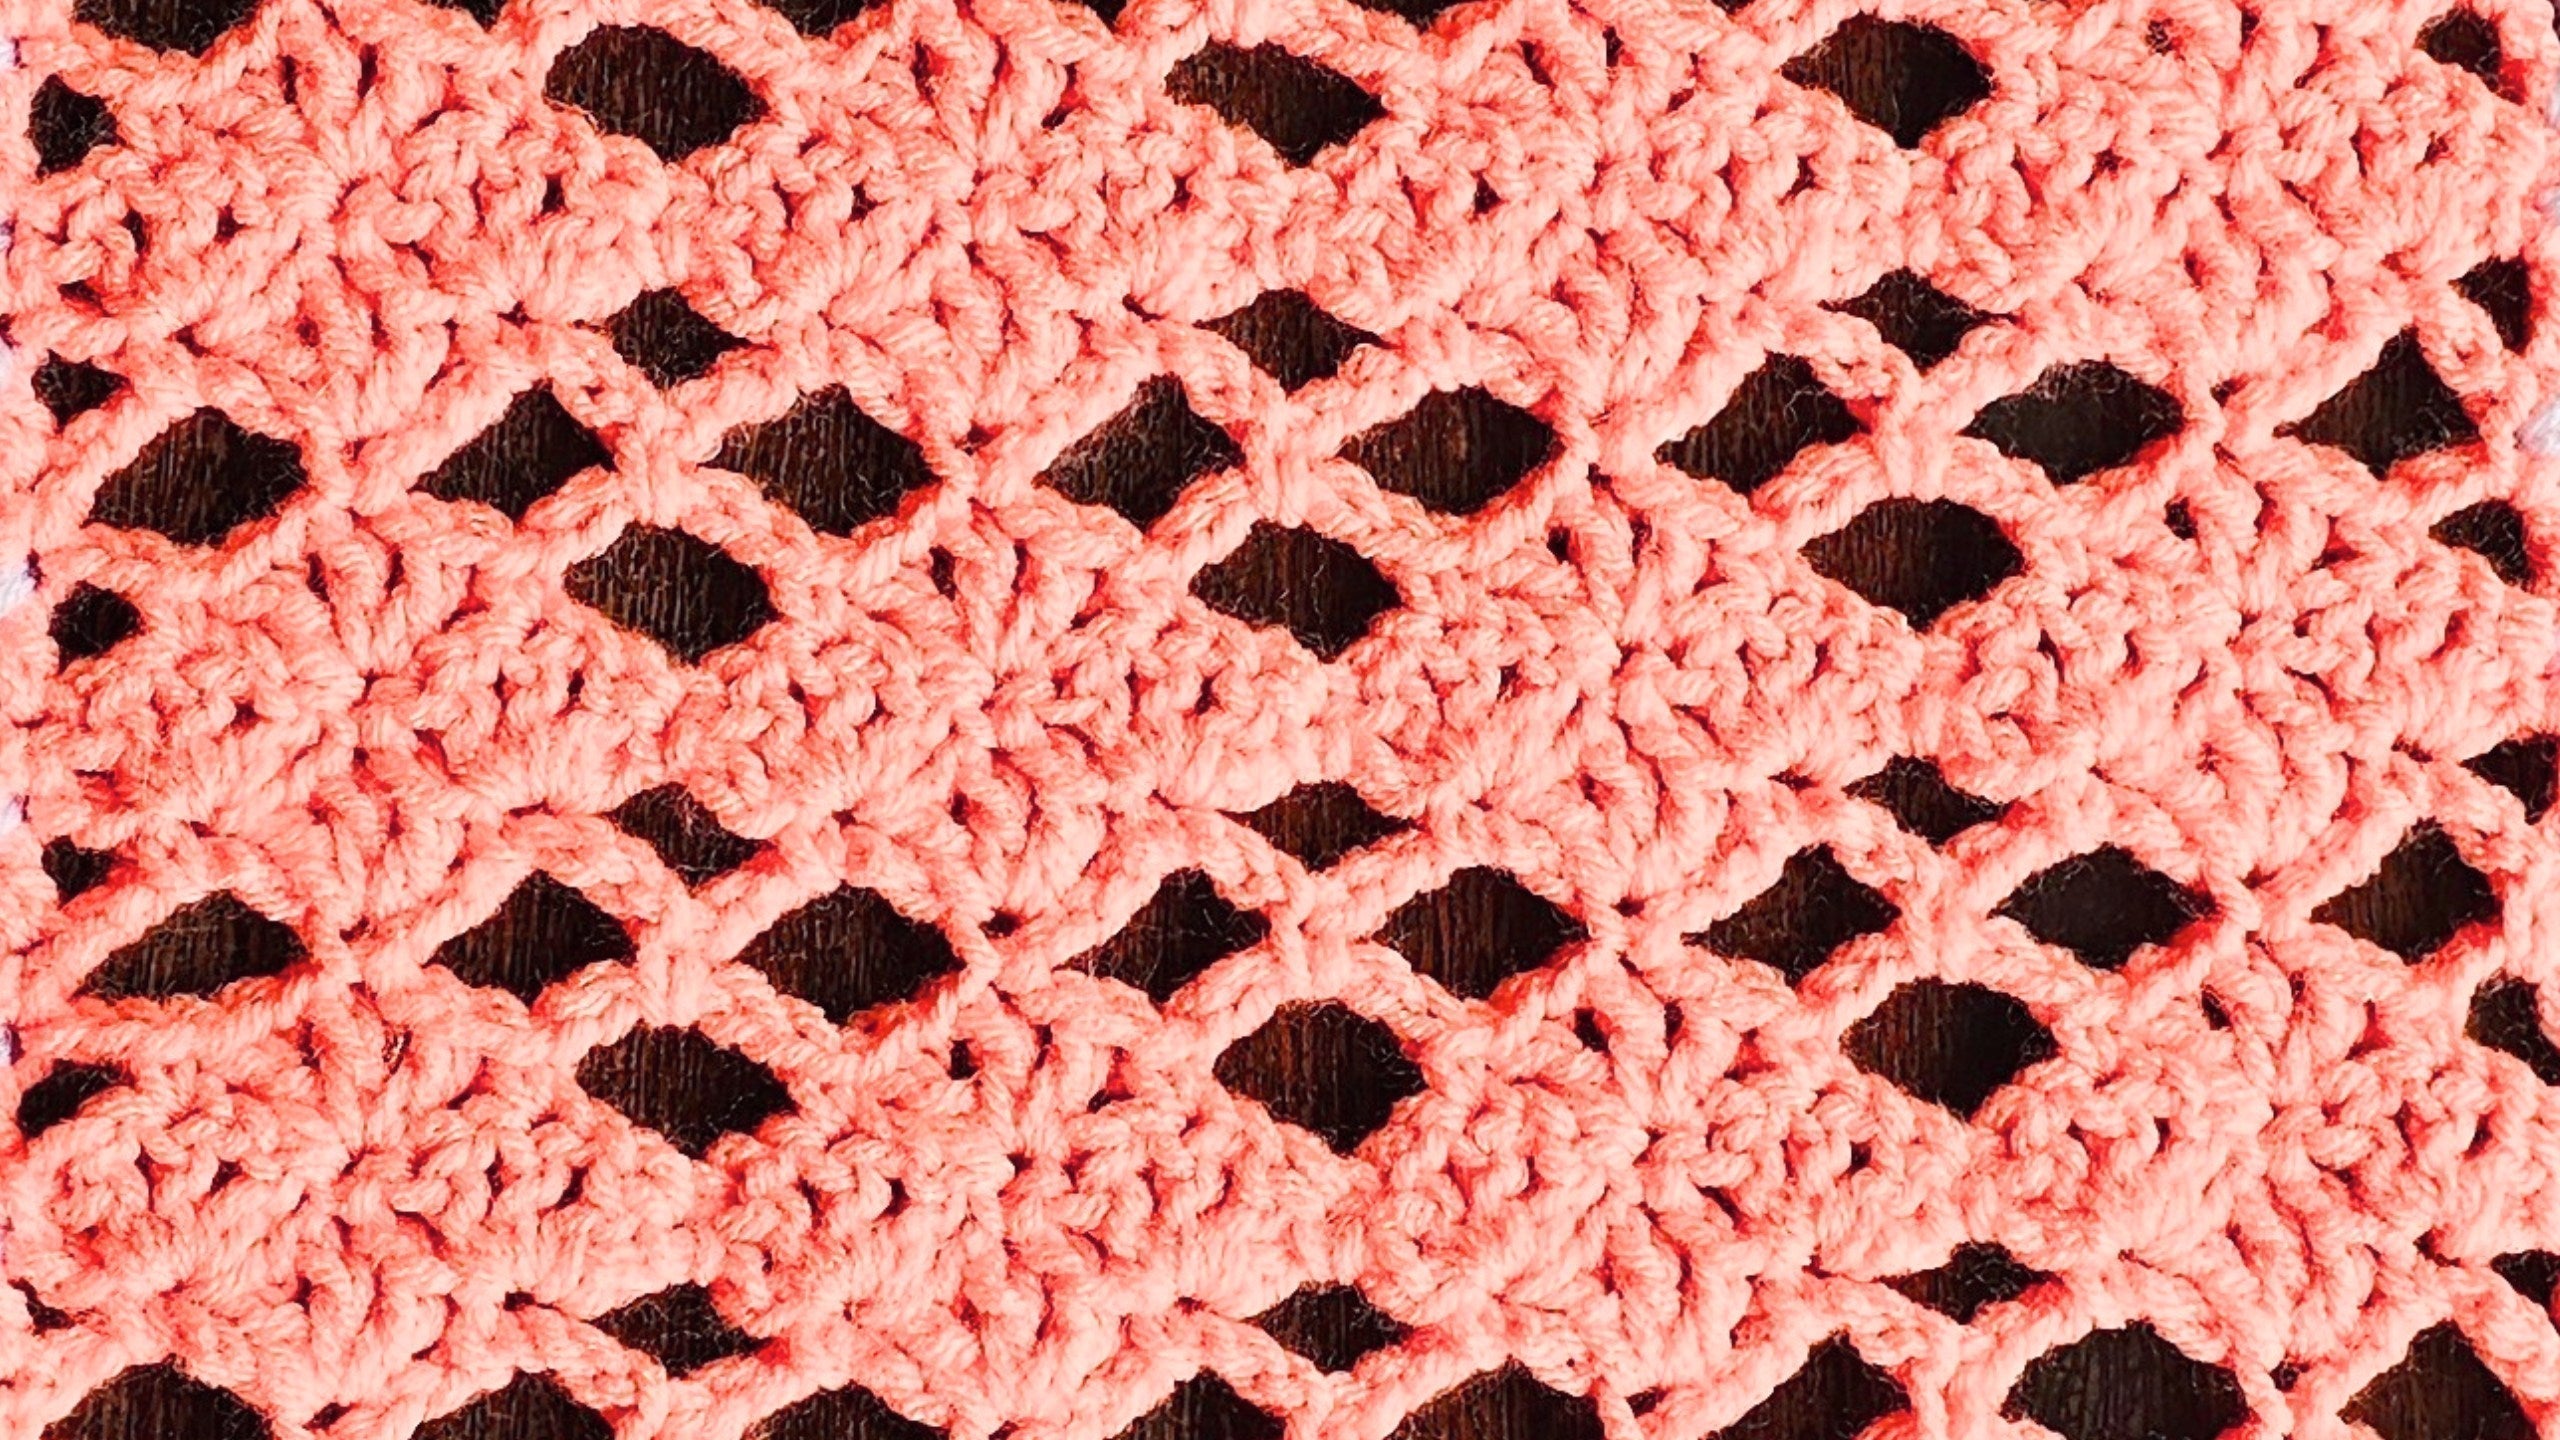
Understanding the Stitch Pattern Basics
The base of this pattern is the multiple of 8 plus 2 for the foundation chain—this sets the pace for all the rows that follow.
I work into the back loops of my foundation chain. This neatens up the finished edge, making your square look great from every angle.
Here’s a quick overview of the main stitches used:
- Chain (ch): The building block of every row.
- Single crochet (sc): A tight, sturdy stitch that keeps your pattern in line.
- Double crochet (dc): Used in clusters to create the diamond motif.
- Chain 1 spaces (ch-1): These make the lacey portions in the diamond clusters.
The magic of the Diamond Trellis Square comes from alternating open “trellis” sections with the bold shape of the diamonds.
Row 1: Foundation Chain and First Row Explained
The first row lays the groundwork for everything else. Here’s exactly how I build the base:
- Chain 32: That’s four sets of 8, plus 2 extra.
- Every 8th chain, place a stitch marker. This keeps your count perfect. You’ll have 4 markers total.
- Turn the chain slightly and work into the back loops.
- In the second chain from the hook, make 1 single crochet (sc).
- Chain 5.
- Skip the next 3 foundation chains.
- Single crochet into the fourth chain (the stitch just before your first marker).
- Keep repeating chain 5, skip 3, single crochet into the 4th chain all the way to the end.
- You should end with a single crochet into the very last chain.
This method results in neatly spaced single crochets, with open spaces ready for the diamonds to come.
![]()
Finishing Row 1
Once you’ve worked your way across, remove the stitch markers gently. Your first row should look like a series of evenly sized spaces, each separated by tall chain loops.
If your chain feels too tight or looks a bit wobbly, that’s okay. Easy crochet blanket projects like this tend to straighten out as you add more rows. If your row pulls in or puckers, try chaining a bit looser next time, or go up a hook size just for that first chain.
Row 2: Creating Half Trellises and Diamonds
This row sets the stage for that lacy diamond look. Here’s how I do it:
- Chain 5, then turn your work (this forms the first trellis).
- Make a single crochet into the first chain space.
- In the next single crochet from the row below, work a diamond cluster: double crochet (dc), chain 1, dc, chain 1, dc (all into the same stitch).
- Single crochet into the next space.
- Chain 5 to jump to the next section.
- Single crochet into the next space.
- In the next stitch, make another diamond cluster (dc, ch 1, dc, ch 1, dc).
- Repeat this pattern—alternating diamonds with trellis spaces—across the row.
- Finish with a chain 2 and a final double crochet into the last stitch.
Key stitch sequence for this row:
- Chain 5, turn
- Single crochet in space
- Diamond cluster in stitch
- Single crochet in next space
- Chain 5
- Continue as above
With each new row, those diamond shapes start to take form.

Row 3: All Diamonds Row
Now, it's diamonds from edge to edge! After starting with a chain 1 and turning your work, single crochet into the first stitch.
Here’s the pattern for row 3:
- Into the next single crochet, make a diamond cluster (double crochet, chain 1, double crochet, chain 1, double crochet).
- Single crochet into the center space (“hill” of stitches).
- In the following single crochet, another diamond cluster.
- Alternate diamond clusters with single crochets in the spaces between diamonds, all the way across.
The single crochets act as anchors or “pins,” stabilizing your diamonds and keeping that lovely symmetry. Take your time, keep your stitches even, and the diamonds will arrange themselves into neat rows.
Tips for this row:
- Always spot the correct stitch before each diamond cluster—it's easy to accidentally shift the placement by one stitch!
- Keeping an even tension means your diamonds will look uniform and crisp.
Row 4: Half Half Row Repeat
Let’s introduce the half-and-half row, where trellises and diamonds alternate across the row.
- Chain 5 and turn your work.
- Single crochet into the first “hill” or center double crochet.
- In the “valley” (the single crochet between the hills), work a diamond cluster.
- Single crochet into the top of the next hill.
- Chain 5.
- Move to the next hill, single crochet again.
- In the next valley, work another diamond.
- Keep alternating trellis (chain 5) sections and diamond clusters all along the row.
- At the end, chain 2 and finish with a double crochet in the last stitch.
This combination gives the square its signature pattern—clusters of diamonds framed by airy trellis sections.
A quick sequence to keep things simple:
- Chain 5, turn
- Sc in hill
- Diamond in valley
- Sc in hill
- Chain 5, sc in hill, repeat
- Finish with chain 2, dc in last stitch
![]()
Trellis Row Explained
Time for a bit of openwork. This row is all about trellis—long chains of five, single crochet into the tops of the “hills.”
Here’s how it comes together:
- Chain 1, turn your work.
- Single crochet into the first stitch.
- Chain 5 for the trellis effect.
- Single crochet into the top of the next hill.
- Chain 5, single crochet into the next space.
- Continue chain 5, single crochet into the top of every hill or into the next space along the row.
- End with a single crochet in the last chain space.
The airy structure of this row highlights the diamonds and keeps the blanket square light and lacy.
Marking Trellis Spaces Using Stitch Markers
To keep your pattern on track and avoid mistakes, I like using stitch markers in the trellis spaces.
After finishing the trellis row:
- Place three stitch markers into the spaces that form your trellises.
- This helps you quickly find which sections to skip chains for the next rows, saving time counting and double-checking your pattern.
Marking these spots keeps the repetitive sequence of the square running smoothly. If you misplace a marker, it’s easy to correct by counting the spaces from the start of the row.
![]()
Half Half Row with Stitch Markers
With your trellis spaces now marked, here’s how the next half-and-half row goes:
- Chain 5 and turn.
- Single crochet into the first space.
- In the next stitch (on top of a diamond), work your diamond cluster.
- Skip over the next trellis space (use your stitch marker as a guide), chaining 5 to do so.
- Single crochet into the next space.
- Continue building stacked diamond clusters, skipping every marked trellis space with chain 5.
- End with chain 2 and a double crochet in the last stitch.
Numbered steps for reference:
- Chain 5, turn
- Sc in first space
- Diamond in stitch
- Chain 5, skip marked trellis
- Sc in space, repeat above steps
By stacking your diamonds directly over the previous diamonds, you build a strong pattern that keeps its shape.
Diamond Row Repeat Instructions
Every time you reach a diamond row, here’s what to do:
- Chain 1 and turn.
- Work a diamond cluster in every single crochet across the row.
- Use chain 1 spaces between double crochets to form the cluster.
- Pin down each diamond with a single crochet into the top of the next hill.
- Keep tracking trellis spaces for future rows by moving your stitch markers up as needed.
This regular sequence creates a visually striking row every time. Make sure to move your stitch markers up after each row to save headaches during repeats.
Tips for this stage:
- Check your gauge after a few repeats. If the square starts to bulge or shrink, adjust tension or hook size.
- Tug gently on the row after finishing to help the pattern settle.
![]()
Half Half Rows (Alternating Diamonds and Trellises) Explained
These rows are the secret sauce of the whole pattern:
- Chain 5 and turn.
- Alternate: single crochet in hill, diamond cluster in valley (the single crochet between hills), single crochet in the next hill, chain 5 across each marked trellis.
- The combination of solid diamonds and trellis chains builds that airy “diamond trellis” look.
- Each row finishes with chain 2 and a double crochet in the last edge stitch for neatness.
Use your stitch markers to always know where to skip. If you ever get off-track, count your chain spaces and work backward to the previous marker for easy correction.
A quick comparison for stitch placement:
- Diamonds: Over single crochets in valleys
- Trellises: Chain-5, skipping marked spaces
The repeat makes it easy to build consistent rows and keeps everything lining up perfectly.
Pattern Sequence Summary
The overall square follows a consistent pattern after the first few rows:
- Trellis row
- Half half row
- Diamond row
- Half half row
- Trellis row
Repeat this structure until you have six complete sets of diamond rows for a perfectly sized easy crochet blanket square. After that, you’ll be ready for the edging.
Here’s the pattern sequence at a glance:
- Trellis row
- Half half row
- Diamond row
- Half half row
- Trellis row
Pause after each set to check that everything lines up and your stitch count matches your plans.

Final Row Instructions (Chain 3 Edging)
The last row tidies it all up, giving you a neat edge that matches the rest of your project.
- Chain 1, turn your work.
- Single crochet in the first stitch.
- Chain 3, then single crochet into the top of the next hill.
- Continue: chain 3, single crochet into space, chain 3, single crochet into hill, and so on.
- When you reach the end, chain 1 more to secure.
- Cut your yarn, leaving a long end for sewing.
- Pull the yarn through the last loop and snug it tight to secure your work.
The chain 3 spaces are important—they prevent the edge from stretching and make sure your square matches up perfectly with others when you start joining.
Finishing the Square (Weaving in Ends & Securing)
Finishing off is as important as the crochet itself. Here’s my go-to way to weave in ends so they don’t work loose with use:
- Thread a darning needle with the long tail.
- Weave the tail through the stitches along the side, going in both directions to lock it in place.
- Trim any remaining yarn once you’re done.
- Gently tug the square to help the stitches settle into place.
This method keeps the ends secure without creating bulky spots at the edges.
Joining Squares: Mention of Forgiving Join Method
A great thing about joining the squares in this CAL is that a forgiving method is used for sewing them together. Even if your squares are slightly different in size, you’ll have some room for adjustment when you assemble your easy crochet blanket.
Don’t worry if your tension varies a little from square to square—this project is designed with flexibility in mind, making it totally friendly for beginners and more relaxed crocheters alike.

Troubleshooting Common Issues
Running into a snag? Some simple fixes to common problems:
Tight chains curling edges
- Loosen up when chaining the foundation row; try a bigger hook.
Stitch markers in the wrong places
- Always check your counts (groups of 8 plus 2). Reposition stitch markers if your numbers don’t line up.
Uneven edges
- Make sure to work into the right loops at the end of each row.
- Double-check that your turning chains are counted as stitches when needed.
Counting confusion
- Check your markers: after each row, count your diamond clusters and trellis spaces to prevent surprises later.
Helpful Tips for Using Stitch Markers Effectively
Stitch markers really do make life easier for this square:
- Use bright, easy-to-see markers to count out your foundation chain and mark trellis spaces.
- Take a moment after every row to move your markers up—they’re there to help you stay organized.
- If you need reliable, colorful markers, check the best-selling crochet designs for trusted recommendations.
Having a set of good quality markers means faster stitching with fewer mistakes.

More Crochet Blanket Inspiration
Looking for even more patterns and ideas? View the entire cozy blankets collection for inspiration. There’s something for every skill level and taste, from snuggly throws to bright baby blankets and beyond.
If you’re exploring for new projects, the 2025 Crochet Ideas for All Levels offer fun and simple options to add to your to-make list.
Conclusion
Crocheting the Diamond Trellis Square for the Secret Stitches CAL is all about enjoying the process and taking pride in each stitch. Whether you follow along for the entire easy crochet blanket or just want to try out a new square, this project is a great way to sharpen your skills and build something beautiful.
Don’t forget to share your finished squares with me over on Instagram @secretyarnery or join our Facebook group, The Secret Yarnery Crochet Community. If you found this tutorial helpful, subscribe on YouTube so you don’t miss out on any future # Easy Crochet Blanket: Diamond Trellis Square Tutorial (Secret Stitches CAL Part 4)
I love creating easy crochet blanket projects, especially the kind that grow one gorgeous square at a time. The Diamond Trellis Square is part four of the Secret Stitches Crochet Along (CAL) 2021 and it's where lace and geometry meet for a stunning effect. The diamond trellis design adds both texture and elegance—a perfect addition to any modern crochet blanket. Whether you want to use the same color for every square, go wild with leftovers, or choose coordinated shades, this pattern is fun, forgiving, and beginner-friendly.
Left Handed?
FAQs
1. What skill level is needed for the Diamond Trellis Square?
The pattern is beginner-friendly. If you know how to chain, single crochet, and double crochet, you can follow this tutorial. Stitch markers help keep the repeats simple and organized.
2. Can I use a different yarn or hook size?
Yes. The pattern uses size 4 worsted weight yarn and a 6 mm hook, but you can use any yarn and a matching hook size. Just adjust your starting chain length for the size you want and check your gauge if you want uniform squares.
3. Why do my edges curl?
Tight foundation chains usually cause curling. Try chaining more loosely or use a larger hook for the foundation row. The edges often flatten as the square grows.
4. My squares are not all the same size. Is that a problem?
Slight size differences are normal, especially when using different yarns or colors. The joining method is forgiving and helps line up all the squares for a neat blanket.
5. How do I keep track of pattern repeats?
Use stitch markers to mark every 8th stitch on your base chain and trellis spaces in pattern rows. Move them up as you go—they save time and help avoid mistakes.
6. How many repeats make a finished square?
For this pattern, work until you have six full sets of diamond rows or until your square reaches your desired size. Finish with the chain 3 edging row.
7. Can I add a border after joining?
Absolutely. Once your blanket is assembled, you can add any border you like to finish the edges and tie all the squares together.
![]()
Christa Patel is the creator behind Secret Yarnery, a crochet community known for bright, approachable projects and clear, step-by-step instructions. With years of experience teaching crochet on YouTube and sharing written patterns, Christa’s mission is to make crochet fun and stress-free for everyone.
She specializes in projects that mix modern style with classic techniques, offering patterns for crocheters of all levels. Christa is known for her friendly tutorials, expert tips, and helpful troubleshooting advice. Her love of color, texture, and community shines through in every Stitch Sampler Blanket Pattern and video.
When she’s not designing new blanket squares or connecting with crocheters around the world, Christa shares behind-the-scenes peeks, yarn hauls, and inspiration through her blog and social channels. Join her on YouTube, Instagram, or the Secret Yarnery Facebook group for more free patterns, tutorials, and a welcoming crochet family.
About the Author
With a passion for crafting easy, beginner-friendly tutorials and patterns, Christa inspires crafters of all skill levels to unleash their creativity worldwide. She encourages yarn lovers to connect, create, and crochet a world filled with beautiful handmade treasures!
Part 4 - Secret Stitches Easy Stitch Sampler Blanket Pattern