Drunken Granny Square | Secret Stitches CAL Part 7
Welcome to my easy guide for making the Drunken Granny Square, part of the Secret Stitches Stitch Sampler Blanket Pattern! If you’ve ever wanted to crochet something fun, fast, and just a bit different from the classic granny square, you’ll love this design. The Drunken Granny Square stands out with its staggered, lively look that’s simple yet eye-catching.
Even if you’re new to crochet, this tutorial walks you through every step, with plenty of tips to smooth out the process. If you’ve made other squares in the Stitch Sampler Blanket Pattern already, you’ll find this block adds a quirky new flavor to your blanket. Beginners, don’t worry! This project is forgiving, and I promise you’ll pick up speed as you go. Grab your hooks, and let’s get creative!
What Makes the Drunken Granny Square Special
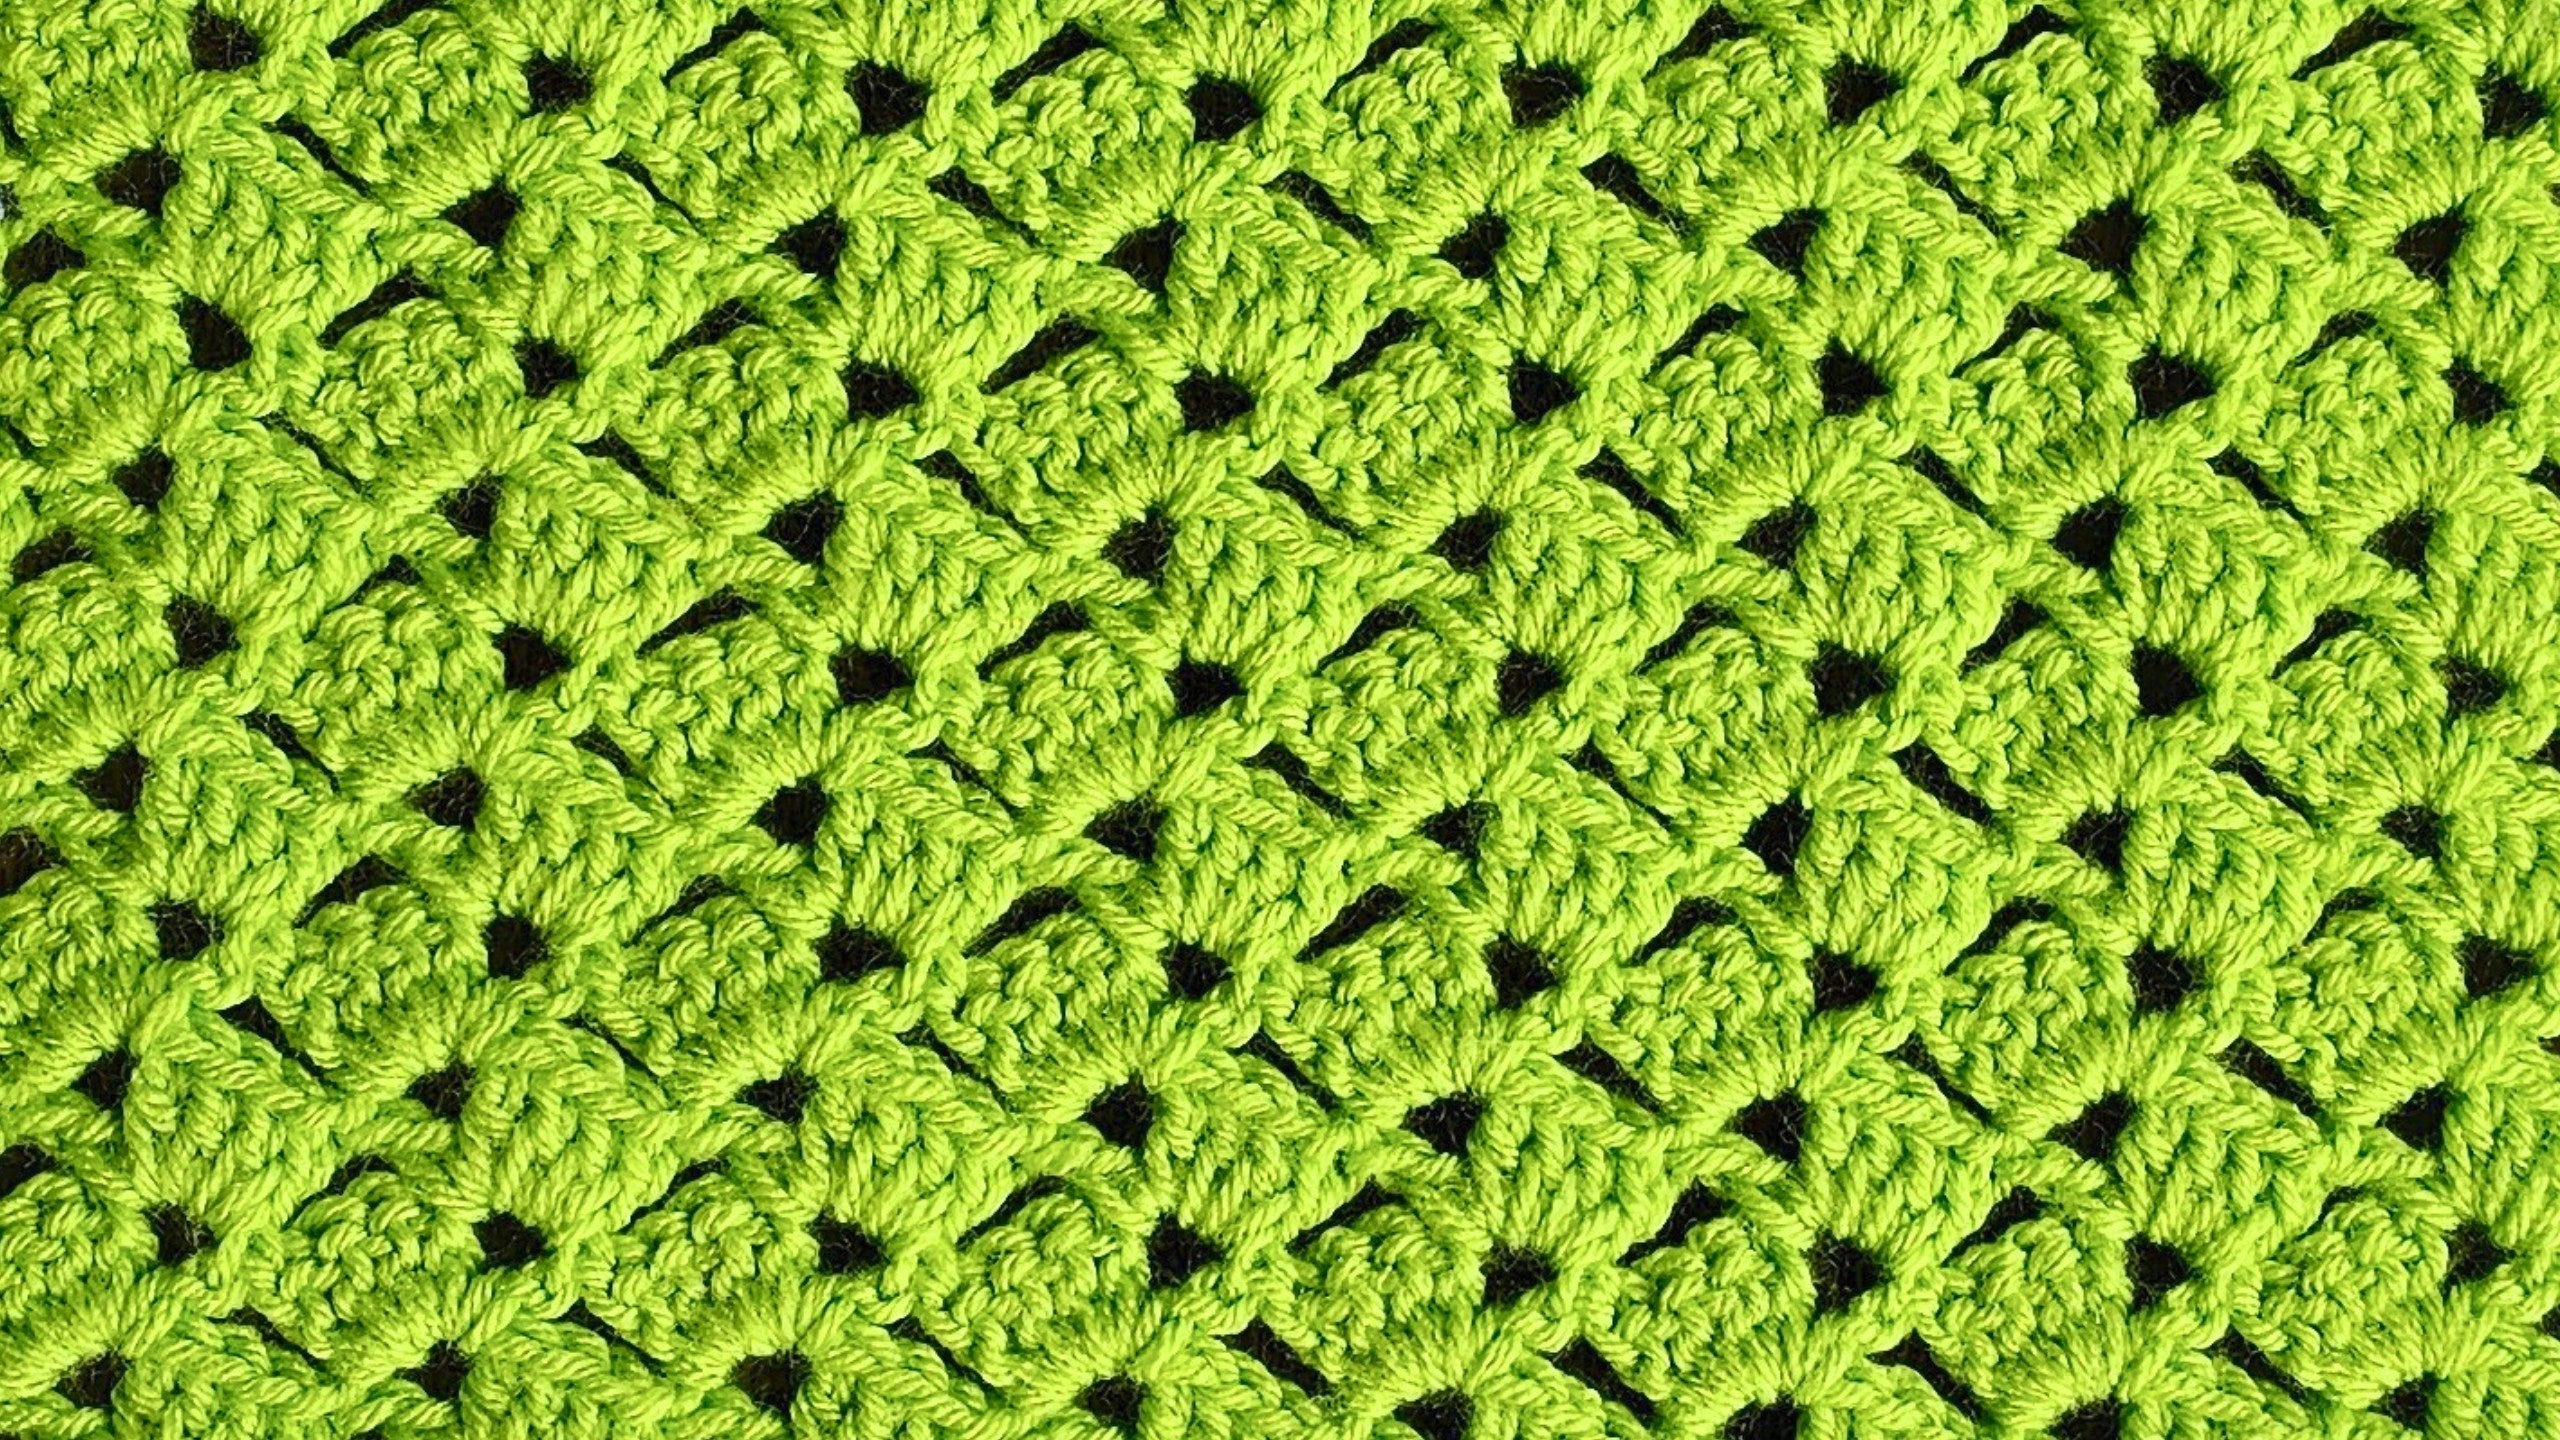
The Drunken Granny Square takes the timeless granny motif and gives it a playful twist. Instead of blocks lined up in neat rows, the stitches “tip” a bit, creating a textured, dynamic look. It’s surprisingly easy, relying on simple repeat rows and basic stitches.
The unique design makes each square pop, whether you use a single color or go for bold stripes. Plus, the step-by-step instructions mean you can crochet along even if you’ve only just learned your double crochet. If you’re joining the Secret Stitches Stitch Sampler Blanket Pattern, this is Part 7, and you can find the other Secret Stitches CAL squares on my site to mix and match a whole set!
Materials Needed for the Drunken Granny Square
Here’s what you need to get started:
- Worsted weight yarn (4 weight, acrylic recommended). I use Saver from Ice Yarns, but any acrylic of similar weight will do.
- 6mm crochet hook for the square itself
- 7mm crochet hook just for making the starting chain. If you don’t own a 7mm hook, you can find one through Amazon or just chain very loosely.
- 8 stitch markers (optional, but very helpful for keeping your place)
- Yarn needle for sewing in tails
- Scissors
Using two hook sizes helps keep your foundation chain loose, making it easier to work into later rows. Stitch markers make counting easier, so grab a few or improvise with paper clips.

Preparing to Crochet: Making the Slip Knot and Starting Chain
Before you dive in, you need to set up your yarn and hook. Here’s how I do it:
- Make a slip knot however you usually do it. I always leave a tail long enough to sew in later—usually 5-6 inches.
- Tighten it just enough to sit snugly on your hook, but not too tight.
- Place the loop on your chosen crochet hook (7mm or the larger you have).
- Make sure your ball of yarn and tools are handy so you don’t need to pause mid-row.
- If you’re unsure about your slip knot, practice a few times—there’s really no “wrong” way, as long as it’s secure and easy to slide onto and off your hook.
Take your time with these steps. Crocheting should feel relaxed, not rushed.
Creating the Foundation Chain: Multiples of Five
The base of the Drunken Granny Square uses chains worked in multiples of five. This makes counting easy and ensures your blocks line up perfectly.
- Chain five stitches.
- Insert a stitch marker into the back loop (camel bump) of the fifth chain. This helps you later when finding where to work your first group of double crochets.
- Continue: Chain five more and add another marker. Repeat until you have 40 chains and 8 stitch markers.
- The raised single “bump” on the back of your chain is called the camel bump. Working into these keeps your edge tidy. If working into the back loop feels tricky, you can use the front loops instead, but try the backs if you can.
Tip: Using stitch markers in your foundation chain helps avoid losing count or misplacing your stitches, especially if you’re new to working into chains. They make the whole process simpler and much less stressful.

Switching Crochet Hooks and Starting Row One
After chaining 40 stitches, it’s time to switch tools:
- Put your 7mm hook aside—far enough away you won’t grab it by accident!
- Pick up your 6mm hook.
- With your 6mm hook, chain four. These four chains set you up to start working your “blocks.”
- Skip the four chains you just made, and insert your hook into the fifth chain (where your stitch marker is).
This step sets the stage for the Drunken Granny Square’s unique block layout, ensuring your stitches are even and your rows start off right.
Making the Blocks: Step-by-Step for Row One
Let’s get into the core of the Drunken Granny Square—the blocks.
- Yarn over and insert your hook into the fifth chain (marked by your stitch marker).
- Work four double crochets into that chain.
- Chain two.
- Make one more double crochet in the same space.
- Skip four chains, and then work the next block into the next stitch marker location (the fifth chain).
Repeat the block pattern (four double crochets, chain two, one double crochet in the same spot) in each marked stitch along your chain. Here’s how it looks in action:
- Four double crochets into the chain,
- Chain two,
- One double crochet into the same chain,
- Skip four stitches,
- Repeat in the next marked spot.
When you reach the last four chains at the end, work a single double crochet in the last chain. Chain three and turn your work.
Tip: Keep counting your stitches as you work to avoid skipping a section. If you run out of chains early, recheck your placements and marker use. Blocks should always be in every fifth chain, making a zig-zag pattern across the row.

How to Properly Turn Your Work
Turning your work might sound simple, but here’s a trick to make it even easier:
After finishing your row, reach under your working yarn, grab your entire square, and flip it back toward you. This keeps the stitches facing the right way and lines up your chains for the next row. If you do it this way, you won’t end up with a twisted or awkward edge, and working into the top of your chains stays easy.
Take a quick look after you flip—your stitches should all be lined up, and your chain edge shouldn’t twist back on itself. If you’re new to crochet, practicing a smooth turn will save you headaches later!
Row Two and the Repeat Pattern Explained
Now that your first row of blocks is finished, row two brings the project to life. Here’s what you do:
- In the first chain two space from the row below, work four double crochets.
- Chain two.
- Work one double crochet into the same chain two space.
- Repeat this in every chain two space across the row.
Each block sits neatly in its own space, and the design begins to take shape. The structure is simple:
- Block (four double crochets, chain two, one double crochet) into each chain two space.
This repeat is the heart of the Drunken Granny Square. Once you get the flow, moving across each row feels rhythmic and quick. As you add rows, you’ll notice the “drunken” offset pattern emerging, giving the square its unique texture.
Pause your work at the end of each row to check your progress and count stitches, especially if you’re prone to missing spaces. If you need to take a break, use your stitch marker to mark your last spot.

Finishing Each Row Correctly
Ending each row the same way keeps your square tidy:
- After your final block, don’t chain—just yarn over and work one double crochet into the top of the chain three from the previous row.
- Look closely at your last set of stitches to find that chain three; it’s usually at the edge and easy to spot once you know what to look for.
- Neatly finishing each row ensures your edges stay straight, which is important as you add more rows.
Taking a moment to align your last stitch keeps everything looking professional, even if you’re still new to crochet.
Counting Rows and Visual Progress Check
To keep track of your project:
- Count your rows by following the “zigzag” line of blocks from the bottom to the top.
- Work up to 20 rows for a full Drunken Granny Square.
- If you’re unsure which row you’re on, count each visible block as one row.
- Move your stitch marker up every few rows if you tend to lose your place or if you set your project down overnight.
Tip: It doesn’t hurt to count twice before you start your border, just to make sure your square is balanced.

Last Row: Single Crochet and Chain Five Edging
Give your square a neat finish with this decorative edge:
- After your final double crochet on row 20, chain three and turn.
- In the first chain two space, work one single crochet.
- Chain five stitches.
- In the next chain two space, work another single crochet.
- Repeat the pattern: single crochet into every chain two space, chain five after each.
- When you reach the end of the row, make your last chain five, then insert a single crochet into the top of the last chain three.
- Chain one, then snip your yarn, leaving a long enough tail to sew in later.
- Pull the yarn through to fasten off.
This edge gives a crisp finish perfect for joining or leaving as a statement square.
Securing and Finishing Off Your Square
Finishing your square might feel like the end, but a little care here pays off:
- Pull the tail snug after fastening off to keep the last stitch tight.
- Thread your needle with the yarn tail and weave it back and forth through the back of your stitches to secure it.
- Trim off any loose ends with scissors.
- If you’re picky, blocking your square (dampening and laying it flat to dry) will help it stay flat and lay nicely with your other CAL blocks.
Sew in tails thoroughly, or you might find your work unravels over time.

Stitch Markers: Why and How to Use Them Effectively
Stitch markers are small but mighty tools for crochet:
- Marking every fifth stitch in your chain makes placing blocks stress-free.
- They help ensure you never lose count, which is helpful if you get distracted.
- Both closed rings and clips work; select what feels easiest to maneuver.
- Markers cut errors and reduce how often you have to go back and recount, making your crochet sessions smoother.
If you haven’t used them before, give them a try on this pattern—you’ll wonder how you managed without.
Choosing the Right Yarn and Hooks: Yarn Weight and Hook Sizes
Picking proper supplies makes all the difference:
- Use worsted weight (4 weight) yarn for best results—it holds shape but stays soft.
- Acrylic yarns like Ice Yarns Saver work great for beginners, resist pilling, and are easy to care for.
- 7mm hook (or whatever larger size you own) for the chain helps keep things loose and even.
- 6mm hook creates neat, tight stitches for the rest of your square.
- If you don’t have a 7mm hook, try chaining extra loosely—practice if you have to or pick up a replacement hook online.
Your hook size shapes your tension and finished square size, so pick tools that feel comfortable in your hands.

Troubleshooting Common Issues with the Drunken Granny Square
Even experienced crocheters run into snags. Here’s how to handle the most common problems:
- Tight chains: If your starting chain feels tight, redo it using a bigger hook or relax your grip.
- Uneven blocks: Double-check you’re working in the right chain two space and always making four double crochets before chaining two.
- Missed stitches: Use your stitch markers—recount before starting the next block.
- Front vs. back loops: If you accidentally work into the front loop instead of the camel bump, your edge may look uneven. Don’t worry—your square will still hold together!
- Losing stitch count: Rely on your markers and recount if you’re unsure.
- Awkward turns: Practice the “under the yarn” turning method to keep edges neat.
If you get stuck, don’t hesitate to rewind the video and rewatch those moments. Crocheting is about relaxing and enjoying the process.
Tips for Faster Crocheting and Keeping Consistent Tension
Want to pick up speed and keep your work even? Here’s how:
- Practice making your chain stitches loose by relaxing your hands and wrists.
- Use larger hook for chains, then switch down for tighter stitches.
- Count quietly to yourself or use stitch markers often.
- Take breaks to avoid hand and wrist cramps.
- Aim for consistent tension—this keeps every Drunken Granny Square the same size, so your blanket pieces will line up.
Crochet is a combination of rhythm and patience. The more you practice, the smoother you’ll get.

How to Follow Along with the Video for Best Results
To get the most out of the step-by-step video:
- Pause at the end of each technique to catch up.
- Rewatch tricky parts, such as turning or working into chain spaces.
- Use timestamps in the video description to skip to sections you want to repeat.
- For left-handed crafters, check out my left-handed tutorials playlist.
- If you prefer reading over watching, there’s a written version of the pattern here.
Taking your time and following along makes the process feel like a cozy crochet-along even if you’re solo.
Posting Your Finished Drunken Granny Square: Social Media & Community
Join other crafters by sharing your final square:
- Tag me on Instagram at @secretyarnery
- Post photos in the Facebook group: The Secret Yarnery Crochet Community
- Share on your feed or in groups—seeing others’ color choices and progress inspires new ideas
- Use hashtags like #SecretYarnery and #DrunkenGrannySquare so the whole community can cheer you on
The Secret Yarnery community is welcoming and supportive—don’t be shy about showing off your work.

Related Patterns and Next Steps in the Secret Stitches CAL
Looking for more pattern inspiration or want to complete your CAL set? Check out these resources:
- Find the full Secret Stitches Sampler Blanket Pattern collection of squares for more fun blocks to try.
- Explore additional Drunken Granny Square variations with my Drunken Granny Square Crochet Pattern.
- Get a free crochet cheat sheet if you find yourself needing a quick reminder on stitch abbreviations.
- For a different take, browse this handy guide on how to crochet the drunken granny stitch with photos.
- If you’re ready to level up, combine multiple squares for a custom blanket or try your hand at a baby blanket with this free Drunken Granny Crochet Baby Blanket pattern.
Stay tuned in the Secret Stitches Stitch Sampler Blanket Pattern for what’s coming next—there’s always something new to learn.
Wrapping Up: Start Your Drunken Granny Square Today
Mastering the Drunken Granny Square adds a unique stitch to your crochet toolbox. Enjoy the process, share your progress, and don’t forget to celebrate the small victories. Crocheting is about more than just stitches—it’s creativity, relaxation, and a whole lot of fun. If you’re stuck or want more ideas, reach out to the Secret Yarnery community or explore more Drunken Granny Square resources. Thanks for hooking along and happy crocheting!
Left Handed?
FAQs
1. What is a Drunken Granny Square?
A Drunken Granny Square is a crochet square that uses staggered blocks, giving it a tilted, lively look different from a traditional granny square.
2. Is this pattern suitable for beginners?
Yes. The pattern uses basic stitches like chains and double crochets, plus step-by-step instructions make it easy to follow for all skill levels.
3. What yarn and hook sizes do I need?
Use worsted weight (4) acrylic yarn, a 7mm hook for the starting chain, and a 6mm hook for the main square.
4. What can I make with the Drunken Granny Square?
The square works well in blankets, throws, cushions, or as a quirky accent in other projects.
5. Do I have to use stitch markers?
Stitch markers are optional but very helpful, especially for beginners—they make counting chains and placing blocks easier.
6. How do I keep my edges straight?
Make sure to finish each row with a double crochet into the chain three from the previous row, and count stitches often.
7. Can I change the square’s size?
Yes. Adjust the starting chain in multiples of five for a larger or smaller square, and add or reduce rows to change the height.
![]()
Christa Patel is the creator behind Secret Yarnery, known for her colorful, easy-to-follow crochet tutorials and patterns. With years of experience teaching beginners and seasoned crocheters alike, Christa’s friendly style makes learning new stitches stress-free and fun. She loves sharing quick tips, video lessons, and creative projects to help everyone grow their skills and confidence. Connect with Christa on YouTube, Instagram, or in the Secret Yarnery Crochet Community to find inspiration and support for all your yarn adventures.
About the Author
With a passion for crafting easy, beginner-friendly tutorials and patterns, Christa inspires crafters of all skill levels to unleash their creativity worldwide. She encourages yarn lovers to connect, create, and crochet a world filled with beautiful handmade treasures!
Part 7 - Secret Stitches Easy Stitch Sampler Blanket Pattern