Golden Gate Granny Square | Secret Stitches CAL Part 10
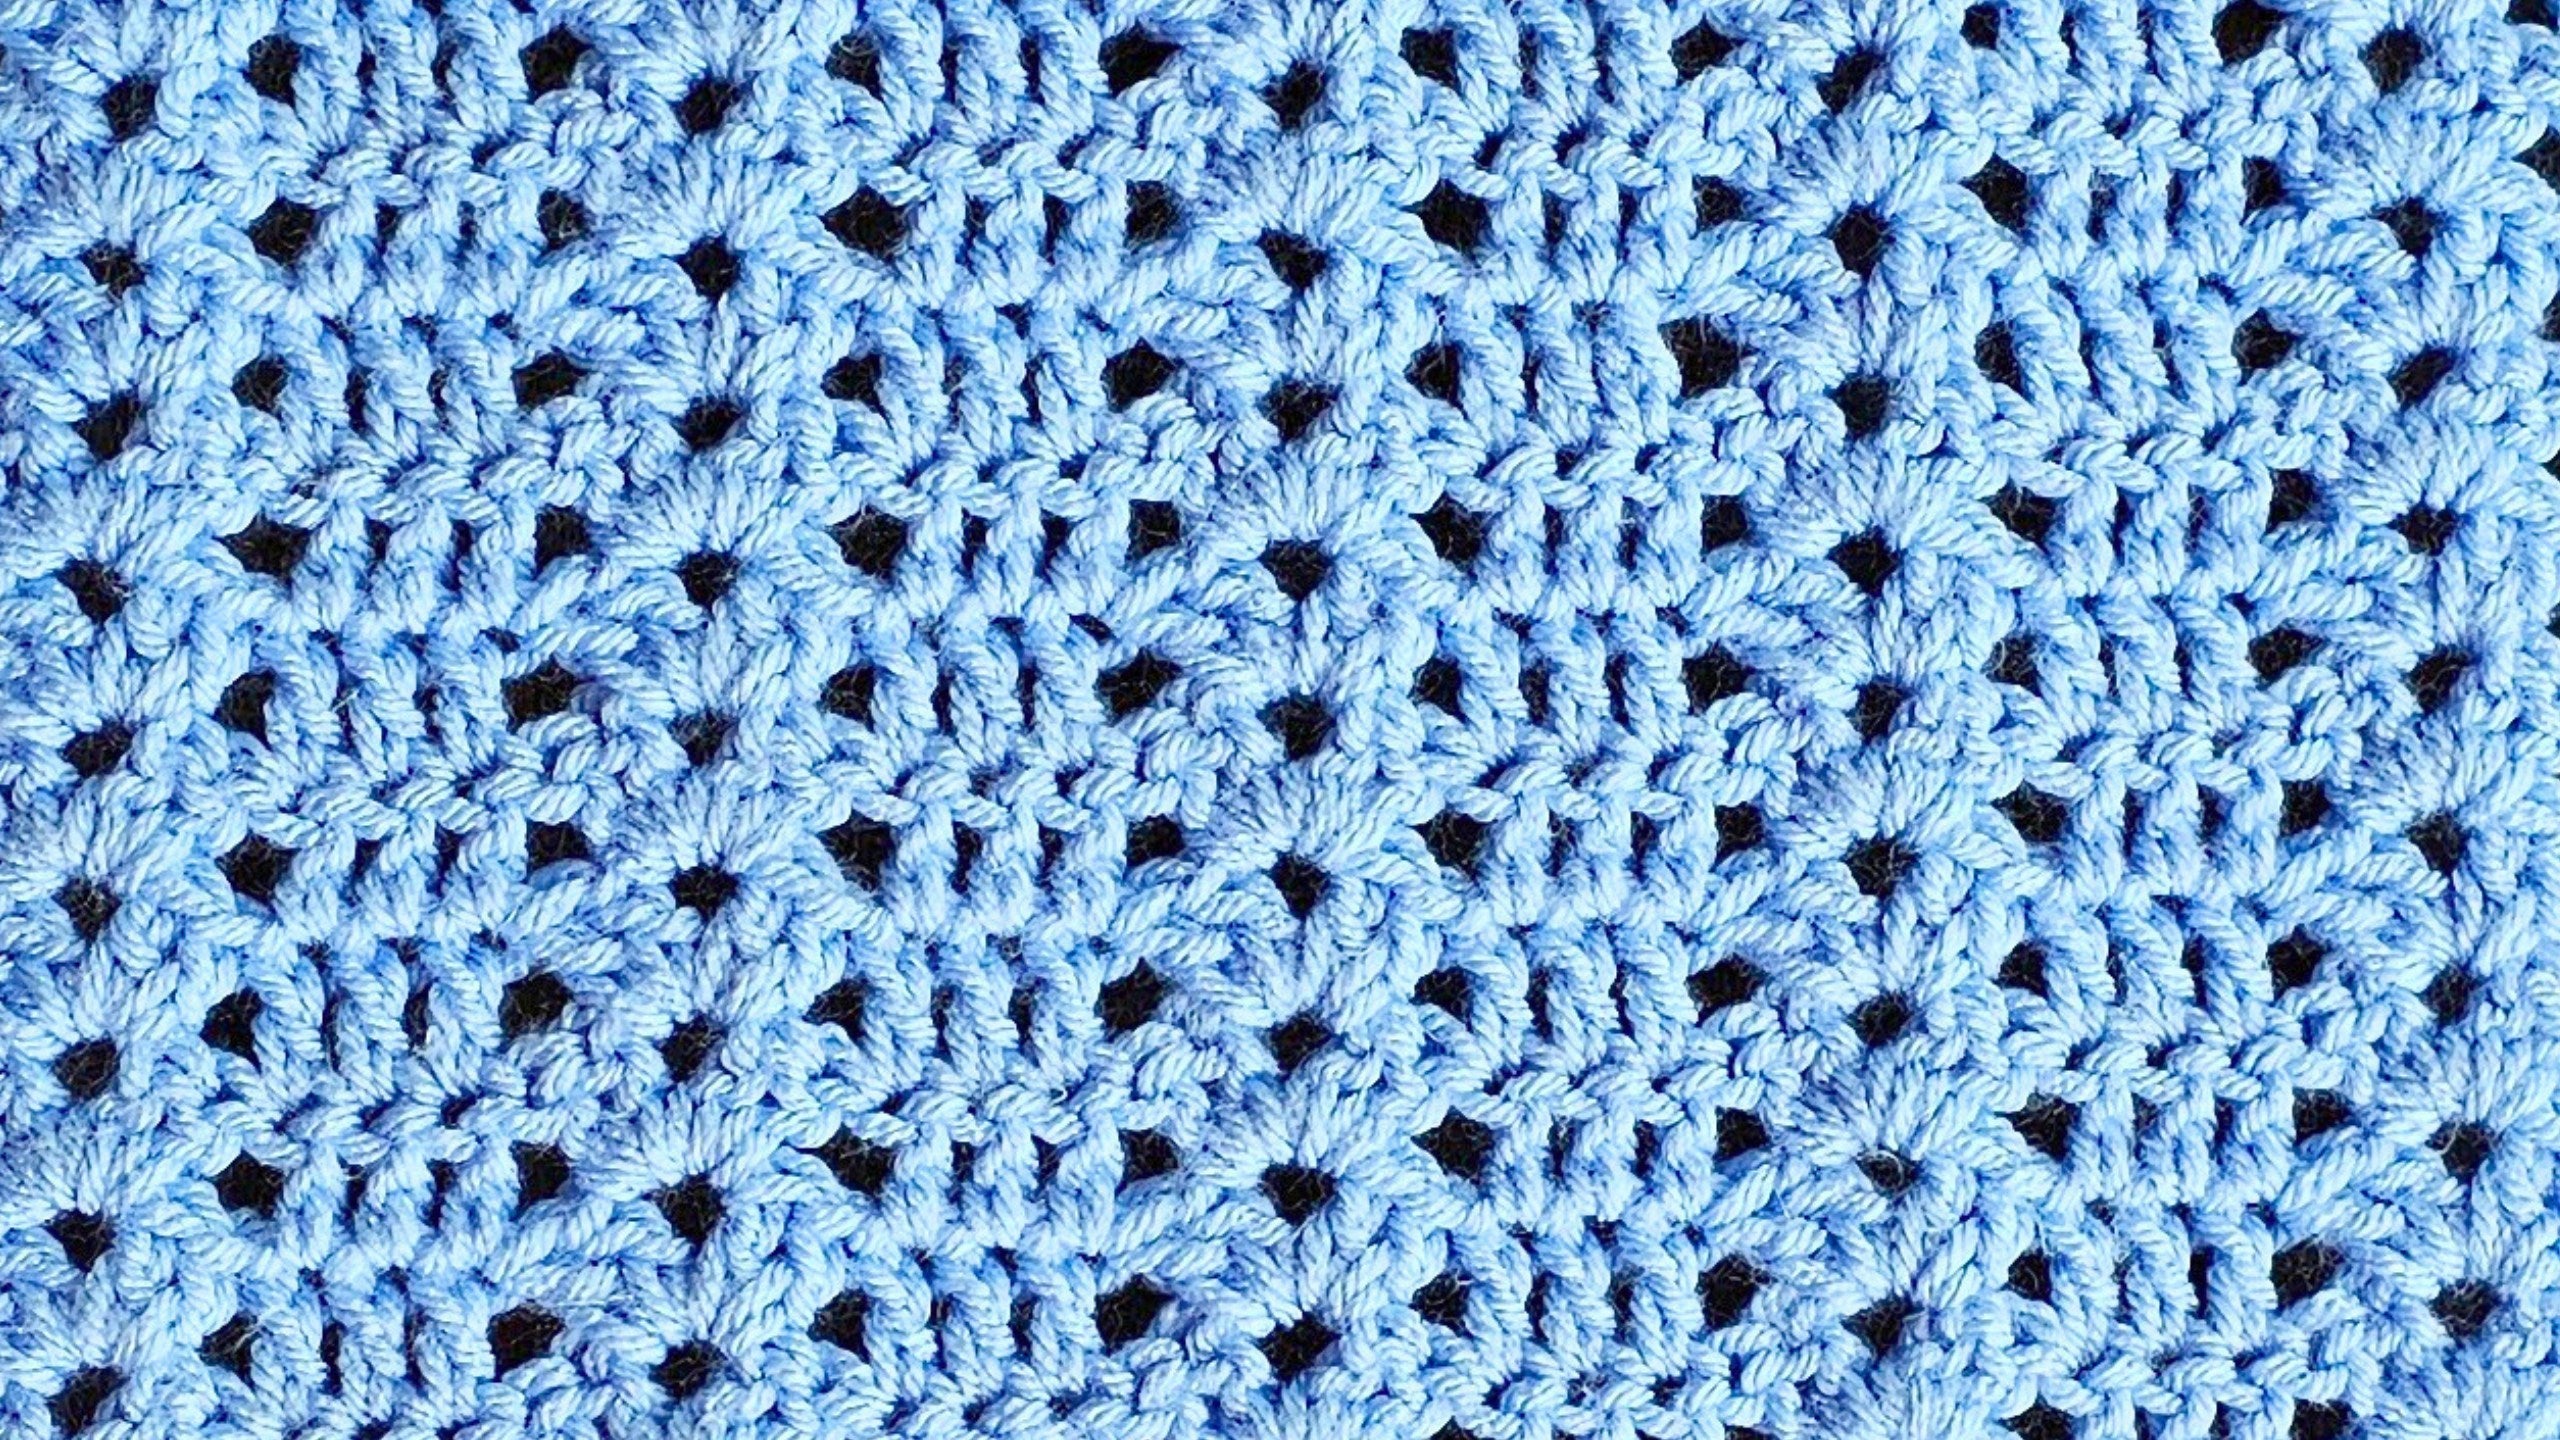
If you’re like me and love collecting granny squares, you probably know that not all of them are made equal. Some squares just have that perfect mix of beauty and simplicity. One of my recent favorites from the Secret Stitches CAL is the Golden Gate Granny Square. This square is Part 10 of the Crochet Along and truly stands out for its easy one row repeat and lovely texture. Whether you’re adding it to a blanket or a new project, it’s satisfying and quick to crochet!
The Golden Gate Granny Square mainly uses basic stitches—double crochets and chains—making it ideal for beginners and seasoned crocheters alike. If you enjoy visual learning or want a written pattern to follow along, you can find the Golden Gate Granny Square Pattern on my website. Having a video tutorial handy also makes the process even easier. Dive in and see how enjoyable it is to whip up these stunning squares!
Materials Needed for the Golden Gate Granny Square
When gathering supplies, keep it simple and use what’s comfortable for your hands.
- Yarn: I recommend Saver from Ice Yarns, but you can use any yarn that matches the weight and thickness of your other squares.
- Crochet Hook: 6mm hook works great for this pattern.
- Stitch Markers: You’ll need five. No markers? Grab paper clips or bobby pins as substitutes.
- Yarn Needle: For weaving in ends at the finish.
- Optional: Scissors for trimming tails.
Stitch markers might seem extra but they really help for accuracy, especially in the first row.

Understanding the Basic Stitches Used
Before starting, let’s review the stitches:
- Double Crochet (dc): Yarn over, insert the hook, yarn over again, pull up a loop, yarn over, pull through two loops, yarn over, pull through the last two loops.
- Chain (ch): Make a slip knot, pull a loop through for each chain.
- Back Loop: This refers to the “camel bump” on the back side of your chain, not the front Vs that most people work into.
- Chain Space: The space created by a chain or series of chains in previous rows.
If you’re brand new to these moves, check out the Beginner's Guide to Crochet. Stitch markers help a ton for new projects—they make it so much easier to find the correct back loops as you go.
Preparing Your Yarn and Hook
Start out by making a simple slip knot. Leave a long enough tail to weave in your ends later with a needle. Place the slip knot onto your hook and make sure the tail is loose and easy to manage. Set your five stitch markers within reach. As you begin, hold your chain with an easy grip—don’t make it too tight. This small adjustment makes a big difference when you’re rolling the chain over to find back loops later.

Creating the Initial Chain Base
I’ve found the best way to keep an even chain and not lose count is to break up the steps. Here’s how I chain my foundation for the Golden Gate Granny Square:
- Chain 10 stitches.
- Turn your chain sideways and locate the first back loop or camel bump (just under the working yarn). Place a stitch marker here.
- Chain another 10. Again, flip your chain and place a stitch marker in that first back loop.
- Repeat this until you reach 50 chains, using all five markers—one after every set of 10.
- Add three extra chains, totaling 53 chains altogether.
As you chain, pay attention to the tiny back bumps. Rolling your chain helps to spot them. Your markers will keep you from working into the wrong bump, so take your time with placement.
Working into the Back Loops vs Front Loops
Why use the back loop instead of the traditional front? Working into the back loop (that little camel bump) gives your foundation a smooth, neat edge. It also adds a bit of stretch and texture to your granny square.
Tip: If you struggle to get your hook into the back loops, it’s totally fine to work into the front instead. The look will be slightly different, but your square will still work out beautifully.

Row One: Beginning Your First Double Crochet
With your starting chain ready, begin row one:
- Skip three chains from the hook; work your first double crochet into the fourth (where your first stitch marker sits). Take out the marker if it gets in the way.
- Next, skip three chains again, working into the fourth chain. Into this back loop, make two double crochets, chain two, and then two more double crochets (this forms your first tower).
- After each tower, skip three and in the next section, place one double crochet in three consecutive stitches—these three create your deck.
- Keep alternating between towers (2 dc, ch 2, 2 dc in the same spot) and decks (3 dc, one in each chain) as you work across the row.
Your stitch markers will always guide you to the third double crochet spot in every deck section. This keeps everything in line and makes the pattern so relaxing once you get the rhythm.
Finishing Row One
Once you get to the end, you’ll usually have five chains left. Skip the first three, then double crochet into the last two chains. This neat little finish ensures your square has a straight edge. Double-check your end stitches match up and adjust if necessary.

Starting Row Two: Chain and Turn
To start the next row, chain three (acts as your first double crochet) and turn your work.
One simple way is to slide your hand under the working yarn, rotate the project towards yourself, and bring the hook to the ready position on the right side (for right-handers). Skip the very first stitch after your starting chain. The chain already counts as your first dc for the row.
Row Two: Working the Repeat Pattern
Now the fun rhythm of the Golden Gate Granny Square begins:
- In each tower’s chain 2 space from the previous row, build a new tower: 2 double crochets, chain 2, 2 double crochets.
- When you reach a series of 3 double crochets below (a deck), place one double crochet into each stitch directly above them—deck on deck.
- Skip two stitches between these repeats to keep alignment.
- Move from tower to deck and deck to tower all across the row.
Pattern summary:
- Chain 3 and turn.
- Double crochet in next stitch.
- Tower in tower’s chain space.
- Deck in deck’s three double crochets.
- Repeat pattern until the row’s end.
To finish, place one double crochet in the last dc and another in the top of your chain-three from the previous row.

Row Three: Beginning and Middle
For row three, chain three and turn. Again, skip that first stitch. Continue stacking towers on top of towers and decks on decks. You’ll notice a grid-like pattern emerging as you progress, with nice open sections from the towers and solid rows from the decks.
It helps to pause and look at your square every couple rows just to make sure everything is stacking right.
Row Three: Ending the Row
The last section is simple—work your dc into the final two stitches just as before, making sure your stitch count remains firm and your edges stay straight. Keep your tension even as you finish each row so that the sides of your square don’t flare or wobble.
Continuing the Repeat Rows
Keep repeating rows two and three. For most projects, you’ll want your Golden Gate Granny Square to match the other squares in your CAL. This usually works out to 19, 20, or 21 rows tall, depending on your tension and yarn. I find it handy to use a stitch marker at every tenth row to track my height or even a simple row counter.

Finishing the Last Row with Single Crochet and Chain 3 Spaces
Once your square is at the perfect height, you’ll finish off with a border row for structure:
- Chain 1 and turn your work.
- Single crochet in the very first stitch.
- Chain 3, then place two single crochets in the center space of the next tower.
- Chain 3 again. Single crochet into the center dc of the next deck.
- Repeat: two singles + chain 3 in towers, one single + chain 3 in decks.
- At the end, place your last single crochet in the top of the final chain three on that row.
- Chain 1, cut your yarn leaving a tail, and pull the yarn all the way through the last loop to secure.
Tip: Always leave a long enough tail to weave in securely later. Pull the yarn gently to “snug” it down without puckering your edge.
Securing and Weaving in Yarn Ends
After you’ve completed your Golden Gate Granny Square, thread the remaining yarn ends onto a yarn needle and weave them into the stitches. Hide tails inside the pattern for a tidy look and avoid trimming too close—you want them secure but not visible from the front.
Stitch Marker Tips for Tracking
Stitch markers aren’t just for the start! Use them in tricky spots, see where your sets of three double crochets should land, or mark your tenth row for easy counting. Paper clips and bobby pins work perfectly if you don’t have crochet markers on hand. When your stitch marker gets in the way, pop it out and move on to the next section. That way you’re always staying aligned.

Troubleshooting Common Challenges
Sometimes back loops can be tricky to find, especially in the starting chain. If your chain feels tight, it might compress those bumps and make things fiddly. Try chaining a bit looser at the base or switch to working through the front loops if you’re having trouble. Tension issues can lead to wonky edges—slow down, count up the stitches after every row, and rely on stitch markers to spot-check your accuracy. If you get lost, the Secret Yarnery Crochet Tutorials are there for visual refreshers.
Yarn and Hook Selection Advice
Matching your yarn’s weight and thickness with your other CAL squares keeps everything even for assembly later. I always reach for a 6mm hook for this pattern—it gives a cozy, soft result. If you’re after crisp stitch definition, try a cotton or cotton-blend yarn. For a more traditional feel, go with acrylic (like Saver from Ice Yarns), which is what I used in my tutorial. The results speak for themselves!
Understanding Towers and Decks
Let’s get specific about “towers” and “decks.” A tower is made up of 2 double crochets, chain 2, and another 2 double crochets, all in a single spot. It forms an open, airy section and adds structure. A deck is simply 3 double crochets in a row, one in each stitch, making that part of your row denser and firmer.
Towers give height and create those pretty arches, while decks fill in the space and keep the square sturdy. Alternating these two shapes makes the pattern easy to memorize but full of lovely texture.

Row Counting and Height Matching
How do you know when your square is tall enough? Match it against your previous squares or measure with a ruler. Most crocheters will end up with between 19 to 21 rows. Adjust as needed for your tension. Consistency is the name of the game, so your finished project goes together seamlessly.
Joining and Finishing Tips
Once you’ve finished and woven in your yarn tails, leave a tail long enough for joining if you’re assembling the squares into a blanket. A neat, well-secured tail means your work holds up to washing and plenty of use.
Making the Golden Gate Granny Square Uniquely Yours
One of my favorite things about this square is how easy it is to customize. Change up your yarn color for each row, or add contrasting borders to make each square pop. The open design of the towers pairs beautifully with variegated yarns, and the solid decks help display any colorway you like.
If you love collecting different granny square styles, check out my Golden Gate Collection for more ideas.
What To Do Next: Expanding Your Crochet Journey
Now that you’ve mastered the Golden Gate Granny Square, why not keep going? The Secret Stitches CAL includes many more square designs that you can mix and match for a truly unique blanket. If you’re looking for step-by-step help or want to see finished project ideas, browse through the Crochet Along Collection for even more inspiration.
Conclusion
The Golden Gate Granny Square combines easy stitches and a clever repeat to deliver beautiful results fast. This square shows how simple techniques, like alternating towers and decks, add so much texture and charm to any project. If you follow along with both the written pattern and the video, you’ll have your own stunning squares in no time.
It’s always rewarding to see everyone’s unique color choices—share your Golden Gate creations with the community and inspire others! If you need clarification on any step, revisit my crochet tutorials or leave your questions in the comments.
Keep your hook moving and enjoy the process. I'm so glad you stopped by for another pattern adventure. Happy crocheting!
Left Handed?
FAQs
1. What yarn type and hook size work best for this pattern?
Use medium-weight (worsted) yarn like Saver from Ice Yarns and a 6mm crochet hook. This combo gives you a square that’s soft but holds its shape. Feel free to match the yarn weight to your other CAL squares.
2. Can beginners make the Golden Gate Granny Square?
Yes, this pattern is beginner-friendly! It uses simple double crochet and chains. The written steps and video tutorial make it easy to follow for first-timers.
3. Why use stitch markers in this pattern?
Stitch markers help you keep your place in long chains and mark important stitch spots. This makes it easier to get even rows and avoids missing stitches, especially when working into the back loops.
4. How do I keep my starting chain from being too tight?
Crochet your initial chain loosely, or use a larger hook for the foundation chain. This makes it easier to work into the back loops and keeps your square from curling.
5. What’s the difference between towers and decks?
Towers are made with 2 double crochet, chain 2, and 2 double crochet in one spot, creating open spaces. Decks are 3 double crochet in a row, making a denser section. Alternating these shapes gives the square its pattern.
6. How many rows should my square have?
Most squares in the CAL are 19–21 rows tall. Check your height by laying your square next to others or measuring with a ruler. Adjust for your tension if needed.
7. Can I change colors each row?
Yes! Switch yarn colors between rows or create stripes for a custom look. The pattern looks great with both solid and mixed yarns.
8. My square’s edges look wavy or uneven. What should I do?
Check your tension and stitch count at the end of each row. Using markers at the row’s start or end helps keep sides straight. If needed, block your finished square to even it out.
9. Do I need to add a border before joining squares?
It’s optional. A single crochet border adds structure and can make assembly easier, but you can join straight away if your edges are even.
![]()
Christa Patel is the creator behind Secret Yarnery, where she shares easy-to-follow crochet patterns, tutorials, and inspiration for yarn lovers around the world. With years of experience teaching crochet both online and in person, Christa is known for her encouraging style and clear instructions that make every project approachable.
Through her YouTube channel and website, she helps beginners build confidence and guides seasoned crafters in exploring new techniques. Christa believes in making crochet joyful, fun, and accessible to all.
About the Author
With a passion for crafting easy, beginner-friendly tutorials and patterns, Christa inspires crafters of all skill levels to unleash their creativity worldwide. She encourages yarn lovers to connect, create, and crochet a world filled with beautiful handmade treasures!
Part 10 - Secret Stitches Easy Stitch Sampler Blanket Pattern