Easy Crochet Blanket for Beginners: Dirty Granny Baby Blanket Guide
Looking for a crochet project that’s both simple and satisfying? The Dirty Granny blanket is your answer! It’s so easy to make and is a great way to learn about crochet! Plus, the repetitive nature of this project makes it a fantastic way to relax and unwind. Keep reading to learn how to make this amazing project.
What is the Dirty Granny Blanket?
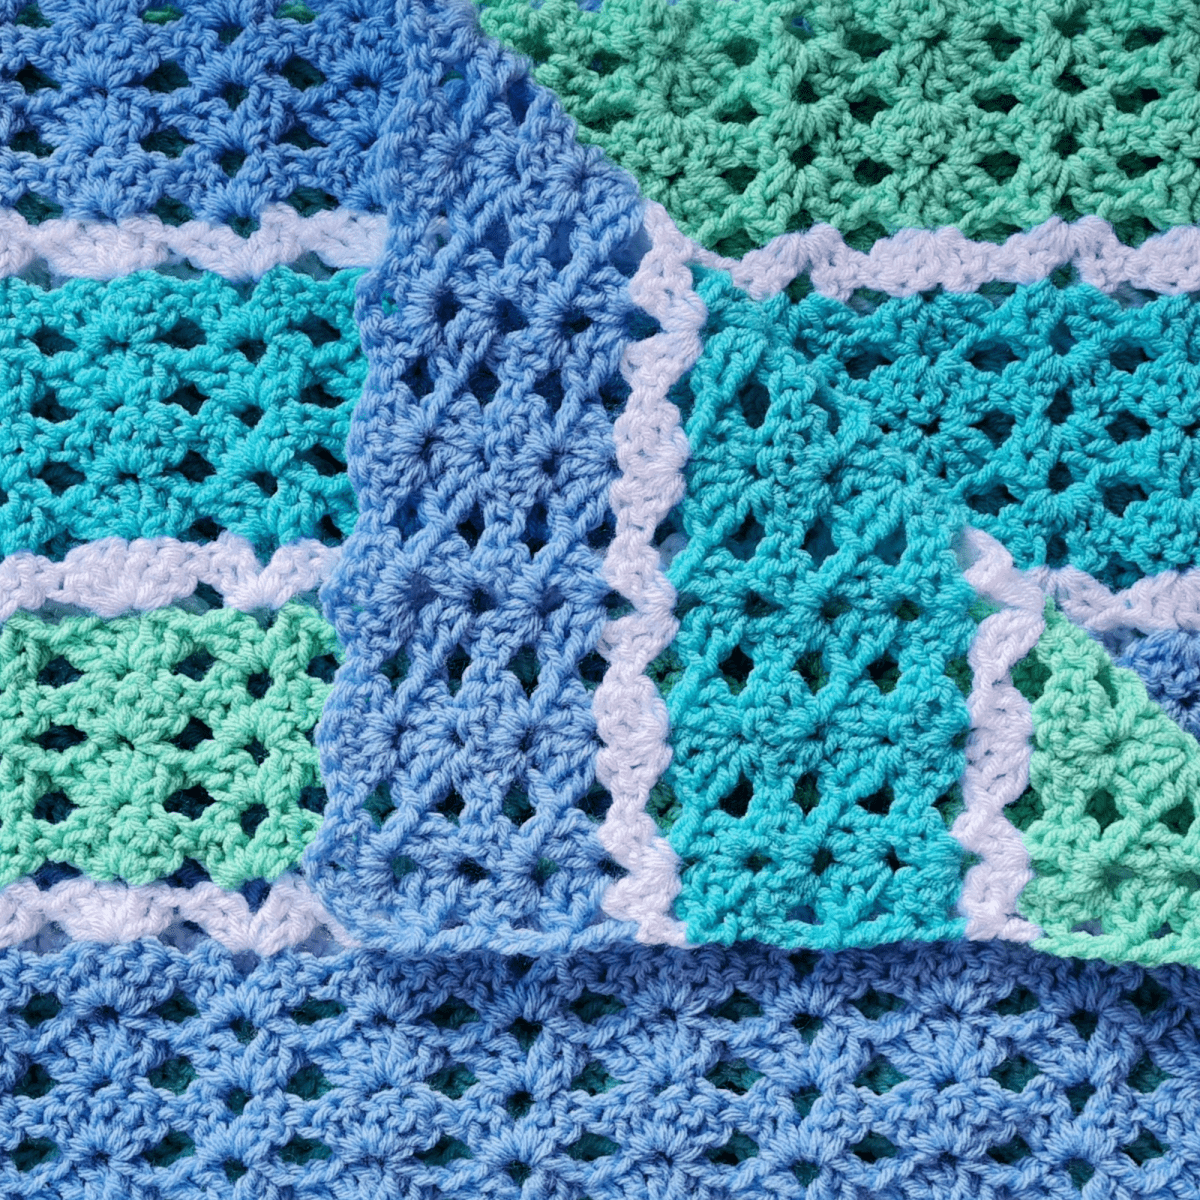
Don't let the name fool you! The "dirty granny" stitch isn't really dirty. It's just a fun, modern take on the classic granny square. This blanket uses a simple variation that focuses on basic crochet stitches. The best part? It’s a one-row repeat, making it incredibly easy to memorize. This means you can work on it while watching TV, listening to a podcast, or just enjoying some quiet time. Because of how simple it is, it works up really quickly! In the video tutorial, Christa makes a blanket that is 38 inches wide and 48 inches tall using specific yarn colors.
Why You'll Love This Project
This project is perfect for beginners because it only uses a few basic stitches. If you're a crochet enthusiast looking for easy patterns, The Secret Yarnery is a treasure trove of amazing crochet patterns, tutorials, and inspiration for both beginners and advanced crocheters. The repetitive pattern is super satisfying, and you'll see results quickly. Plus, you can totally customize it to fit your style! You can adjust the size by changing the starting chain and choose any colors you like. Ready to get started? Let's dive in!

Materials You'll Need
To make your own Dirty Granny baby blanket, you'll need a few essential supplies. Here's a breakdown:
-
Yarn: For the blanket in the tutorial, you'll need about 600 grams of worsted weight acrylic size 4 yarn. This is broken down into 200 grams of each of your three main colors, and less than 100 grams of white for the accent rows. Feel free to use any colors you like! Christa used specific yarns in the tutorial, and you can find similar options if you wish.
-
Crochet Hooks: You'll need two different sized hooks: an 8mm hook for the foundation chain and a 7mm hook for the rest of the blanket. If you don't have those exact sizes, you can use a 6mm hook, just make sure to chain very loosely!
-
Other Supplies:
- You'll need 13 stitch markers to help keep track of your place.
- A darning needle is essential for weaving in those pesky ends.
- And, of course, you'll need a trusty pair of scissors to cut your yarn.
Getting Started: Chain Foundation
The foundation chain is the base of your entire blanket, so it's important to get it right.
-
Understanding Multiples: The chain needs to be a multiple of eight because that's the number of stitches in each pattern repeat.
-
Creating a Slip Knot: To start, make a slip knot. Wrap the yarn around your fingers, creating a loop. Then, pull the yarn through the loop to form a knot. Place the slip knot on your larger hook.
-
Chaining in Sets of Eight: Now, chain eight stitches. That means yarn over, pull through, yarn over, pull through, eight times. Try to keep your tension consistent, not too tight, and not too loose.
-
Using Stitch Markers: Stitch markers are your friends! They help you keep track of your stitch count and ensure you're maintaining the pattern. After each set of eight chains, find the back loop (the "camel bump" on the back of the chain) and place a stitch marker there.
-
Visual Aid: Imagine a neat row of "V" shapes. You want to insert your hook into the back of each "V".
Continue chaining eight and placing stitch markers until you've reached your desired width. Chaining 104 will give you the same width as Christa's blanket (38 inches/96 cm), but you can use any multiple of eight to customize the size!
![]()
Row 1: Laying the Foundation
Row 1 is where the magic starts to happen!
-
Hook Switch: If you used a larger hook for the chain, switch back to your regular hook now.
-
Chain One: Chain one stitch.
-
Finding the Sixth Chain: Now, find the sixth chain from your hook. Count back six chains, and that's where you'll start working.
-
Creating the "Glass" Stitch (or "Shell"): This stitch is also called the "shell" stitch. In that sixth chain, work two double crochets, chain two, and then two more double crochets all into the same chain.
-
Skipping Chains: This is important! Skip the next three chains.
-
Creating the "Olive" Stitch (or "Cluster"): This stitch is also known as a "cluster". Into the next chain (the fourth one after skipping three), work five double crochets all into the same chain.
-
Alternating Stitches: Now, repeat the pattern: skip three chains, then create either a "glass" or an "olive." Keep alternating these stitches across the row.
-
Using Stitch Markers as a Guide: If you're unsure where to place your next stitch, check your stitch markers! They should line up with the chains where you need to work.
-
Finishing the Row: To finish the row, skip two chains and work one double crochet into the very last chain. This creates a nice, straight edge for your blanket.
Row 2 (and Beyond): The Repeat
Row 2 is where the rhythm kicks in! This is the row you'll be repeating over and over again.
-
Turning Chain: Chain three and turn your work. You can use the hand-sliding turning technique, sliding your hand underneath your working yarn, grab your work and turn it to line up the chain. This gets you ready to start the next row.
-
Maintaining the Pattern: Remember the golden rule: "Glasses get glasses and olives get olives." This means you'll work a "glass" stitch into every "glass" stitch from the previous row, and an "olive" stitch into every "olive" stitch.
-
Working into the "Glass" Stitch: To work into the "glass" stitch, create a "glass" stitch into the center space (the chain-2 space) of the "glass" from the previous row.
-
Working into the "Olive" Stitch: This can be a little tricky at first. Find the third stitch (the top of the "hill") of the "olive" from the previous row. Then, create an "olive" stitch into that third stitch.
-
Repeating the Pattern: Keep repeating the pattern of alternating "glass" and "olive" stitches across the row.
-
Finishing the Row: End the row with one double crochet into the top of the turning chain from the previous row.
-
Row 3 Recap: Row 3 is exactly the same as Row 2! Just keep repeating the pattern.
-
Tips for Maintaining Even Tension: To keep your blanket from becoming wonky, try to maintain even tension throughout. That means keeping your stitches consistently snug, not too tight and not too loose.
![]()
Changing Colors
Changing colors is a great way to add visual interest to your blanket.
-
When to Change Colors: You can change colors at the end of any row. A nice pattern is to change after a set number of rows, like four rows of a color followed by one row of white.
-
The Color Change Technique: Here's how to do it seamlessly:
- Start the last double crochet of the old color, but don't finish it.
- Cut the old yarn, leaving a long tail (about 5-6 inches).
- Make a slip knot with the new color.
- Finish the double crochet with the new color.
-
Securing the Yarn: Drop the tails of both yarns, hold them along the back of your work, and snug down the new yarn to secure it.
-
Continuing the Pattern: Chain three and turn your work to begin the next row with the new color.
Finishing the Blanket: The Border
The border gives your blanket a polished, finished look.
-
When to Add the Border: Add the border when the blanket reaches the desired height.
-
Starting the Border: Chain one, turn your work, and create one single crochet into the first stitch.
-
Creating the Chain Loops: Chain two and create one single crochet into the first "glass" space. Then, chain three (loosely!) and create one single crochet into the third stitch of the "olive".
-
Repeating the Border Pattern: Repeat the pattern of alternating chain loops and single crochets across the row.
-
Finishing the Border: Chain two and create one single crochet into the top of the turning chain from the previous row.
-
Securing the Yarn: Chain one, cut the yarn, and pull it through to secure.

Weaving in the Ends
Weaving in the ends is an essential step to prevent your blanket from unraveling.
-
Importance of Weaving in Ends: It creates a neat, professional finish.
-
Weaving Technique: Use a darning needle to weave the yarn tails into the back of your work, matching the color of the yarn. Weave in different directions to secure the ends. You can even split the yarn to make it extra secure.
-
Trimming Excess Yarn: Once you've woven in the ends, trim any excess yarn.
Blocking (Optional)
Blocking is a process that can improve the drape and appearance of your blanket.
-
What is Blocking? Blocking is a technique used to shape and set your finished crochet project.
-
Why Block? It can even out stitches, improve the drape, and give your blanket a more professional look.
-
Blocking Methods: There are different blocking methods, like wet blocking and steam blocking.
Customization Ideas
Want to make your Dirty Granny blanket truly unique? Here are some ideas:
- Color Combinations: Experiment with different color palettes! Try using complementary colors (like blue and orange) or analogous colors (colors that are next to each other on the color wheel).
- Size Adjustments: You can easily adjust the size of the blanket by changing the starting chain and adding or removing rows.
- Border Variations: There are tons of different border options! Try a picot border, a shell border, or a simple single crochet border.
- Yarn Substitutions: You can substitute different types of yarn, like cotton, wool, or bamboo.
Tips for Beginners
If you're new to crochet, here are a few tips to help you succeed:
- Practice Makes Perfect: Practice the basic stitches (chain, single crochet, double crochet) before starting the blanket.
- Don't Be Afraid to Make Mistakes: Mistakes are part of the learning process! Don't get discouraged.
- Take Breaks: Crochet can be hard on your hands, so take breaks to avoid fatigue.
- Watch the Video Again: If you're confused about something, re-watch that section of the video tutorial.
- Tension: Keep an eye on your tension, how tight or loose the yarn is making the work. Try to keep the tension consistent with each stitch.
Common Mistakes and How to Avoid Them
Even experienced crocheters make mistakes! Here are some common ones and how to avoid them:
- Incorrect Stitch Count: Use stitch markers to keep track of your stitch count. Count your stitches carefully at the end of each row.
- Uneven Tension: Relax your hands and use a consistent grip.
- Wonky Edges: Make sure you're working the correct number of stitches in each row and that your tension is consistent.
- Skipping Stitches: Pay close attention to the pattern and count your stitches.
- Yarn Splitting: Use a hook with a rounded head to avoid splitting the yarn.
Left Handed?
Frequently Asked Questions
Here are some common questions about this project:
-
What if I don't have the exact yarn specified?
- You can substitute with any worsted weight yarn.
-
Can I make this blanket bigger or smaller?
- Yes, adjust the starting chain and add/remove rows.
-
What does "working into the back loop" mean?
- It means inserting your hook into the back loop of the stitch instead of both loops.
-
How do I weave in the ends so they don't come undone?
- Use a darning needle to weave the yarn tails into the back of your work, matching the color of the yarn. Weave in different directions to secure the ends.
-
My blanket is curling. What am I doing wrong?
- This is often due to tension. Try to relax your hands and loosen your stitches.
-
I'm left-handed. Can I still follow this tutorial?
- Yes! There's a left-handed version of this tutorial!
Sharing Your Progress
I'd love to see your finished Dirty Granny blankets! Share them on social media using the hashtag #SecretYarnery. You can also find me on social media.
More Crochet Patterns from The Secret Yarnery
Looking for more crochet inspiration? Here are some other patterns you might enjoy:
Conclusion
The Dirty Granny blanket is a fun, easy, and satisfying project for crocheters of all skill levels. I hope you enjoyed this tutorial and that you're inspired to create your own beautiful blanket! Subscribe to my channel for more tutorials. Thanks so much for hooking along!
What is Crochet?
Crochet is a craft that uses a hook to create fabric from yarn or thread. Unlike knitting, which uses two needles, crochet uses just one hook to interlock loops of yarn. The name "crochet" comes from the French word for "hook." Crochet is believed to have originated in the 16th century.
Crochet Stitches
Here are some basic crochet stitches that are useful for beginner projects:
- Slip Knot: The first knot that starts the project.
- Chain Stitch: The foundation of most crochet projects.
- Single Crochet: A basic stitch that creates a dense fabric.
- Double Crochet: A taller stitch than single crochet, creating a more open fabric.
- Half Double Crochet: A stitch that falls between single and double crochet in height.
How to Read a Crochet Pattern
Crochet patterns can seem intimidating at first, but they're actually quite simple once you understand the basics.
-
Abbreviations: Crochet patterns use abbreviations to save space. Some common abbreviations include:
- ch = chain
- sc = single crochet
- dc = double crochet
- sl st = slip stitch
- rep = repeat
- Following Instructions: Pay close attention to the instructions in the pattern. They will tell you which stitches to use and where to place them.
- What to Look for in Patterns: Look for patterns that are clearly written and include helpful diagrams or photos.
Tools for Crochet
Here are some essential tools for crochet:
- Crochet Hooks: They come in different sizes, so choose the size that's recommended for your yarn.
- Yarn: Choose a yarn that's appropriate for your project.
- Scissors: For cutting yarn.
- Stitch Markers: To mark important stitches.
- Darning Needle: For weaving in ends.
- Measuring Tape: To measure your project.
Types of Yarn
Yarn comes in many different types and fibers. Here are some common ones:
- Wool: A natural fiber that's warm and durable.
- Cotton: A natural fiber that's soft and breathable.
- Acrylic: A synthetic fiber that's inexpensive and easy to care for.
- Blend: A combination of different fibers.
Ply refers to the thickness of the yarn. Each yarn is useful for different projects!
Here are additional Frequently Asked Questions (FAQs) you can include for the Dirty Granny Baby Blanket tutorial:
Additional Frequently Asked Questions
1. How long does it take to make the Dirty Granny blanket?
The time it takes depends on your skill level and how much time you dedicate to it. For beginners, it may take around 12-15 hours. Experienced crocheters can complete it faster, within 8-10 hours.
2. What if my blanket isn’t straight on the edges?
Uneven edges are often the result of inconsistent tension. Remember to double-check your stitch counts at the end of each row and keep a steady tension throughout. Blocking the finished piece can help smooth out uneven edges as well.
3. Can I use a different hook size for this blanket?
Yes, you can use a different hook size, but keep in mind it will affect the final size and texture of the blanket. If you choose a smaller hook, the blanket will be tighter and smaller. Using a larger hook will give a looser, more open texture.
4. Why do I need stitch markers? Can I skip them?
Stitch markers help keep your count accurate and save time in the long run. While experienced crocheters could skip them, they are highly recommended for beginners to avoid errors.
5. Is the Dirty Granny stitch suitable for other projects?
Definitely! You can use the Dirty Granny stitch for scarves, shawls, dishcloths, and more. Its repetitive nature makes it versatile, and it looks beautiful on a variety of items.
6. What should I do if I accidentally skip a stitch in the middle of a row?
If skipping a stitch doesn't seriously affect the pattern, you can continue and fix it with some adjustments. However, if it disrupts the design, you may need to unravel the row and fix the mistake.
7. Can I make this blanket without changing colors?
Absolutely! Using a single color creates a classic, monochromatic look. You can also use variegated yarn for a unique color-changing effect without needing to switch yarns.
8. How do I know how many rows to crochet?
The number of rows depends on the desired height of your blanket. In the tutorial example, Christa uses 48 rows (each row is roughly 1 inch tall). You can adjust this based on your preference.
9. What is the best yarn for baby blankets?
Soft, machine-washable yarn such as acrylic, cotton, or blends is ideal for baby blankets as they are gentle on the skin and easy to care for.
10. How can I prevent yarn from tangling while crocheting?
Use a yarn bowl or a yarn organizer to keep the skein from rolling around. Remember to only pull out the amount of yarn you need as you crochet.
![]()
Christa Patel is the creative force behind The Secret Yarnery, a hub for crochet enthusiasts worldwide. With years of crochet experience, Christa is passionate about making crochet accessible and enjoyable for everyone, regardless of skill level. Her engaging tutorials and easy-to-follow patterns have inspired thousands to pick up their hooks and start creating.
Known for her clear instructions, helpful tips, and vibrant personality, Christa specializes in beginner-friendly projects like blankets, shawls, and practical decor pieces. Whether you're an absolute beginner or a seasoned crocheter, Christa’s approachable teaching style ensures your crochet journey is both fun and rewarding.
Beyond crochet, Christa values community and shares her passion on social media, connecting yarn lovers and showcasing creative designs from her audience. Want to follow along on her crochet adventures? You can find Christa at The Secret Yarnery or on her popular YouTube channel for more tutorials, tips, and inspiration.
Christa lives in Kenya, surrounded by sunshine and lots of yarn, where she continually inspires creativity and crochet joy in her followers.
About the Author
With a passion for crafting easy, beginner-friendly tutorials and patterns, Christa inspires crafters of all skill levels to unleash their creativity worldwide. She encourages yarn lovers to connect, create, and crochet a world filled with beautiful handmade treasures!
Easy Crochet Blanket for Beginners: Dirty Granny Baby Blanket Guide