Easy Crochet Shawl for Beginners: Wandering Granny Shawl!
Are you tired of crochet patterns that seem more like puzzles than projects? Do you long for a relaxing crochet experience where the stitches flow easily, and your mind can wander? Then, let me introduce you to the Wandering Granny Shawl! This beginner-friendly pattern uses simple repeats and clear instructions, so you can relax and crochet with confidence. Even if you're new to crochet, you can create this gorgeous shawl
What is the Wandering Granny Stitch?
Ever wonder where the name "Wandering Granny" comes from? Well, it perfectly describes the nature of this project! The "Wandering" aspect comes from the up-and-down motion of the crochet pattern. As you work, your hook moves between "hills" and "valleys," creating a rhythmic flow that allows your mind to wander as you create something beautiful.
Project Overview
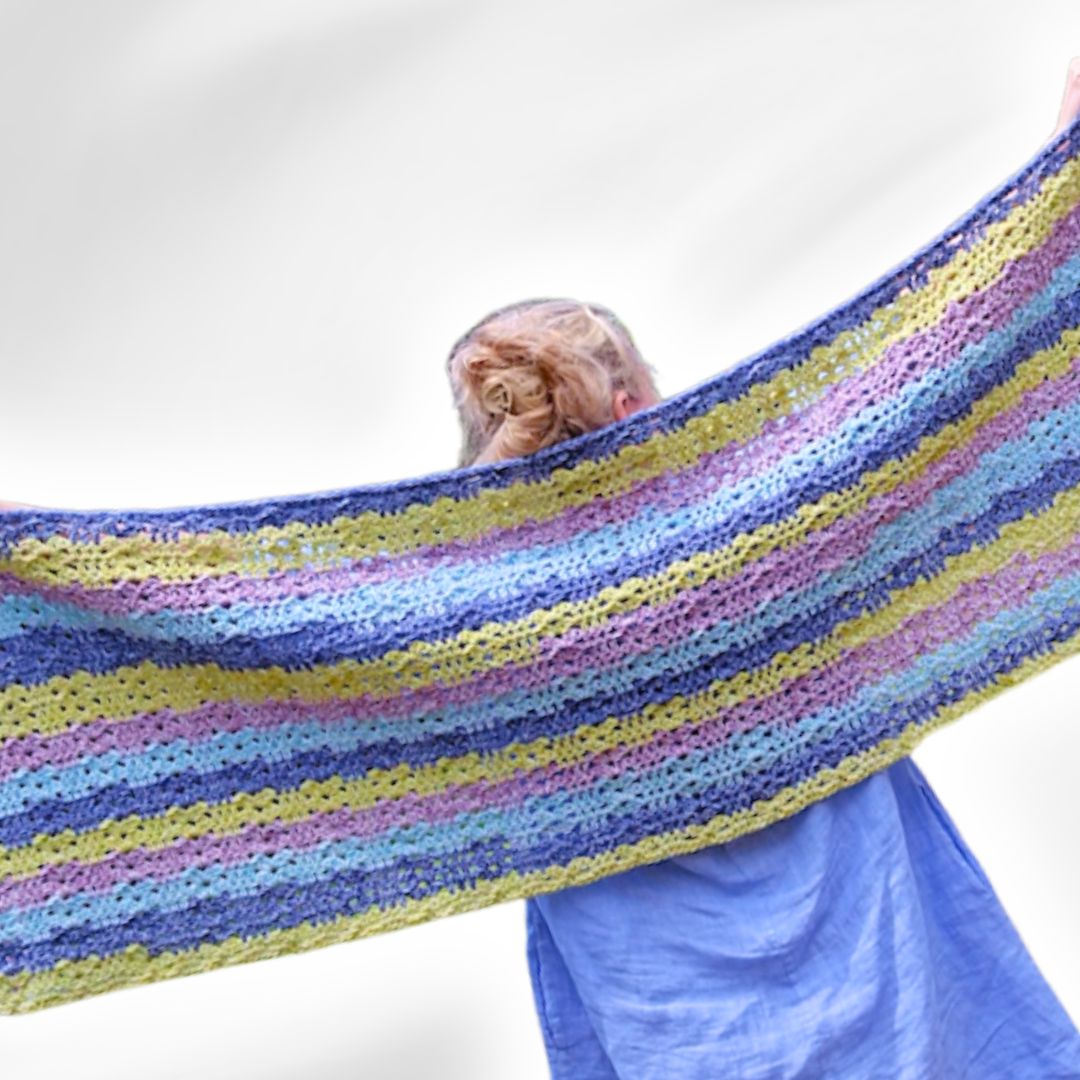
The Wandering Granny Shawl is a rectangular shawl featuring a simple, repeating stitch pattern. This creates a beautiful, textured fabric. The pattern is easy to memorize, making it perfect for relaxing evenings or crocheting on the go. It is finished with an optional border on the two narrow ends for an extra splash of pizzazz. But, you're welcome to make it without the border, just leaving the nice straight edge that's automatically part of the pattern. You can find even more crochet border patterns in my patterns collection.
Materials You'll Need
To make your own Wandering Granny Shawl, you'll need a few basic materials:
-
Yarn:
- Four cakes of worsted weight acrylic yarn (size 4). I used Cakes Splash from Ice Yarns (140 grams, 225 meters per cake) for the original shawl. Any similar worsted weight acrylic will work beautifully. If you are looking for other project ideas, you could even create the Cakes & Candles 1 Ball Shawl – Quick and Practical using just one ball of yarn.
- A small amount of white yarn for the border (optional).
- Hook: 7 mm crochet hook.
- Stitch Markers: Stitch markers for the starting chain. I used 22 stitch markers for my width, but the number you need may vary.
- Yarn Needle: A yarn needle for weaving in those pesky ends.
- Sharp Tip Needles: For weaving in the ends, these sharp tip needles from my Amazon store are perfect! As an Amazon Associate I earn from qualifying purchases. You can find all my favorites in my Amazon Store.

Finished Size
The finished size of your Wandering Granny Shawl will depend on your tension and the yarn you use. However, here are the approximate dimensions:
- Without Border: 58 inches long by 22 inches wide.
- With Border: 72 inches long by 22 inches wide.
Sizing Adjustments
Want to make your shawl a different size? No problem! You can easily customize the size of your shawl to fit your needs.
To change the width, use any multiple of 10 for your starting chain. For example, if you want a wider shawl, you could start with a chain that's a multiple of 10, like 230 or 240.
To adjust the length, simply add or subtract rows of the repeat pattern. Keep in mind that it's important to end with an odd number of "shell rows" for the border to work out correctly.
Getting Started: Two Options for the Foundation
There are two ways to begin your Wandering Granny Shawl, and both are beginner-friendly:
- Larger Hook Method: Use an 8 mm crochet hook for your chain, then switch to the 7 mm hook for the rest of the pattern. This creates a looser foundation chain, which can be easier to work into.
- Chainless Foundation: This method eliminates the need to work into a tight chain, creating a more flexible and comfortable starting edge. It's a bit trickier, but well worth the effort!

Chainless Foundation: Step-by-Step Instructions
Ready to try the chainless foundation? Here's a detailed breakdown of each step:
-
Step 1: Make a Slip Knot
- Create a slip knot and place it on your hook.
-
Step 2: Chain Two
- Chain one, then chain two.
-
Step 3: Work into the First Stitch
- Insert your hook into the very first stitch (the one closest to the slip knot), with just one strand on your hook.
- Bring your yarn back and pull your hook up a little bit. I kind of pull my hook so it's facing up.
- Chain one.
-
Step 4: Make a Single Crochet
- Hold the open space with your thumb. I'm just going to hold this open right here, that little spot with my thumb.
- Wrap and take off two loops.
-
Step 5: Push your hook in
- Push your hook in right where your thumb was holding those stitches.
- Bring your yarn back through and just pinch your work and pull your hook up to that 12:00 position on a clock and chain one.
-
Step 6: Separate Three Strands
- Separate them. I want two underneath my thumb and one on top.
- Now wrap and do your single crochet.
-
Step 7: Push your hook in again
- Now I'm just going to push my hook right where my thumb is.
- That gets those perfect two loops on your hook.
- Bring your yarn back through. Grab your work. Just pinch it with your thumb and fingers.
- Pull your hook up to 12:00 and chain one.
-
Step 8: Repeat
- Repeat steps 6 and 7 until you have the desired length. Remember to keep the tension loose and relaxed.

Chain Method: Instructions
If the chainless foundation is proving too fiddly, don't worry! The traditional chain method works just as well.
Simply chain 221 using an 8 mm hook. Then, switch to a 7 mm hook and make one single crochet into the second stitch from the hook, and continue with single crochets all the way back down along your row. Easy peasy!
Adding Stitch Markers
Once you have your chainless foundation or chain, it's time to add those stitch markers! This will help you keep track of your stitch count and ensure your shawl is the correct width.
Place stitch markers every 10 stitches along your foundation.
-
Chainless Foundation
- The first stitch is right there with the chainless foundation, so that is stitch number one right there.
- You're just going to count to 10.
-
Chain Method
- Chain 221 using an 8 mm hook.
First Row: Creating the Hills and Valleys
The first row is where the magic happens! This is where you'll establish the "hills" and "valleys" that give the Wandering Granny Shawl its unique texture.
-
Step 1: Chain Two and Turn
- Chain two and turn your work.
-
Step 2: Double Crochet into the First Stitch
- Make one double crochet into the very first stitch.
-
Step 3: Skip and Create the First Hill
- Skip three stitches. In the fourth stitch, create a "hill": two double crochets, chain two, and two double crochets all into the same stitch.
-
Step 4: Skip and Create the Valley
- Skip three stitches again. Into the next three stitches, make one double crochet into each. This creates a "valley."
-
Step 5: Repeat
- Repeat steps 3 and 4 across the row, alternating hills and valleys.
-
Step 6: Finish the Row
- At the end of the row, skip three stitches and make one double crochet into each of the last two stitches.

Understanding Hills and Valleys
So, what exactly do these "hills" and "valleys" look like?
The hills are the raised sections created by the two double crochets, chain two, and two double crochets. The valleys are the flatter sections created by the three double crochets.
The Repeat Rows: Wandering Up and Down
Now comes the fun part – the repeat rows! This is where the pattern becomes super easy to memorize and the "wandering" really begins.
- Hills get hills: 2 double crochet, chain 2, 2 double crochet.
- Valleys get valleys: 3 double crochet.
Here's the step-by-step:
-
Step 1: Chain Two and Turn
- Chain two and turn your work.
-
Step 2: Double Crochet into the First Stitch
- Into this very first stitch, right where our chain is right there, we're going to make one double crochet.
-
Step 3: Hill into Hill
- Jump straight over into our very first hill, just into the center of that hill right there, and we're going to make a hill.
-
Step 4: Double Crochet
- Into each of those double crochets down below, one double crochet into each.
-
Step 5: Repeat
- Repeat steps 3 and 4 across the row.
Ending the Repeat Row
To finish the repeat row, work into the top of the chain, making two double crochets into the top of the chain. This will create a nice, clean edge.

Determining the Shawl Length
Keep repeating the repeat row until your shawl reaches the desired length. Remember, it's important to end with an odd number of "shell rows" (rows with hills).
For mine, I ended on 30, but I should have ended on 31 or 29. So for you, end on 29 or 31 or whatever number you get to, but just have it as an odd number of these shell rows.
Joining a New Cake of Yarn
If you're using a variegated yarn like I did, you may need to join a new cake of yarn before you reach the end of a row. Here's how to do it seamlessly:
-
Step 1: Join the same color yarn
- You want to join the same color yarn.
- You can check in the center of your balls or your cakes if you have the same color in the middle.
-
Step 2: Dismantle It A Bit
- You can decide whichever cake you want to use and kind of dismantle it a bit.
-
Step 3: Join with a magic knot
- I'm just going to join with a magic knot.
- You can find tutorials for the magic knot on YouTube.
-
Step 4: Slide those two tails together
- After you have joined your yarn, just slide those two tails together.
- Shrink it up. If it's going to break, this is a great time.
- So pull as much as you can. Get the strongest person in your house to pull on this yarn.
- It's fine. If it breaks, do it again or sew in your tails.
-
Step 5: Cut that off
- And then just cut that off.

Finishing the Top Edge
To give your shawl a professional finish and prevent the neckline from stretching, we'll add two rows of crochet along the top edge.
-
Row 1: Half Double Crochet and Chain Spaces
-
Step 1: Make a half double crochet
- Into this very first stitch and into the second, we're going to do one half double crochet into each.
-
Step 2: Chain Two
- Chain two.
-
Step 3: Single Crochet
- Into this very first hill, the center of the hill, one single crochet.
-
Step 4: Chain Three
- Chain three.
-
Step 5: Single Crochet into the center stitch of the valley
- Chain three again and single crochet into the center of the hill.
- We're going to be doing this all the way along the edge of our shaw.
-
Step 6: Finish the Row
- I'm going to chain two, and I'm going to make one half double crochet into the last double crochet and also into the top of our chain.
-
Step 1: Make a half double crochet
-
Row 2: Half Double Crochet Row
-
Step 1: Loose Chain One
- Another chain one, a loose chain one.
-
Step 2: Two Half Double Crochets
- And now into this stitch right here, we're going to do two half double crochets.
-
Step 3: One Half Double Crochet into two chains
- We want two strands on the top of your hook.
- You can work into the space if you prefer.
- One half double crochet into two chains, so two half double crochets into that space.
-
Step 4: Repeat
- Three half double crochets into the chain and a half double crochet into each stitch all the way along.
-
Step 5: Finish the Row
- Half double into that last chain.
-
Step 1: Loose Chain One
Preparing for the Border: Stitch Marker Placement
If you're adding the optional border, it's helpful to place stitch markers along the edges of the shawl. This will ensure that your border is evenly spaced and looks professional.
To place the stitch markers:
- Start at the very first stitch right at the edge.
- Skip a row and work into the second.
- Skip this stitch here in the center, or this little connection.
- Skip a connection and work in to the next.
- Continue placing stitch markers every two rows along the edge of the shawl.

Border: Attaching Yarn and Creating the Foundation Row
Now, let's create the foundation row for the border:
-
Step 1: Attach your yarn
- Pop your hook into that very last stitch we made, or the corner stitch if you're working on the other end.
- Pop a loop of yarn onto your hook. Bring it through. Slip stitch with both strands to join and drop your tail.
-
Step 2: Chain two
- Chain two.
-
Step 3: Single crochet
- Single crochet into that stitch right after our row of single crochets, right into that stitch or into that space along the edge.
-
Step 4: Chain Three
- Chain three.
-
Step 5: Repeat
- So we're skipping a connection, or we're skipping a row and making one single crochet into the side of the second chaining three.
-
Step 6: Finish the Row
- So chaining two and one single crochet into that stitch or into that chain.
Border: First Pattern Row
Now for the first pattern row of the border:
-
Step 1: Chain Two and Turn
- Chain two.
-
Step 2: Double Crochet, Chain One
- Into this very first stitch, one double crochet.
-
Step 3: Single Crochet
- Chain one, one single crochet into that next stitch.
-
Step 4: Hill into that next stitch
- Two double crochets, chain two, and two double crochets.
-
Step 5: Chain One
- Chain one.
-
Step 6: Repeat
- Chain one and single crochet into the single crochet chain one and a hill into that next stitch.
-
Step 7: Finish the row
- Chain one single crochet into the stitch and chain one.
- Then, into that beginning stitch or our join, we're going to make two double crochets, but we're not going to finish the last one.

Border: Second Pattern Row
Let's move on to the second pattern row of the border:
-
Step 1: Chain Two and Turn
- Chain two.
-
Step 2: One Double Crochet
- One double crochet.
-
Step 3: Chain Four
- Chain four.
-
Step 4: Hill into the next hill
- Chain four.
-
Step 5: Repeat
- Chain four and a hill into the next hill.
-
Step 6: Finish the Row
- Chain four, and into the top of our chain, two double crochets to finish.
Border: Third Pattern Row
Third pattern row:
-
Step 1: Chain Two and Turn
- Chain two.
-
Step 2: Double Crochet, Chain Two
- One double crochet. Chain two.
-
Step 3: Single Crochet
- Single crochet around this chain.
-
Step 4: Chain Two, Hill into the hill
- Chain two.
-
Step 5: Repeat
- Chain two, single crochet around, and chain two.
-
Step 6: Finish the Row
- Chain two and single crocheting around that last chain and chaining two.
- And now, into the top of our chain, we're going to just finish with two double crochets.

Border: Repeating the Pattern Rows
Keep repeating the first two purple rows again until your border is the length you want it to be. You could make it shorter or longer, just repeating these sets of rows.
Border: Last Row - Picot Edging
For a final touch of elegance, let's add a picot edging to the border.
-
Step 1: Chain Five
- Chain five.
-
Step 2: Pico
- We're just going to pico into that third chain.
- So just counting these loops, there's one, two, three. We're just going to go into number three right there and slip stitch.
- That makes our pico, just like that.
-
Step 3: Double Crochet, Chain One
- Wrap our yarn twice and make one treble crochet and three double crochets all into the same stitch.
-
Step 4: Single Crochet
- And single crochet around the chain.
-
Step 5: Repeat
- We're doing three double crochets, one treble crochet.
-
Step 6: Finish the Row
- And we are going to do three double crochets into the top of that chain.
- Chain three, and we just slip stitch around those two strands or into those two strands.
- Chain three. And we're going to slip stitch right back down into the beginning right where all those stitches came from.
- One slip stitch and a chain one to secure your yarn.

Weaving in Ends
Don't forget the most important step: weaving in all those loose ends! Use a yarn needle to carefully weave in all loose ends for a professional finish.
Left Handed?
Show Off Your Work!
I hope you enjoyed making this shawl as much as I did! Share your finished Easy Crochet Shawl on social media using #SecretYarnery. You can also find more beginner crochet clothing patterns at the Secret Yarnery.
More Free Patterns!
Don't miss out on new free crochet patterns – subscribe, like, and hit the bell on my YouTube channel right now!
Subscribe and Join!
Subscribe to my YouTube channel for more easy crochet patterns and tutorials!
Printable PDF Patterns
Ready to start crafting your next crochet pattern? Get printable PDF patterns at the Secret Yarnery!
Watch Next
I'm waiting for you in that video up there, and stay hooked.
This Wandering Granny Shawl is more than just a crochet project; it's an invitation to relax, create, and let your mind wander. With its simple repeats and beginner-friendly design, it's the perfect project for anyone looking to unwind and create something beautiful. So grab your hook, choose your favorite yarn, and let's get started!
FAQs
1. What makes the Wandering Granny Shawl beginner-friendly?
The pattern uses simple crochet stitches and easy repeats. Step-by-step instructions and video tutorials guide you through the entire process, even if you’re new to crochet.
2. What type of yarn should I use?
Worsted weight (size 4) yarn is recommended. The sample uses Ice Yarns Cakes Splash, but any worsted weight yarn will work.
3. How much yarn do I need?
You’ll need four cakes of worsted weight yarn (about 140g/225m each) for the main shawl, plus a small amount of contrasting color for the border if desired.
4. Do I need a specific size hook?
A 7 mm crochet hook is recommended for the body of the shawl. If you use a traditional starting chain, an 8 mm hook helps keep the foundation loose.
5. Can I adjust the size of the shawl?
Yes. Use any multiple of 10 for your starting chain to customize the width. Make more or fewer rows for your preferred length.
6. How do I join a new cake of yarn?
Use the magic knot method for a strong, nearly invisible join. Match color sections for smoother transitions, especially with variegated yarns.
7. Is it okay to skip the border?
Yes. The border is optional and can be left off for a simpler look.
![]()
Christa Patel is the creator behind The Secret Yarnery, a popular crochet resource known for easy-to-follow patterns and friendly video tutorials. With years of crochet experience, Christa specializes in designing beginner-friendly projects that inspire confidence. Her clear instructions help new and seasoned crocheters make beautiful, functional pieces without frustration.
Through her YouTube channel and website, Christa shares creative ideas, tips, and tricks to make crochet accessible and fun for everyone. She believes that crafting should be joyful and stress-free, encouraging makers to relax, enjoy the process, and take pride in their finished work.
You can find more of Christa’s patterns, tutorials, and vibrant crochet community at The Secret Yarnery and on her YouTube channel.
About the Author
With a passion for crafting easy, beginner-friendly tutorials and patterns, Christa inspires crafters of all skill levels to unleash their creativity worldwide. She encourages yarn lovers to connect, create, and crochet a world filled with beautiful handmade treasures!
Easy Crochet Shawl for Beginners: Wandering Granny Shawl!