Granny Square Heart Coaster Crochet Pattern 2025 | Easy DIY Coasters!
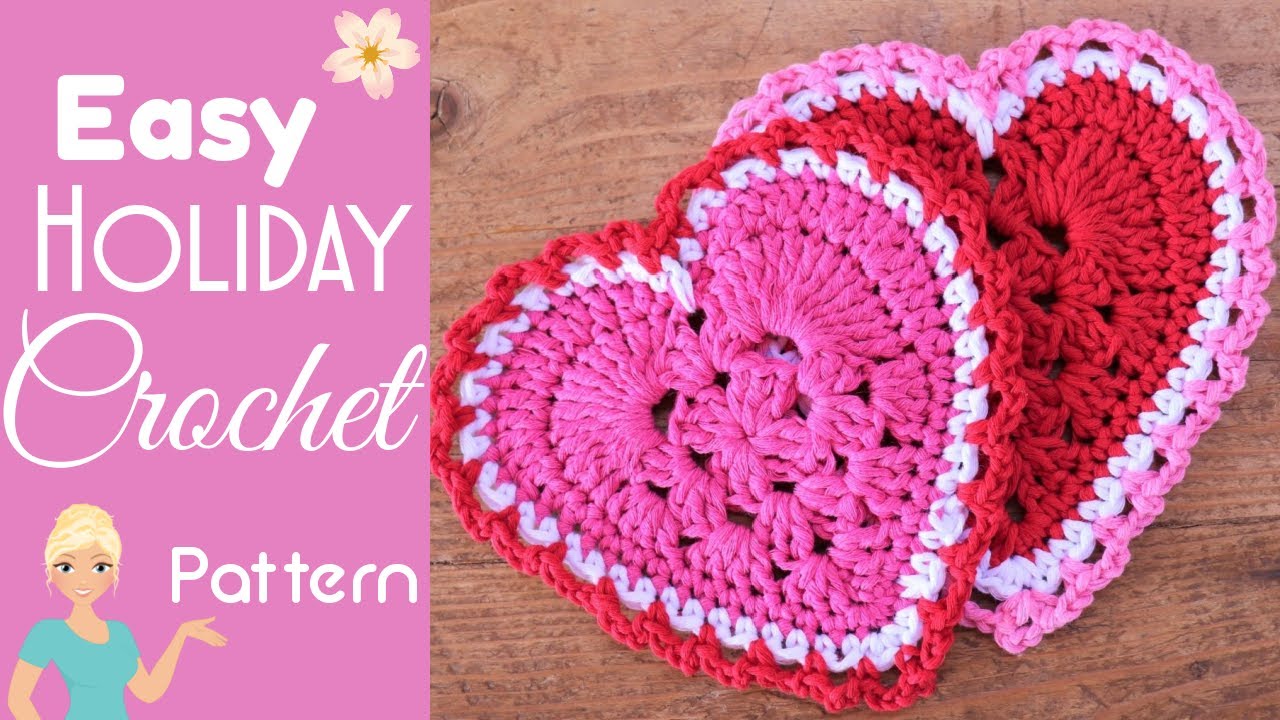
If you love crochet, you know how satisfying it is to make something beautiful and useful at the same time. Today, I’m excited to show you my super sweetheart coasters—adorably oversized heart-shaped coasters that start with a familiar favorite: the granny square. These coasters are roomy enough for your favorite mug, with extra space for a spoon, cookie, or even a chocolate.
They work up quickly, and you can customize them in so many ways. They're perfect for gift giving, brightening up your own table, or sharing with friends and family. Let’s jump right in!
Materials and Tools Needed
For these granny square heart coasters, I reached for my cotton yarn scraps—specifically, 100% natural cotton. Each ball started out at 100 grams (about 180 meters), and I found that a little goes a long way with this project. Using leftover yarn makes this a perfect stash buster.
Here’s exactly what I used for one coaster:
- Cotton yarn in three colors (for the heart center, edging, and ruffle)
- 5 mm crochet hook (this is my go-to size for coasters because it gives just the right feel)
- Sharp scissors for cutting ends
- Tapestry or darning needle to weave in ends
For smoother crocheting, I like to use stitch markers, especially when working corners. They help keep the pattern (and my sanity) organized, especially if I’m interrupted or multitasking.
If you’re gathering supplies, you can find my favorite crochet hooks, sharp scissors, needles, and even recommended yarn linked in the video description. Purchases through those links help support Secret Yarnery at no extra cost to you—thank you for your support!

Understanding the Project: Super Sweetheart Coasters
This granny square heart coaster pattern is all about versatility and fun. The finished coaster is large enough to hold your cup of coffee or tea, and there’s even a spot for your spoon or snack on the side. The heart shape adds a playful touch, making these perfect for Valentine’s Day, birthdays, or just to brighten any table.
The pattern starts with a classic granny square, so it’s great for beginners or anyone who loves a quick, satisfying project. You don’t need to be a crochet expert to follow along—if you can work up a granny square, you can make this heart.
Want a smaller coaster? Stop before the last round. Prefer delicate or bold borders? You can swap out the finishing round for a simple single crochet edge, a whimsical loop border, or leave it border-free. I’ll walk through each option as we go.
If you’re curious about other heart-shaped coaster designs, you might enjoy reading my step-by-step heart coaster guide, which breaks down the process and offers fresh ideas for gifts and decor.
Step-by-Step Crochet Instructions
Starting the Granny Square Base
I always begin with a slipknot. Wrap the yarn around two fingers and pull through, pop it onto your hook, and you’re ready to begin.
- Chain 3. Insert the hook into the yarn, pull through for one chain, and repeat until you have three. This is the start of your center ring.
- Form the ring. Push your hook into the very first chain, right on top of the knot. Grab your working yarn and pull through both loops—now you have a ring to work into. Hold the tail flat against your work for stability.
-
Chain 3 (counts as first double crochet). Begin working double crochets into the ring:
- Two more double crochets into the center. That gives you three (including the starting chain).
- Chain 2 for the first corner.
- Repeat: three double crochets into the ring, chain 2 for the next corner. Do this four times to create all four sides.
- After your final three double crochets, chain 2 and prepare to close the round.

Joining Invisibly
Say goodbye to bulky joins! I like to do a chain 1, then single crochet into the top of the starting chain to create an almost invisible join. It keeps the edge neat and ready for the next round.
Pause and use a stitch marker to mark your first corner if you tend to forget where you started (crocheting with distractions is real life!). This little trick saves time in the long run.
If the center ring feels tight, just pull gently on the stitches to open up space as you go.
Want a deep dive on color changes and perfect granny square rounds? My easy crochet granny square tutorial focuses on getting crisp, seamless finishes every time.
Transitioning the Granny Square into a Heart Shape
With the granny square done, it’s time to transform it into a heart.
- Chain 3 at the start of the round. This acts as a double crochet. Work two double crochets into the corner space.
- Double crochets along the sides: Each side space gets three double crochets. Work up to the corner but don’t make a full traditional corner.
- Shaping the heart: In the side space that will become the “bump” of the heart, work four double crochets.
-
Creating the rounded bumps (the “big bumpy bit”):
- Wrap yarn twice for a treble crochet (US terms).
- Into the same side/corner space, work 12 treble crochets. They form the larger lobe of the heart.
- After the 12th treble, slip stitch into the next corner to anchor the shape.
-
Mirror the process for the other half of the heart:
- 12 treble crochets in the next space, slip stitch to the next side.
- Finish the round as you started, working three and four double crochets where needed to bring the round together.
You can stop here for a smaller coaster—secure the round with chain 2 and a slip stitch into the starting chain. Or, if you want a bold, large heart, keep going for more graduated rounds and extra flare.
Looking for project inspiration beyond this design? The Granny Squares Collection offers creative variations for future makes.

Working the Next Color Rows and Shaping the Heart
To start the next row and keep the coaster solid, join with a single crochet and chain 1 for a snug transition. Switch to your chosen edge color here if you’d like a contrast border.
- Single crochet all along the heart’s edge. Be mindful where you work into tricky chain spaces or previous joins—a tapestry needle or stitch marker can help pick the right spot.
- To shape the curves, work half double crochets and strategic increases (two stitches in one space). This smooths out the bumps so your heart looks rounded and plush.
- Alternate single and double crochets along the dips and tips to keep the coaster flat and shapely.
- Use stitch markers or just slightly stretch your work as you go—this helps spot the beginning and end of each section.
After single crocheting around, use a slip stitch to join, chain 1, then cut your yarn and pull through to fasten off neatly.
Want more on easy beginner patterns and shaping techniques? Check out the Warm and Beautiful Crochet Rose Blanket for tips that carry over to many cozy projects.
Adding the Final Border and Decorative Ruffle
Ready for a fun finishing touch? The white round really makes the heart pop.
- To attach a border color, insert your hook into any stitch, pull up a loop, and slip stitch to secure. Chain 1 and single crochet around. At the heart’s tip, be sure to put three single crochets into the center stitch for a crisp point.
- Join with a slip stitch and finish off the round by pulling your yarn through and snugging it down.
Optional Decorative Ruffle
Next, add a ruffled border in a fresh color (think pink for a classic valentine vibe).
- Flip your work over and work from the back for a flat finish.
- Chain 3, skip a stitch, and single crochet into the next. Repeat around the heart, always skipping a stitch before the next chain 3.
- When you reach the bottom, slip stitch into the very center, chain 1, and pull your tail through to fasten.
Tidy up by weaving in all your loose ends. I poke mine to the back for a tidy front and a finished look I love.
If you want more beautiful heart motifs or ideas for celebratory decorations, visit my Creative Uses for Crochet Hearts post for ways to make every stitch count.
Tips, Tricks, and Troubleshooting
- Use stitch markers to remember key corners. Whether you’re a beginner or just like to crochet while multitasking, markers save time and frustration.
- Pause the video frequently to catch up or check your work. It makes learning less stressful.
- When your ring feels cramped, gently stretch it to fit more stitches.
- Finding tricky spots: Some stitches, like chain spaces, can hide on you! Use a needle or your hook tip to open them up before you place your stitches.
- Flipping your work for the last round ensures your coaster lays flat and symmetrical.
- Always mirror any stitch increases or ruffles on both sides of your heart for the most balanced shape.
- The pattern offers natural stopping points for different size coasters. Stop when it looks just right to you.
If you’re eager for even more granny square options, browse my list of Top 20 Crochet Granny Square Projects.

Ideas for Using and Customizing Your Sweetheart Coasters
These heart-shaped coasters are perfect for so many occasions! Add them to your Valentine’s Day table, tuck them into gifts for coffee-loving friends, or let the kids give them out at school. They’re equally at home on your desk at work or on a tray with your favorite cookies.
Don’t be afraid to play with colors. Mix up your yarn scraps for each coaster, or pick traditional reds and whites for a romantic touch; pastel colors look fresh for spring. You can even match your coaster to the decor of any room.
For a minimalist look, skip the border. For more drama, double up ruffles or alternate your border colors. Stopping after each round gives you new coaster sizes: small for espresso cups, large for soup mugs, or somewhere in between!
Need more inspiration? The Heart Coasters Collection is full of ideas to help spark even more creativity.
Helpful Links and Resources
- Discover the written pattern for these Granny Square Heart Coasters for a handy printable version.
- Prefer to watch? The original right-handed video tutorial is right here.
- For latest patterns, sales, and design news, check out the Secret Yarnery on Instagram (@secretyarnery) or join the Facebook crochet community for sharing photos, questions, and support.
- Love making crochet clothes too? Visit the Secret Yarnery Clothing Collection for beginner-friendly patterns for sweaters and shawls.
If you enjoy video tutorials, be sure to subscribe and join live chats on Fridays. It’s a wonderful way to stay inspired, swap tips, and connect with other yarn lovers!

Conclusion
Making a Granny Square Heart Coaster is as easy as it is fun. Starting with a classic shape and adding creative touches, you can fill your home with colorful, heartfelt pieces or turn out gorgeous gifts in no time. I hope you enjoy making these coasters as much as I do.
Try out this easy crochet pattern, share your results, and let your creativity shine. Whether it’s for a special celebration or everyday charm, these coasters will warm hearts and hands alike.
Stay hooked!
FAQs
1. What skill level do I need to make the Granny Square Heart Coaster?
This project is beginner-friendly. If you can crochet a basic granny square and know simple stitches like chain, double crochet, treble crochet, and single crochet, you’re ready to go.
2. Can I use a different type of yarn?
Yes, you can use any yarn you like. Cotton is best for coasters because it’s absorbent and sturdy, but acrylic or blends will work. Just adjust your hook size if you change yarn weight.
3. How do I make the coaster larger or smaller?
To make your coaster larger, add extra rounds before shaping it into a heart. For a smaller coaster, stop after fewer rounds. You can also adjust your hook and yarn size for different results.
4. How do I keep my heart shape even and flat?
Use stitch markers on key points and count your stitches. Make sure to mirror any increases or ruffle stitches on both sides. If the coaster curls or ripples, gently block it by pinning it flat and spraying lightly with water.
5. How do I weave in my ends so they stay hidden?
Use a tapestry needle to weave your yarn tails back and forth through the stitches on the back side of your coaster. Trim any extra yarn close to the work, but don’t cut the stitches themselves.
6. What are some good color ideas?
Try classic reds and pinks for Valentine’s Day, pastels for spring, bold contrasts for statement pieces, or use up your yarn scraps for unique results.
![]()
Christa Patel is the creative mind behind Secret Yarnery. With years of crochet experience, she loves making fun and easy patterns that anyone can follow. Christa shares her passion for yarn, color, and DIY through practical tutorials, video demos, and a friendly online community. Her clear instructions and love for teaching help crafters of all levels build confidence and creativity. When she’s not designing new patterns, Christa enjoys sharing tips, live chats, and fresh inspiration for crochet lovers around the world.
About the Author
With a passion for crafting easy, beginner-friendly tutorials and patterns, Christa inspires crafters of all skill levels to unleash their creativity worldwide. She encourages yarn lovers to connect, create, and crochet a world filled with beautiful handmade treasures!
Granny Square Heart Coaster Crochet Pattern 2025 | Easy DIY Coasters!